Olympus LS-10 LS-10 Instructions (English) - Page 13
Changing the Time and Date
 |
UPC - 050332162358
View all Olympus LS-10 manuals
Add to My Manuals
Save this manual to your list of manuals |
Page 13 highlights
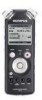
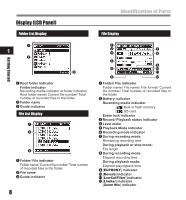
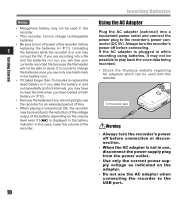
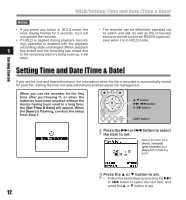
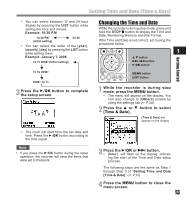
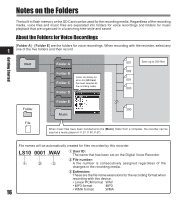
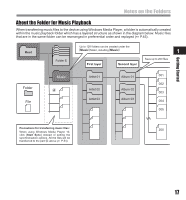
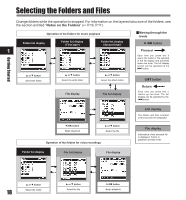
Setting Time and Date [Time & Date] • You can select between 12 and 24 hour display by pressing the LIST button while setting the hour and minute. Example: 10:38 P.M 10:38 PM (Initial setting) 22:38 • You can select the order of the [year], [month], [day] by pressing the LIST button while setting them. Example: January 7, 2008 1M 7D 2008Y (Initial setting) 7D 1M 2008Y 2008Y 1M 7D 3 Press the `/OK button to complete the setup screen. Changing the Time and Date While the recorder is during stop mode, press and hold the STOP 4 button to display the Time and Date, Remaining Memory and File Format. If the Time and Date is not correct, set it using the procedure below. 1 2 3 button 9 0 button `/OK button MENU button LIST button 1 While the recorder is during stop mode, press the MENU button. • The menu will appear on the display. You can also change to [Others] screen by using the settings tab (☞ P.34). 2 Press the 2 or 3 button to select [Time & Date]. [Time & Date] will appear on the display Getting Started • The clock will start from the set date and time. Press the `/OK button according to the time signal. Note • If you press the `/OK button during the setup operation, the recorder will save the items that were set to that point. 3 Press the `/OK or 9 button. • [hour] will flash on the display, indicating the start of the Time and Date setup process. The following steps are the same as Step 1 through Step 3 of "Setting Time and Date [Time & Date]" (☞ P.12). 4 Press the MENU button to close the menu screen. 13
-
 1
1 -
2
-
3
-
4
-
5
-
6
-
7
-
 8
8 -
 9
9 -
 10
10 -
 11
11 -
 12
12 -
 13
13 -
 14
14 -
 15
15 -
 16
16 -
 17
17 -
 18
18 -
19
-
20
-
21
-
22
-
23
-
24
-
25
-
26
-
27
-
28
-
29
-
30
-
31
-
32
-
33
-
34
-
35
-
36
-
37
-
38
-
39
-
40
-
41
-
42
-
43
-
44
-
45
-
46
-
47
-
48
-
49
-
50
-
51
-
52
-
53
-
54
-
55
-
56
-
57
-
58
-
59
-
60
-
61
-
62
-
63
-
64
-
65
-
66
-
67
-
68
-
69
-
70
-
71
 |
 |
