Olympus WS-600S WS-710M Instructions (English) - Page 35
Setting an index mark or a temp
 |
UPC - 050332175716
View all Olympus WS-600S manuals
Add to My Manuals
Save this manual to your list of manuals |
Page 35 highlights
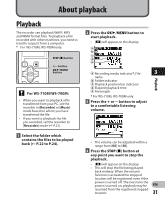
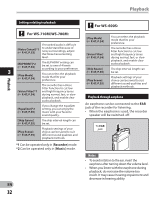
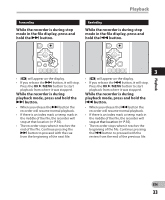
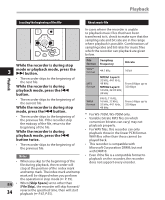
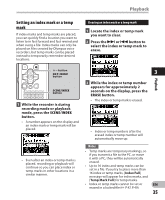
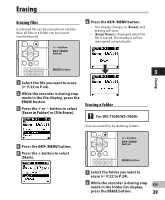
Playback Setting an index mark or a temp mark If index marks and temp marks are placed, you can quickly find a location you want to listen to in fast forward and fast rewind and when cuing a file. Index marks can only be placed on files created by Olympus voice recorders, but temp marks can be placed instead to temporarily remember desired locations. Clearing an index mark or a temp mark 1 Locate the index or temp mark you want to clear. 2 Press the 9 or 0 button to select the index or temp mark to erase. +− button OK `/MENU button SCENE/INDEX button 1 While the recorder is during recording mode or playback mode, press the SCENE/INDEX button. • A number appears on the display and an index mark or temp mark will be placed. • Even after an index or temp mark is placed, recording or playback will continue so you can place index or temp marks in other locations in a similar manner. Playback 3 3 While the index or temp number appears for approximately 2 seconds on the display, press the ERASE button. • The index or temp mark is erased. • Index or temp numbers after the erased index or temp number will automatically move up. Notes • Temp marks are temporary markings, so if you transmit a file to the PC, or move it with a PC, they will be automatically erased. • Up to 16 index and temp marks can be set in a file. If you try to place more than 16 index or temp marks, [Index Full] message will appear for index marks, and [Temp Mark Full] for temp marks. • Index or temp marks cannot be set or EN erased in a locked file (☞ P.47, P.49). 35
-
 1
1 -
2
-
3
-
4
-
5
-
6
-
7
-
8
-
9
-
10
-
11
-
12
-
13
-
14
-
15
-
16
-
17
-
18
-
19
-
20
-
21
-
22
-
23
-
24
-
25
-
26
-
27
-
28
-
29
-
 30
30 -
 31
31 -
 32
32 -
 33
33 -
 34
34 -
 35
35 -
 36
36 -
 37
37 -
 38
38 -
 39
39 -
 40
40 -
41
-
42
-
43
-
44
-
45
-
46
-
47
-
48
-
49
-
50
-
51
-
52
-
53
-
54
-
55
-
56
-
57
-
58
-
59
-
60
-
61
-
62
-
63
-
64
-
65
-
66
-
67
-
68
-
69
-
70
-
71
-
72
-
73
-
74
-
75
-
76
-
77
-
78
-
79
-
80
-
81
-
82
-
83
-
84
-
85
-
86
-
87
-
88
-
89
-
90
-
91
-
92
 |
 |
