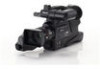
Panasonic AG-AC7 Operating Instructions - Page 88
Connecting to a PC
 |
View all Panasonic AG-AC7 manuals
Add to My Manuals
Save this manual to your list of manuals |
Page 88 highlights
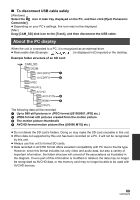
Connecting to a PC A USB cable (supplied) 1 Connect this unit to the AC adaptor. ≥ It is possible to use it connected to the PC with the batteries only, but you will not be able to write data into the unit. 2 Turn on the unit. ≥ This function is available in all modes. 3 Connect this unit to a PC. ≥ The USB function selection screen will appear. 4 Touch [PC] on the screen of this unit. ≥ This unit is automatically recognized as an external drive of the PC. (l 89) ≥ When you select an option other than [PC], reconnect the USB cable. ≥ When using the battery, the LCD monitor turns off after about 5 seconds. Touch the screen to turn the LCD monitor on. 5 Perform non-linear editing on the PC. ≥ When copying files from the unit to a PC, be careful to ensure that files are not accidentally overwritten. ≥ For more details, refer to your PC editing software's operating instructions. ≥ Do not use any other USB cables except the supplied one. (Operation is not guaranteed with any other USB cables.) ≥ When the unit is connected to a PC it cannot be turned off. Disconnect the USB cable, before turning this unit off. ≥ Do not disconnect the USB cable, the battery or the AC adaptor while the access lamp is on or card access icon ( ) appears on the unit screen. ≥ When performing reading/writing between a PC and an SD card, be aware that some SD card slots built into PCs and some SD card readers are not compatible with the SDHC memory card or SDXC memory card. ≥ When using an SDXC Memory Card, check the following support site. http://panasonic.net/avc/sdcard/information/SDXC.html 88 VQT3Q78
-
 1
1 -
2
-
3
-
4
-
5
-
6
-
7
-
8
-
9
-
10
-
11
-
12
-
13
-
14
-
15
-
16
-
17
-
18
-
19
-
20
-
21
-
22
-
23
-
24
-
25
-
26
-
27
-
28
-
29
-
30
-
31
-
32
-
33
-
34
-
35
-
36
-
37
-
38
-
39
-
40
-
41
-
42
-
43
-
44
-
45
-
46
-
47
-
48
-
49
-
50
-
51
-
52
-
53
-
54
-
55
-
56
-
57
-
58
-
59
-
60
-
61
-
62
-
63
-
64
-
65
-
66
-
67
-
68
-
69
-
70
-
71
-
72
-
73
-
74
-
75
-
76
-
77
-
78
-
79
-
80
-
81
-
82
-
 83
83 -
 84
84 -
 85
85 -
 86
86 -
 87
87 -
 88
88 -
 89
89 -
 90
90 -
 91
91 -
 92
92 -
 93
93 -
94
-
95
-
96
-
97
-
98
-
99
-
100
-
101
-
102
-
103
-
104
-
105
-
106
-
107
-
108
-
109
-
110
-
111
-
112
-
113
-
114
-
115
-
116
 |
 |
