Panasonic BB-HCE481A Pro-line Network Cam - Page 77
Setting the Date and Time
 |
UPC - 037988845095
View all Panasonic BB-HCE481A manuals
Add to My Manuals
Save this manual to your list of manuals |
Page 77 highlights
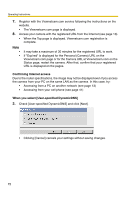
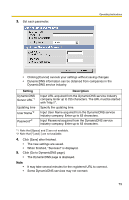
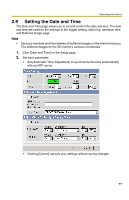
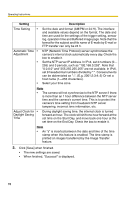
Operating Instructions 2.9 Setting the Date and Time The Date and Time page allows you to set and confirm the date and time. The date and time are used for the settings of the trigger setting, alarm log, operation time and Buffered Image page. Note • Saving a new date and time deletes all buffered images on the internal memory. The buffered images on the SD memory card are not deleted. 1. Click [Date and Time] on the Setup page. 2. Set each parameter. • Set [Automatic Time Adjustment] to synchronize the time automatically with an NTP server. • Clicking [Cancel] cancels your settings without saving changes. 77
-
 1
1 -
2
-
3
-
4
-
5
-
6
-
7
-
8
-
9
-
10
-
11
-
12
-
13
-
14
-
15
-
16
-
17
-
18
-
19
-
20
-
21
-
22
-
23
-
24
-
25
-
26
-
27
-
28
-
29
-
30
-
31
-
32
-
33
-
34
-
35
-
36
-
37
-
38
-
39
-
40
-
41
-
42
-
43
-
44
-
45
-
46
-
47
-
48
-
49
-
50
-
51
-
52
-
53
-
54
-
55
-
56
-
57
-
58
-
59
-
60
-
61
-
62
-
63
-
64
-
65
-
66
-
67
-
68
-
69
-
70
-
71
-
 72
72 -
 73
73 -
 74
74 -
 75
75 -
 76
76 -
 77
77 -
 78
78 -
 79
79 -
 80
80 -
 81
81 -
 82
82 -
83
-
84
-
85
-
86
-
87
-
88
-
89
-
90
-
91
-
92
-
93
-
94
-
95
-
96
-
97
-
98
-
99
-
100
-
101
-
102
-
103
-
104
-
105
-
106
-
107
-
108
-
109
-
110
-
111
-
112
-
113
-
114
-
115
-
116
-
117
-
118
-
119
-
120
-
121
-
122
-
123
-
124
-
125
-
126
-
127
-
128
-
129
-
130
-
131
-
132
-
133
-
134
-
135
-
136
-
137
-
138
-
139
-
140
-
141
-
142
-
143
-
144
-
145
-
146
-
147
-
148
-
149
-
150
-
151
-
152
-
153
-
154
-
155
-
156
-
157
-
158
-
159
-
160
-
161
-
162
-
163
-
164
-
165
-
166
-
167
-
168
-
169
-
170
-
171
-
172
-
173
-
174
-
175
-
176
-
177
-
178
-
179
-
180
-
181
-
182
-
183
-
184
-
185
-
186
-
187
-
188
-
189
-
190
-
191
-
192
-
193
-
194
-
195
-
196
-
197
-
198
 |
 |

Operating Instructions
77
2.9
Setting the Date and Time
The Date and Time page allows you to set and confirm the date and time. The date
and time are used for the settings of the trigger setting, alarm log, operation time
and Buffered Image page.
Note
•
Saving a new date and time deletes all buffered images on the internal memory.
The buffered images on the SD memory card are not deleted.
1.
Click [Date and Time] on the Setup page.
2.
Set each parameter.
•
Set [Automatic Time Adjustment] to synchronize the time automatically
with an NTP server.
•
Clicking [Cancel] cancels your settings without saving changes.