Panasonic BB-HCE481A Pro-line Network Cam - Page 9
Rear View, Bottom View - camera
 |
UPC - 037988845095
View all Panasonic BB-HCE481A manuals
Add to My Manuals
Save this manual to your list of manuals |
Page 9 highlights
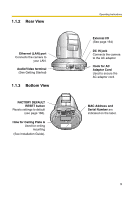
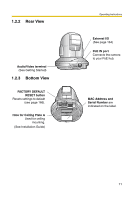
1.1.2 Rear View Ethernet (LAN) port Connects the camera to your LAN. Audio/Video terminal (See Getting Started) 1.1.3 Bottom View FACTORY DEFAULT RESET button Resets settings to default (see page 166). Hole for Ceiling Plate A Used for ceiling mounting (See Installation Guide). Operating Instructions External I/O (See page 164) DC IN jack Connects the camera to the AC adaptor. Hook for AC Adaptor Cord Used to secure the AC adaptor cord. MAC Address and Serial Number are indicated on the label. 9
-
 1
1 -
2
-
3
-
 4
4 -
 5
5 -
 6
6 -
 7
7 -
 8
8 -
 9
9 -
 10
10 -
 11
11 -
 12
12 -
 13
13 -
 14
14 -
15
-
16
-
17
-
18
-
19
-
20
-
21
-
22
-
23
-
24
-
25
-
26
-
27
-
28
-
29
-
30
-
31
-
32
-
33
-
34
-
35
-
36
-
37
-
38
-
39
-
40
-
41
-
42
-
43
-
44
-
45
-
46
-
47
-
48
-
49
-
50
-
51
-
52
-
53
-
54
-
55
-
56
-
57
-
58
-
59
-
60
-
61
-
62
-
63
-
64
-
65
-
66
-
67
-
68
-
69
-
70
-
71
-
72
-
73
-
74
-
75
-
76
-
77
-
78
-
79
-
80
-
81
-
82
-
83
-
84
-
85
-
86
-
87
-
88
-
89
-
90
-
91
-
92
-
93
-
94
-
95
-
96
-
97
-
98
-
99
-
100
-
101
-
102
-
103
-
104
-
105
-
106
-
107
-
108
-
109
-
110
-
111
-
112
-
113
-
114
-
115
-
116
-
117
-
118
-
119
-
120
-
121
-
122
-
123
-
124
-
125
-
126
-
127
-
128
-
129
-
130
-
131
-
132
-
133
-
134
-
135
-
136
-
137
-
138
-
139
-
140
-
141
-
142
-
143
-
144
-
145
-
146
-
147
-
148
-
149
-
150
-
151
-
152
-
153
-
154
-
155
-
156
-
157
-
158
-
159
-
160
-
161
-
162
-
163
-
164
-
165
-
166
-
167
-
168
-
169
-
170
-
171
-
172
-
173
-
174
-
175
-
176
-
177
-
178
-
179
-
180
-
181
-
182
-
183
-
184
-
185
-
186
-
187
-
188
-
189
-
190
-
191
-
192
-
193
-
194
-
195
-
196
-
197
-
198
 |
 |

Operating Instructions
9
1.1.2
Rear View
1.1.3
Bottom View
Ethernet (LAN) port
Connects the camera to
your LAN.
Audio/Video terminal
(See Getting Started)
External I/O
(See page 164)
DC IN jack
Connects the camera
to the AC adaptor.
Hook for AC
Adaptor Cord
Used to secure the
AC adaptor cord.
FACTORY DEFAULT
RESET button
Resets settings to default
(see page 166).
Hole for Ceiling Plate A
Used for ceiling
mounting
(See Installation Guide).
MAC Address and
Serial Number
are
indicated on the label.