Panasonic DMREH60 DMREH60 User Guide - Page 44
Press [DUBBING
 |
View all Panasonic DMREH60 manuals
Add to My Manuals
Save this manual to your list of manuals |
Page 44 highlights
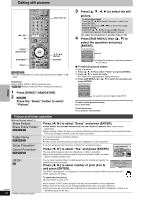
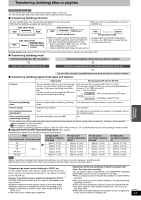
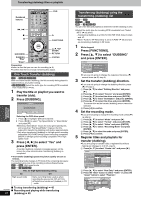
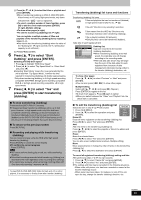
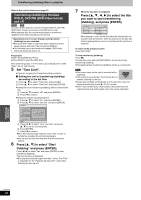
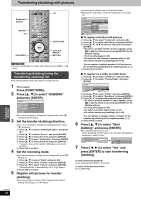
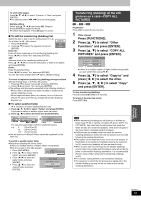
Transferring (dubbing) titles or playlists Numbered buttons :, 9 ∫ ; HDD DVD SD AUDIO 123 F Rec 456 SETUP 789 CANCEL VCR Plus+ CM SKIP 0 SKIP SLOW/SEARCH STOP PAUSE PLAY/x1.3 NU T OR TV GUIDE FU DVD 1 FUNCTIONS NAVITDIGORAETPCME NCTIONS SCHEDULE SUB MENU DUBBING "Blue" "Green" TIME SLIP ENTER SUB MENU S CH CREATE DUBBING CHAPTER Info RETURN STATUS PAGE REC REC MODE ERASE DISPLAY PAGE 3,4,2,1 ENTER RETURN STATUS Preparation ≥Insert a disc that you can use for recording (➡ 8). ≥Confirm that there is enough remaining disc space. DVD/TV One Touch Transfer (dubbing) [HDD] > [RAM] [-R] [-RW‹V›] [+R] With one touch transfer (dubbing), the title currently being played is dubbed without any further setting. ≥[-R] [-RW‹V›] [+R] Select the audio type for recording MTS broadcast from "Select MTS" (➡ 56). 1 Play the title or playlist you want to transfer (dub). 2 Press [DUBBING]. DUBBING Transferring (Dubbing) Dub in High Speed mode. Do you want to continue? Yes No Selecting the DVD drive speed§ 1 Press [3] to highlight "DVD Drive Speed". 2 Press [2, 1] to select "Top Speed Mode" or "Silent Mode" and press [4]. ≥Selecting "Silent Mode" means the noise generated by this unit is less than "Top Speed Mode"; however, the time required for transferring (dubbing) will double (approximately). §Only when transferring (dubbing) to 5thigh speed recording compatible DVD-RAM, 8thigh speed recording compatible DVD-R or 8thigh speed recording compatible +R in High speed mode 3 Press [2, 1] to select "Yes" and press [ENTER]. A transfer (dubbing) complete message appears on the screen for a few seconds when transferring (dubbing) is completed. ≥The transfer (dubbing) speed and picture quality are set as follows. The recording mode changes to FR mode if the remaining disc space is exceeded using one of the recording modes indicated below. [HDD] > [RAM]: High speed mode [HDD] > [-R] [-RW‹V›] [+R]: Rec. for High-Speed Dubbing setting On Off High speed mode Same recording mode used as when recording the source title (XP-EP, FR). ≥Playlists are transferred (dubbed) in FR mode. ∫ To stop transferring (dubbing) ➡ 45 RQT8307 ∫ Recording and playing while transferring 44 (dubbing) ➡ 45 Transferring (dubbing) using the transferring (dubbing) list [HDD] ,-. [RAM] [-RW‹VR›] > [HDD] [HDD] > [-R] [-RW‹V›] [+R] You can order titles and playlists as desired for transfer (dubbing) to disc. ≥Select the audio type for recording MTS broadcasts from "Select MTS" (➡ 56) when: -Transferring (dubbing) to a DVD-R, DVD-RW (DVD-Video format) and +R. -When "Audio for XP Recording" is set to "LPCM" (➡ 56) and you are transferring (dubbing) in XP mode. 1 While stopped Press [FUNCTIONS]. 2 Press [3, 4] to select "DUBBING" and press [ENTER]. DUBBING Cancel All 1 Dubbing Direction HDD > DVD 2 Mode Video High Speed Source HDD Destination DVD 3 Create List 0 ≥If you are not going to change the registered list press [4] several times (➡ 45, step 6). 3 Set the transfer (dubbing) direction. ≥If you are not going to change the dubbing direction, press [4] (➡ step 4). 1 Press [3, 4] to select "Dubbing Direction" and press [1]. 2 Press [3, 4] to select "Source" and press [ENTER]. 3 Press [3, 4] to select the drive and press [ENTER]. 4 Press [3, 4] to select "Destination" and press [ENTER]. 5 Press [3, 4] to select the drive and press [ENTER]. The same drive as the transfer (dubbing) source cannot be selected. 6 Press [2] to confirm. 4 Set the recording mode. ≥If you are not going to change the recording mode, press [4] (➡ step 5). 1 Press [3, 4] to select "Mode" and press [1]. 2 Press [3, 4] to select "Format" and press [ENTER]. 3 Press [3, 4] to select "Video" and press [ENTER]. 4 Press [3, 4] to select "Recording Mode" and press [ENTER]. 5 Press [3, 4] to select the mode and press [ENTER]. 6 Press [2] to confirm. 5 Register titles and playlists for transfer (dubbing). ≥If you are going to transfer (dub) a registered list without making any changes to it (➡ 45, step 6). 1 Press [3, 4] to select "Create List" and press [1]. DUBBING Cancel All 1 Dubbing Direction HDD > DVD 2 Mode Video High Speed 3 Create List Current Capacity: 4343MB Dubbing list: 0MB( 0%) No. Size Title Name New Entry (Total=0) Start Dubbing ENTER S SUB MENU Page 01/01 Create a dubbing list. 2 Press [3, 4] to select "New Entry" and press [ENTER]. 3 Press the "Blue" button to select "Video" or press the "Green" button to select "Playlists". Create List HDD 007 Video Playlists 008 0:30(SP) - - - 10 10/10 Fri 8 11/10 Sat - - - - - - - - -
-
 1
1 -
2
-
3
-
4
-
5
-
6
-
7
-
8
-
9
-
10
-
11
-
12
-
13
-
14
-
15
-
16
-
17
-
18
-
19
-
20
-
21
-
22
-
23
-
24
-
25
-
26
-
27
-
28
-
29
-
30
-
31
-
32
-
33
-
34
-
35
-
36
-
37
-
38
-
 39
39 -
 40
40 -
 41
41 -
 42
42 -
 43
43 -
 44
44 -
 45
45 -
 46
46 -
 47
47 -
 48
48 -
 49
49 -
50
-
51
-
52
-
53
-
54
-
55
-
56
-
57
-
58
-
59
-
60
-
61
-
62
-
63
-
64
-
65
-
66
-
67
-
68
-
69
-
70
-
71
-
72
 |
 |
