Panasonic DMREH60 DMREH60 User Guide - Page 49
Press [FUNCTIONS]., to select Copy
 |
View all Panasonic DMREH60 manuals
Add to My Manuals
Save this manual to your list of manuals |
Page 49 highlights
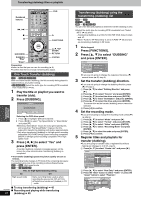
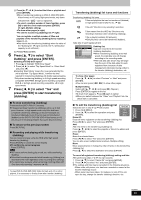
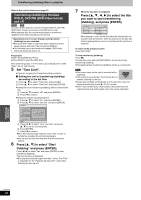
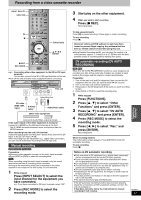
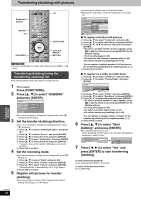
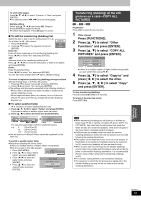
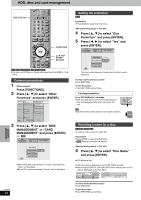
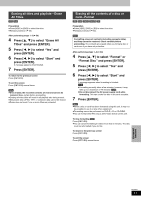
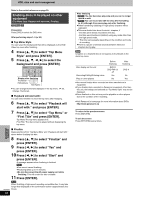
To show other pages Press [3, 4, 2, 1] to select "Previous" or "Next" and press [ENTER]. ≥You can also press [:, 9] to show other pages. Multiple editing Select with [3, 4, 2, 1] and press [;]. (Repeat.) Press [ENTER] to register to the list. ≥A check mark appears. Press [;] again to cancel. ∫ To edit the transferring (dubbing) list Select the item in step 5-3 (for a still picture) or 5-5 (for a folder) (➡ 48, right column) Erase All 1 Press [SUB MENU]. 2 Press [3, 4] to select the operation and press [ENTER]. Add Erase Erase All: Erase all items registered on the transferring (dubbing) list. Press [2, 1] to select "Yes" and press [ENTER]. Add: Add new items to the transferring (dubbing) list. Press [3, 4, 2, 1] to select the still picture or folder to be added and press [ENTER]. Erase: Erase the selected items. Press [2, 1] to select "Yes" and press [ENTER]. You can also erase multiple items (➡ above, Multiple editing). To cancel all registered transferring (dubbing) settings and lists After performing steps 1-2 (➡ 48, left column) 1 Press [3, 4] to select "Cancel All" and press [ENTER]. 2 Press [2, 1] to select "Yes" and press [ENTER]. ≥The settings and lists may be cancelled in the following situations. -When a title or still picture has been recorded or erased at the transfer (dubbing) source -When steps have been taken, for instance, to turn off the unit, remove the card, open the tray, change the transfer (dubbing) direction, etc. ∫ To select another folder (➡ 9, Structure of folders displayed by this unit) 1 Press [3, 4, 2, 1] to select "Folder" and press [ENTER]. If you want to switch to another higher folder (➡ below) 2 Press [3, 4] to select the folder and press [ENTER]. Create List SD CARD Folder Select pictures 103__DVD 0001 0002 0003 0004 \DCIM\100__DVD 001 100__DVD 002 101__DVD 003 102__DVD 004 103__DVD --- You can also select folders with the numbered buttons. e.g., 5: [0] ➡ [0] ➡ [5] 15: [0] ➡ [1] ➡ [5] 115: [1] ➡ [1] ➡ [5] ≥The still pictures of different folders cannot be registered on the same list. To switch to another higher folder ≥Only when selecting the source folder If there is a multiple number of higher folders recognizable, While the screen on the right appears 1 Press [SUB MENU]. 2 Press [3, 4] to select "Select Folder" and press [ENTER]. \DCIM\100__DVD 001 100__DVD 002 101__DVD 003 102__DVD 004 103__DVD --- 3 Press [2, 1] to select the higher folder and press [ENTER]. 4 Press [3, 4] to select the desired folder and press Select Folder Select folder to access. \DCIM Press ENTER to confirm. [ENTER]. Transferring (dubbing) all the still pictures on a card-COPY ALL PICTURES [SD] > [HDD] or [RAM] Preparation Press [SD] to select the source drive. 1 While stopped Press [FUNCTIONS]. 2 Press [3, 4] to select "Other Functions" and press [ENTER]. 3 Press [3, 4] to select "COPY ALL PICTURES" and press [ENTER]. Copy All Pictures (JPEG) Copy from \DCIM SD card Copy to HDD \JPEG\DCIM001 Copy all pictures (JPEG) in the card ≥If there is a multiple number of higher folders recognizable, you can switch them using [2, 1]. 4 Press [3, 4] to select "Copy to" and press [2, 1] to select the drive. 5 Press [3, 4, 2, 1] to select "Copy" and press [ENTER]. To stop transferring (dubbing) Press and hold [RETURN] for 3 seconds. To return to the previous screen Press [RETURN]. [Note] ≥When transferring (dubbing) the still pictures on a folder by folder basis (➡ 48) or card by card basis (➡ above, COPY ALL PICTURES), files other than the still picture files inside the folder will also be transferred (dubbed). (This does not apply to the lower folders contained inside the folders.) ≥If still pictures are already contained inside the transfer (dubbing) destination folder, the new still pictures are recorded following the existing still pictures. ≥If the space on the destination drive runs out or the number of files/folders to be transferred (dubbed) exceeds the maximum (➡ 35), transferring (dubbing) will stop partway through. ≥When a name has not been input for the transfer (dubbing) source folder, it is possible that this folder's name will not be the same on the transfer (dubbing) destination. It is recommended that you input a folder name before transferring (dubbing) (➡ 42). ≥Print number setting (DPOF) is not transferred (dubbed). ≥The sequence in which the still pictures are registered on the transfer (dubbing) list may not be the same at the transfer (dubbing) destination. Transferring (Dubbing) RQT8307 49
-
 1
1 -
2
-
3
-
4
-
5
-
6
-
7
-
8
-
9
-
10
-
11
-
12
-
13
-
14
-
15
-
16
-
17
-
18
-
19
-
20
-
21
-
22
-
23
-
24
-
25
-
26
-
27
-
28
-
29
-
30
-
31
-
32
-
33
-
34
-
35
-
36
-
37
-
38
-
39
-
40
-
41
-
42
-
43
-
 44
44 -
 45
45 -
 46
46 -
 47
47 -
 48
48 -
 49
49 -
 50
50 -
 51
51 -
 52
52 -
 53
53 -
 54
54 -
55
-
56
-
57
-
58
-
59
-
60
-
61
-
62
-
63
-
64
-
65
-
66
-
67
-
68
-
69
-
70
-
71
-
72
 |
 |
