Panasonic KX-HNC505 HomeHawk App Users Guide - Page 126
Turning the camera audio on and off, Viewing images horizontally, Zooming in and out
 |
View all Panasonic KX-HNC505 manuals
Add to My Manuals
Save this manual to your list of manuals |
Page 126 highlights
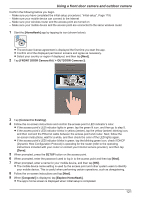
Using a front door camera and outdoor camera E Shows the live camera image without zoom applied G Turns sound on/off ( "Turning the camera audio on and off", Page 126) I Starts/stops recording ( "Recording camera images (manual recording)", Page 127) K Switches between single and dual view ( "Viewing images in dual view", Page 127) F Shows the live camera image with zoom applied H Enables talking with the camera ( "Talking to the camera", Page 128) J Takes snapshots ( "Taking snapshots", Page 127) Note: R Multiple mobile devices can view live images from the same camera at the same time ( "Accessing from multiple mobile devices", Page 26). However, only one mobile device can use certain features at a time (talking to the camera, etc.). R When connected away from home, or is displayed next to the access point's name. See "Accessing while away from home", Page 21 for more information. R When displaying front door cameras or outdoor camera images while away from home, the app will disconnect from the access point after a certain period of time in some conditions. This is to minimize data usage. If you are disconnected automatically, a dialog is displayed asking if you want to connect to the camera again. The time out period cannot be changed. Turning the camera audio on and off Tap the icon to select the desired setting while viewing live images from a camera. : Camera audio will be heard : Camera audio will not be heard Viewing images horizontally By turning your mobile device on its side you can display camera images horizontally. When viewing images horizontally, icons for operating the camera (e.g., recording, talking, etc.) are not displayed. To display these icons, tap anywhere on the camera image. Zooming in and out Pinch in and out on the camera image while viewing live images from a camera. While zoomed in, you can swipe your finger on the camera image to display a different area of the image. Using night vision If there is not adequate light to illuminate the subject, such as at night, the camera switches to night vision mode depending on the settings (see "Using night vision", Page 137). Recording camera images To record camera images manually, see "Recording camera images (manual recording)", Page 127. To record images automatically when a sensor is triggered, see "Mode settings (overview)", Page 132. Taking snapshots To save snapshots (i.e., still images) while viewing live camera images, see "Taking snapshots", Page 127. 126
-
 1
1 -
2
-
3
-
4
-
5
-
6
-
7
-
8
-
9
-
10
-
11
-
12
-
13
-
14
-
15
-
16
-
17
-
18
-
19
-
20
-
21
-
22
-
23
-
24
-
25
-
26
-
27
-
28
-
29
-
30
-
31
-
32
-
33
-
34
-
35
-
36
-
37
-
38
-
39
-
40
-
41
-
42
-
43
-
44
-
45
-
46
-
47
-
48
-
49
-
50
-
51
-
52
-
53
-
54
-
55
-
56
-
57
-
58
-
59
-
60
-
61
-
62
-
63
-
64
-
65
-
66
-
67
-
68
-
69
-
70
-
71
-
72
-
73
-
74
-
75
-
76
-
77
-
78
-
79
-
80
-
81
-
82
-
83
-
84
-
85
-
86
-
87
-
88
-
89
-
90
-
91
-
92
-
93
-
94
-
95
-
96
-
97
-
98
-
99
-
100
-
101
-
102
-
103
-
104
-
105
-
106
-
107
-
108
-
109
-
110
-
111
-
112
-
113
-
114
-
115
-
116
-
117
-
118
-
119
-
120
-
 121
121 -
 122
122 -
 123
123 -
 124
124 -
 125
125 -
 126
126 -
 127
127 -
 128
128 -
 129
129 -
 130
130 -
 131
131 -
132
-
133
-
134
-
135
-
136
-
137
-
138
-
139
-
140
-
141
-
142
-
143
-
144
-
145
-
146
-
147
-
148
-
149
-
150
-
151
-
152
-
153
-
154
-
155
-
156
-
157
-
158
-
159
-
160
-
161
-
162
-
163
-
164
-
165
-
166
-
167
-
168
-
169
-
170
-
171
-
172
-
173
-
174
-
175
-
176
-
177
-
178
-
179
-
180
-
181
-
182
-
183
-
184
-
185
-
186
-
187
-
188
-
189
-
190
-
191
-
192
-
193
-
194
-
195
-
196
-
197
-
198
-
199
-
200
 |
 |
