Panasonic P2 HD Camcorder Operating Instructions - Page 101
To read the lens file from the builtin memory, FILE> screen from the FILE
 |
View all Panasonic P2 HD Camcorder manuals
Add to My Manuals
Save this manual to your list of manuals |
Page 101 highlights
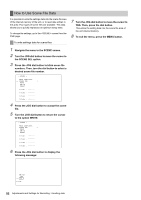
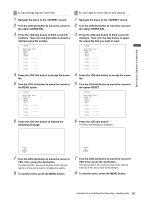
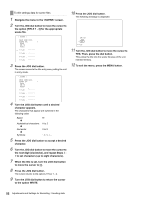
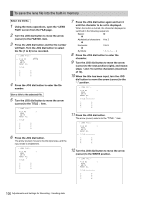
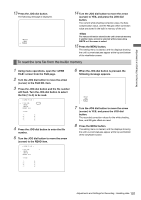
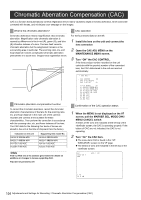
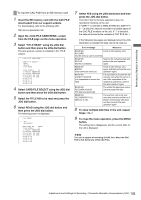
Adjustments and Settings for Recording 13 Press the JOG dial button. The following message is displayed. WRITE? YES # NO 14 Turn the JOG dial button to move the arrow (cursor) to YES, and press the JOG dial button. The current white shading correction value, the flare compensation value, and the RB gain offset correction value are stored in the built-in memory of the unit. ‹Note The values will not be stored in the unit's internal memory if another menu screen is selected without executing WRITE or if the menu is exited. 15 Press the MENU button. The setting menu is cleared, and the displays showing the unit's current statuses appear at the top and bottom of the viewfinder screen. To read the lens file from the builtin memory 1 Using menu operations, open the screen from the FILE page. 2 Turn the JOG dial button to move the arrow (cursor) to the FILE NO. item. 3 Press the JOG dial button and the file number will flash. Turn the JOG dial button to select the file (1 to 8) to be read. < LENS FILE > # FILE NO. :1 READ WRITE RESET ALL TITLE: 1: 5: 2: 6: 3: 7: 4: 8: 4 Press the JOG dial button to enter the file number. 5 Turn the JOG dial button to move the arrow (cursor) to the READ item. < LENS FILE > FILE NO. :1 # READ WRITE RESET ALL TITLE: 1: 5: 2: 6: 3: 7: 4: 8: 6 When the JOG dial button is pressed, the following message appears. READ? YES # NO 7 Turn the JOG dial button to move the arrow (cursor) to YES, and press the JOG dial button. The recorded correction values for the white shading, flare, and RB gain offset are read. 8 Press the MENU button. The setting menu is cleared, and the displays showing the unit's current statuses appear at the top and bottom of the viewfinder screen. Adjustments and Settings for Recording : Handling data 101
-
 1
1 -
2
-
3
-
4
-
5
-
6
-
7
-
8
-
9
-
10
-
11
-
12
-
13
-
14
-
15
-
16
-
17
-
18
-
19
-
20
-
21
-
22
-
23
-
24
-
25
-
26
-
27
-
28
-
29
-
30
-
31
-
32
-
33
-
34
-
35
-
36
-
37
-
38
-
39
-
40
-
41
-
42
-
43
-
44
-
45
-
46
-
47
-
48
-
49
-
50
-
51
-
52
-
53
-
54
-
55
-
56
-
57
-
58
-
59
-
60
-
61
-
62
-
63
-
64
-
65
-
66
-
67
-
68
-
69
-
70
-
71
-
72
-
73
-
74
-
75
-
76
-
77
-
78
-
79
-
80
-
81
-
82
-
83
-
84
-
85
-
86
-
87
-
88
-
89
-
90
-
91
-
92
-
93
-
94
-
95
-
 96
96 -
 97
97 -
 98
98 -
 99
99 -
 100
100 -
 101
101 -
 102
102 -
 103
103 -
 104
104 -
 105
105 -
 106
106 -
107
-
108
-
109
-
110
-
111
-
112
-
113
-
114
-
115
-
116
-
117
-
118
-
119
-
120
-
121
-
122
-
123
-
124
-
125
-
126
-
127
-
128
-
129
-
130
-
131
-
132
-
133
-
134
-
135
-
136
-
137
-
138
-
139
-
140
-
141
-
142
-
143
-
144
-
145
-
146
-
147
-
148
-
149
-
150
-
151
-
152
-
153
-
154
-
155
-
156
-
157
-
158
-
159
-
160
-
161
-
162
-
163
-
164
-
165
-
166
-
167
-
168
-
169
-
170
-
171
-
172
-
173
-
174
-
175
-
176
-
177
-
178
-
179
-
180
-
181
-
182
-
183
-
184
-
185
-
186
-
187
-
188
-
189
-
190
-
191
-
192
-
193
-
194
-
195
-
196
-
197
-
198
-
199
-
200
-
201
-
202
-
203
-
204
-
205
-
206
-
207
-
208
 |
 |
