Panasonic P2 HD Camcorder Operating Instructions - Page 41
Following basic operations of shooting and, recording according to Basic Procedures, lock the camera securely., Press the REC button., Press the STOP button.
 |
View all Panasonic P2 HD Camcorder manuals
Add to My Manuals
Save this manual to your list of manuals |
Page 41 highlights
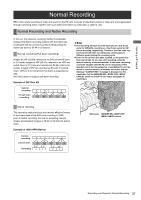
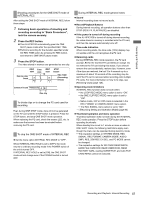
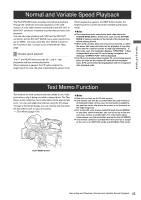
Recording and Playback Shooting procedures for the ONE SHOT mode of INTERVAL REC After setting the ONE SHOT mode of INTERVAL REC, follow these steps: 1 Following basic operations of shooting and recording according to "Basic Procedures", lock the camera securely. 2 Press the REC button. z The AJ-HPX3100 automatically goes into ONE SHOT pause mode after the specified REC TIME. z Performs recording for the duration specified under the REC TIME option by pressing the REC button, and returns to ONE SHOT pause mode. 3 Press the STOP button. The video stored in memory are generated as one clip. iREC Time start Axis Real-time video Sound A t iREC start B t STOP button REC TIME (Recording time=t) Content on P2 card Previous clip A B One clip To divide clips or to change the P2 card used for recording Even during ONE SHOT mode, clips will not be generated on the P2 card until the STOP button is pressed. Press the STOP button, and stop ONE SHOT mode operation. When replacing the P2 card, check the access LED, etc. to make sure that access has been terminated before removing the P2 card. To stop the ONE SHOT mode of INTERVAL REC z Set the menu option INTERVAL REC MODE to "OFF". When INTERVAL REC HOLD is set to [OFF], the mode returns to ordinary recording mode if the POWER switch of the unit is turned OFF. If INTERVAL REC HOLD is set to [ON], the ONE SHOT mode will not change even if the POWER switch is turned OFF. During INTERVAL REC mode general notes z Sound Interval recording does not record audio. z Record/Playback Buttons During interval recording, all operation buttons other than STOP (REW, FF, PLAY/PAUSE) are disabled. z If the power is turned off during recording If the AJ-HPX3100 is turned off during interval recording, the video stored in memory is recorded onto the P2 card, and then the camera automatically turns off. z Time code indication When recording starts, the time code (TCG) display may not update until the unit recognizes the P2 card. z Removing cards During INTERVAL REC mode operation, the P2 card access LED for the inserted P2 card blinks in orange. Do not remove the P2 card during this status. If you should remove the card accidentally, restore clips. However, even if the clips are restored, the last 3 to 4 seconds up to a maximum of about 10 seconds of the recording may be lost if the P2 card is removed while recording onto multiple P2 cards. For more information on how to fix clips, see [Restoring Clips] (page 126). z Operating mode limitations INTERVAL REC function does not work when: Š the LOOP REC MODE menu option is set to "ON". Š the ONE CLIP REC MODE menu option is set to "ON". Š Native mode, 24P or 24PA mode is selected in the REC FORMAT or CAMERA MODE menu option. Š The REC SIGNAL menu option is set to "SDI". > [Recording Setting and Operation Mode] (page 46) z Thumbnail operation and menu operation Thumbnail operation does not work during the INTERVAL REC mode operation. Press the STOP button before operating thumbnails. When standby time is set to 1 minute or more or when in ONE SHOT mode, the following restrictions apply even though the menu can be operated during stand-by mode. Š The respective settings or SYSTEM MODE, REC SIGNAL, REC FORMAT, CAMERA MODE, AUDIO SMPL RES, 25M REC CH SEL, and PC MODE cannot be changed. Š The respective settings for SD CARD READ/WRITE, LENS FILE CARD R/W, READ USER DATA, READ FACTORY DATA, reading SCENE FILE, and CAC FILE CARD READ cannot be executed. 41 Recording and Playback: Interval Recording
-
 1
1 -
2
-
3
-
4
-
5
-
6
-
7
-
8
-
9
-
10
-
11
-
12
-
13
-
14
-
15
-
16
-
17
-
18
-
19
-
20
-
21
-
22
-
23
-
24
-
25
-
26
-
27
-
28
-
29
-
30
-
31
-
32
-
33
-
34
-
35
-
 36
36 -
 37
37 -
 38
38 -
 39
39 -
 40
40 -
 41
41 -
 42
42 -
 43
43 -
 44
44 -
 45
45 -
 46
46 -
47
-
48
-
49
-
50
-
51
-
52
-
53
-
54
-
55
-
56
-
57
-
58
-
59
-
60
-
61
-
62
-
63
-
64
-
65
-
66
-
67
-
68
-
69
-
70
-
71
-
72
-
73
-
74
-
75
-
76
-
77
-
78
-
79
-
80
-
81
-
82
-
83
-
84
-
85
-
86
-
87
-
88
-
89
-
90
-
91
-
92
-
93
-
94
-
95
-
96
-
97
-
98
-
99
-
100
-
101
-
102
-
103
-
104
-
105
-
106
-
107
-
108
-
109
-
110
-
111
-
112
-
113
-
114
-
115
-
116
-
117
-
118
-
119
-
120
-
121
-
122
-
123
-
124
-
125
-
126
-
127
-
128
-
129
-
130
-
131
-
132
-
133
-
134
-
135
-
136
-
137
-
138
-
139
-
140
-
141
-
142
-
143
-
144
-
145
-
146
-
147
-
148
-
149
-
150
-
151
-
152
-
153
-
154
-
155
-
156
-
157
-
158
-
159
-
160
-
161
-
162
-
163
-
164
-
165
-
166
-
167
-
168
-
169
-
170
-
171
-
172
-
173
-
174
-
175
-
176
-
177
-
178
-
179
-
180
-
181
-
182
-
183
-
184
-
185
-
186
-
187
-
188
-
189
-
190
-
191
-
192
-
193
-
194
-
195
-
196
-
197
-
198
-
199
-
200
-
201
-
202
-
203
-
204
-
205
-
206
-
207
-
208
 |
 |