Panasonic PT-D7700U-K Dlp Projector - English/ French - Page 17
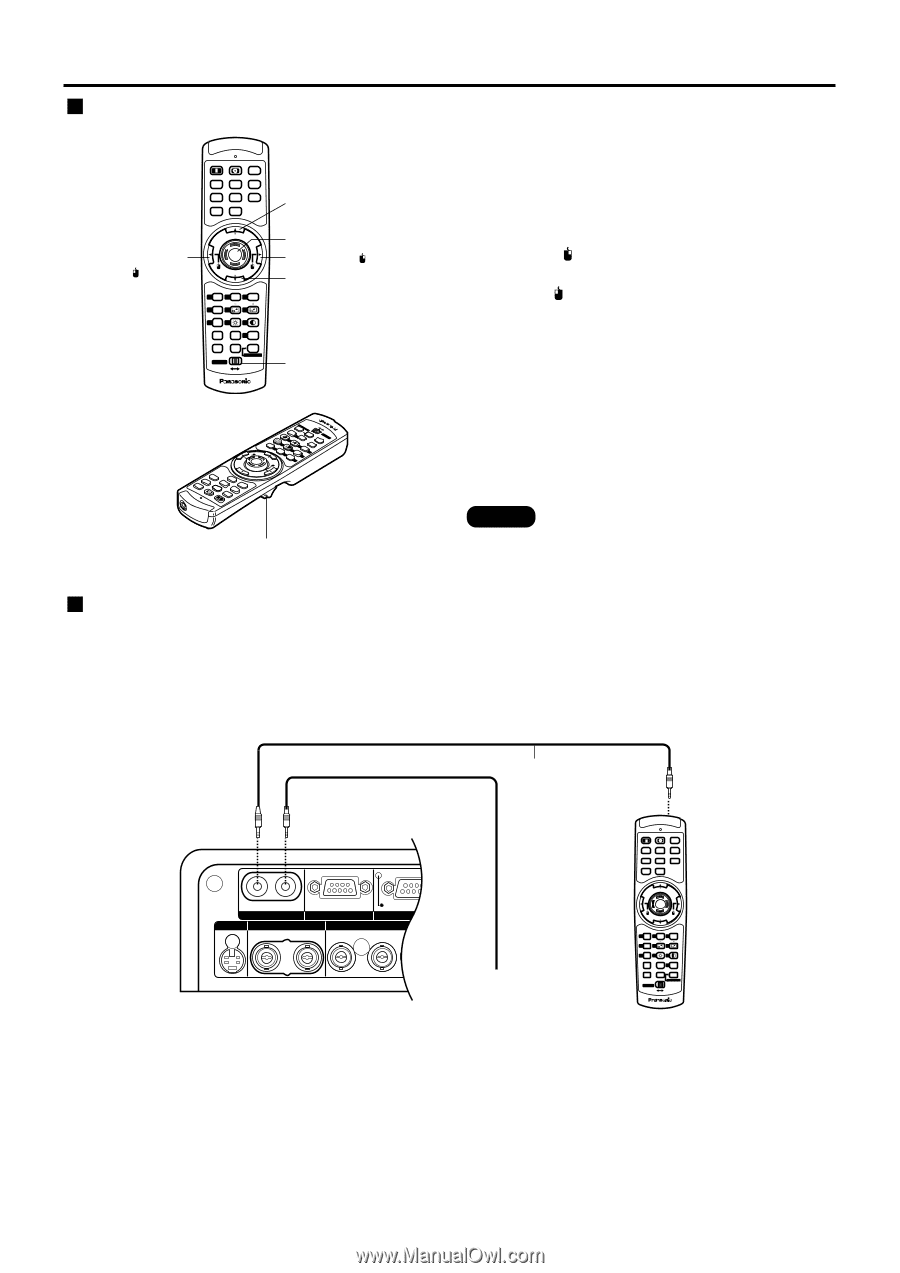
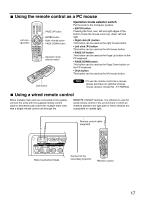
USING THE REMOTE AS A PC MOUSE, USING A WIRED REMOTE CONTROL, Operation mode selector switch
 |
UPC - 791871111000
View all Panasonic PT-D7700U-K manuals
Add to My Manuals
Save this manual to your list of manuals |
Page 17 highlights
Using the remote control as a PC mouse PAGE UP OOSNDSCREEN PAGE DOWN ENTER 2 3 SSYESLTEM 6 ON POWER OFF AUTO SETUP RGB 1 VIDEO RGB 2 S-VIDEO AUX SHUTTER SHUT MENU FREEZE Left click ( ) button PAGE UP ENTER PAGE DOWN ON SCREEN 1 2 3 STD OSD SYSTEM SEL D.ZOOM 4 FUNC 1 5 6 BRIGHT CONTRAST 7 LENS 8 9 NEXT ASPECT 0 USER LIGHT ID ALL ID SET Computer Numetric LASER ON/OFF Projector PAGE UP button ENTER button Right click ( ) button PAGE DOWN button Operation mode selector switch D.ZOOM CONTRAST STD BRIGHT 9 1 1FUNC 5 0 USER 8 4 ASPECT LENS Proj LeAcStEoRrONI/DOFSFET 7 NEXT ID ALL NuCometmripcutLIerGHT Operation mode selector switch Put the knob to the Computer position. • ENTER button Pressing the front, rear, left and right edges of the button moves the mouse cursor up, down, left and right. • Right click ( ) button This button can be used as the right mouse button. • Left click ( ) button This button can be used as the left mouse button. • PAGE UP button This button can be used as the Page Up button on the PC keyboard. • PAGE DOWN button This button can be used as the Page Down button on the PC keyboard. • Click button This button can be used as the left mouse button. MPEANGUE VPIADGEEO FREEZE S-VIDEO 2RGB SHSUHTUTTERAUX SETAUUTPO 1RGB POWEROFF ON Click button Note • To use the remote control as a mouse, please purchase an optional wireless mouse receiver (model No.: ET-RMRC2). Using a wired remote control When multiple main units are connected in the system, connect the units with the supplied remote control cable to simultaneously control the multiple main units with a single remote control unit through the REMOTE1 IN/OUT terminal. It is effective to use the wired remote control in the environment in which an obstacle stands in the light path or where devices are susceptible to outside light. Remote control cable (supplied) IN OUT REMOTE 1 REMOTE 2 S-VIDEO VIDEO IN IN OUT R/PR RS-232C (G) / RS-422 (R) RS-232C (G) / RS-422 (R) IN OUT SERIAL RGB 1 IN G/Y B/PB SYNC/HD RGB 2 IN / RGB 1 OUT VD Side-mounted terminals Connect to the secondary projector ON POWER OFF AUTO SETUP RGB 1 VIDEO RGB 2 S-VIDEO AUX SHUTTER SHUT MENU FREEZE PAGE UP ENTER PAGE DOWN ON SCREEN 1 STD 2 OSD 3 SYSTEM SEL D.ZOOM 4 FUNC 1 5 6 BRIGHT CONTRAST 7 LENS 8 9 NEXT ASPECT 0 USER LIGHT ID ALL ID SET Computer Numetric LASER ON/OFF Projector Remote control 17
-
 1
1 -
2
-
3
-
4
-
5
-
6
-
7
-
8
-
9
-
10
-
11
-
 12
12 -
 13
13 -
 14
14 -
 15
15 -
 16
16 -
 17
17 -
 18
18 -
 19
19 -
 20
20 -
 21
21 -
 22
22 -
23
-
24
-
25
-
26
-
27
-
28
-
29
-
30
-
31
-
32
-
33
-
34
-
35
-
36
-
37
-
38
-
39
-
40
-
41
-
42
-
43
-
44
-
45
-
46
-
47
-
48
-
49
-
50
-
51
-
52
-
53
-
54
-
55
-
56
-
57
-
58
-
59
-
60
-
61
-
62
-
63
-
64
-
65
-
66
-
67
-
68
-
69
-
70
-
71
-
72
-
73
-
74
-
75
-
76
-
77
-
78
-
79
-
80
-
81
-
82
-
83
-
84
-
85
-
86
-
87
-
88
-
89
-
90
-
91
-
92
-
93
-
94
-
95
-
96
-
97
-
98
-
99
-
100
-
101
-
102
-
103
-
104
-
105
-
106
-
107
-
108
-
109
-
110
-
111
-
112
-
113
-
114
-
115
-
116
 |
 |