Panasonic PT-D7700U-K Dlp Projector - English/ French - Page 44
Registration Of Input Signal Data, Registration Of New Data, Renaming The Registered Signals
 |
UPC - 791871111000
View all Panasonic PT-D7700U-K manuals
Add to My Manuals
Save this manual to your list of manuals |
Page 44 highlights
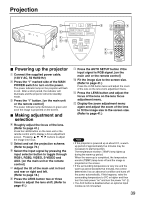
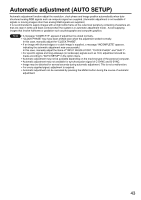
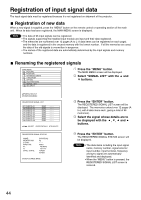
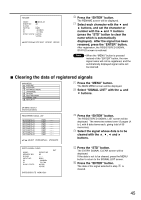
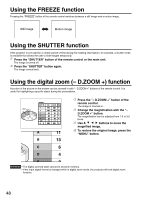
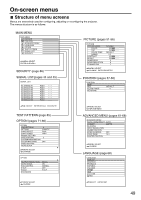
Registration of input signal data The input signal data must be registered because it is not registered on shipment of the projector. Registration of new data When a new signal is supplied, press the "MENU" button on the remote control or operating section of the main unit. When its data has been registered, the MAIN MENU screen is displayed. Note • The data of 96 input signals can be registered. • The signals supporting the installed input module are input and their data registered. • The memories are numbered over 12 pages (A to L: 8 data items can be registered on each page), and the data is registered in the unused memory with the lowest number. If all the memories are used, the data of the old signals is overwritten in sequence. • The names of the registered data are automatically determined by the input signals and memory numbers. Renaming the registered signals MAIN MENU PICTURE POSITION ADVANCED MENU LANGUAGE OPTION TEST PATTERN SIGNAL LIST SECURITY Press the "MENU" button. The MAIN MENU screen will be displayed. Select "SIGNAL LIST" with the and buttons. :MENU SELECT ENTER:SUB MENU REGISTERED SIGNAL LIST A1:SVGA72-A1 A2:SVGA72-A2 A3:SVGA72-A3 A4:SVGA72-A4 A5:SVGA72-A5 A6:SVGA72-A6 A7:SVGA72-A7 A8:SVGA72-A8 RGB1 RGB1 RGB1 RGB1 RGB1 RGB1 RGB1 RGB1 :SELECT ENTER:DETAILS STD:DELETE REGISTERED SIGNAL STATUS NAME: MEMORY NO: S.S.NO: INPUT NO: fH: fV: SYNC. STATE: SVGA72-A2 A2 - - - RGB1 48.08kHz 72.17Hz H(POS) V(POS) ENTER:CHANGE NANE Press the "ENTER" button. The REGISTERED SIGNAL LIST screen will be displayed. The memories extend over 12 pages (A to L with 8 data items each, giving a total of 96 memories). Select the signal whose details are to be displayed with the , , and buttons. Press the "ENTER" button. The REGISTERED SIGNAL STATUS screen will be displayed. Note • The data items including the input signal name, memory number, signal selector input number, input terminal, frequency and sync signal are automatically identified and displayed. • When the "MENU" button is pressed, the REGISTERED SIGNAL LIST screen is restored. 44
-
 1
1 -
2
-
3
-
4
-
5
-
6
-
7
-
8
-
9
-
10
-
11
-
12
-
13
-
14
-
15
-
16
-
17
-
18
-
19
-
20
-
21
-
22
-
23
-
24
-
25
-
26
-
27
-
28
-
29
-
30
-
31
-
32
-
33
-
34
-
35
-
36
-
37
-
38
-
 39
39 -
 40
40 -
 41
41 -
 42
42 -
 43
43 -
 44
44 -
 45
45 -
 46
46 -
 47
47 -
 48
48 -
 49
49 -
50
-
51
-
52
-
53
-
54
-
55
-
56
-
57
-
58
-
59
-
60
-
61
-
62
-
63
-
64
-
65
-
66
-
67
-
68
-
69
-
70
-
71
-
72
-
73
-
74
-
75
-
76
-
77
-
78
-
79
-
80
-
81
-
82
-
83
-
84
-
85
-
86
-
87
-
88
-
89
-
90
-
91
-
92
-
93
-
94
-
95
-
96
-
97
-
98
-
99
-
100
-
101
-
102
-
103
-
104
-
105
-
106
-
107
-
108
-
109
-
110
-
111
-
112
-
113
-
114
-
115
-
116
 |
 |
