Panasonic SA-BX500 Operating Instructions - Page 10
Panasonic SA-BX500 Manual
 |
View all Panasonic SA-BX500 manuals
Add to My Manuals
Save this manual to your list of manuals |
Page 10 highlights
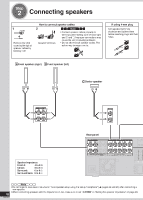
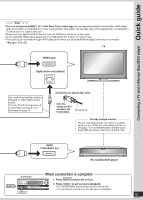
Step 2 Connecting speakers How to connect speaker cables If using 4-mm plug Turn speaker terminals clockwise and tighten them before inserting plugs into their holes. 1 2 Note • Connect speaker cables properly to terminals after making sure left and right, and ( and ). Improper connections may cause the unit to develop problems. • Do not short-circuit speaker cables. The action may damage circuits. Remove the vinyl covering the tips of speaker cables by twisting it off. Speaker terminals ( ) ( ) A Front speaker (right) B Front speaker (left) C Center speaker FRONT FRONT A A R LF L BI-WIRE CENTER CENTER Rear panel FRONT A A FRONT FRONT FRONT B B CENTER CENTER SURROUND SURROUND SURROUND BACK SURROUND BACK R LF L BI-WIRE R HF L R L R L OUT CO Y A OR B/BI-WIRE : 4-8 Ω / EACH SPEAKER (CHAQUE) A AND B : 6-8 Ω / EACH SPEAKER (CHAQUE) SPEAKERS 6-8 Ω / EACH SPEAKER (CHAQUE) HAUT-PARLEURS Class2 wiring PB PR Speaker impedance Front A: 4 to 8 Ω Center: 6 to 8 Ω Surround: 6 to 8 Ω Surround back: 6 to 8 Ω IN OUT (BD/ TV MONITOR (DVD RECORDER) DVD 1 CE L AC IN~ R IN CD SUB 10 RQT9223 • Do not forget to take steps instructed in "Auto speaker setup using the setup microphone" (➔ pages 24 and 25) after connecting a new speaker. • When connecting speakers with the impedance of 4 Ω, make sure to set "4 OHMS " in "Setting the speaker impedance" on page 38. Note
-
 1
1 -
2
-
3
-
4
-
 5
5 -
 6
6 -
 7
7 -
 8
8 -
 9
9 -
 10
10 -
 11
11 -
 12
12 -
 13
13 -
 14
14 -
 15
15 -
16
-
17
-
18
-
19
-
20
-
21
-
22
-
23
-
24
-
25
-
26
-
27
-
28
-
29
-
30
-
31
-
32
-
33
-
34
-
35
-
36
-
37
-
38
-
39
-
40
-
41
-
42
-
43
-
44
-
45
-
46
-
47
-
48
-
49
-
50
-
51
-
52
-
53
-
54
-
55
-
56
-
57
-
58
-
59
-
60
 |
 |
