Panasonic SDRH20 Sd/hdd Video Camcorder - Page 74
Copying still picture files, Select [SELECT] or [ALL]
 |
View all Panasonic SDRH20 manuals
Add to My Manuals
Save this manual to your list of manuals |
Page 74 highlights
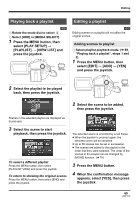
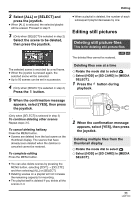
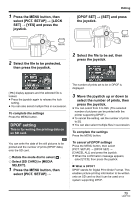
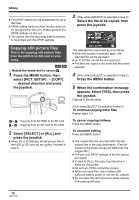
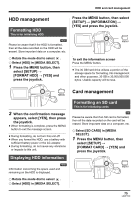
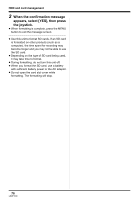
Editing ≥ The DPOF setting can be established for up to 999 files. ≥ DPOF setting made on other devices may not be recognized by this unit. Please perform the DPOF settings on this unit. ≥ You cannot add the recording date to pictures to be printed with the DPOF settings. 3 (Only when [SELECT] is selected in step 2) Select the file to be copied, then press the joystick. Copying still picture files This is for copying still picture files from the HDD to an SD card or vice versa. [HDD] [SD] ¬ Rotate the mode dial to select . 1 Press the MENU button, then select [PICT. SETUP] # [COPY] # desired direction and press the joystick. MENU Copying from the HDD to an SD card Copying from an SD card to the HDD 2 Select [SELECT] or [ALL] and press the joystick. ≥ When [ALL] is selected, all still picture files in the HDD or SD card will be copied. Proceed to step 5. The selected file is encircled by a red frame. ≥ When the joystick is pressed again, the selected file will be canceled. ≥ Up to 50 files can be set in succession. ≥ The files are copied in the order that they were selected. 4 (Only when [SELECT] is selected in step 2) Press the MENU button. 5 When the confirmation message appears, select [YES], then press the joystick. Copying of the file starts. (Only when [SELECT] is selected in step 2) To continue copying other files Repeat steps 3-5. To cancel copying halfway Press the MENU button. To complete editing Press the MENU button. ≥ The copied files are recorded after the still picture files in the copy destination. (The file names or the folder names will differ from the original file.) ≥ The lock and DPOF settings of the file cannot be copied. ≥ In case of [ALL], the copy may take time if there are many files. ≥ Do not turn off this unit while copying. ≥ When you copy files, use a battery with sufficient battery power or use the AC adaptor. ≥ Do not open the card slot cover while copying. The copying will stop. 74 LSQT1190
-
 1
1 -
2
-
3
-
4
-
5
-
6
-
7
-
8
-
9
-
10
-
11
-
12
-
13
-
14
-
15
-
16
-
17
-
18
-
19
-
20
-
21
-
22
-
23
-
24
-
25
-
26
-
27
-
28
-
29
-
30
-
31
-
32
-
33
-
34
-
35
-
36
-
37
-
38
-
39
-
40
-
41
-
42
-
43
-
44
-
45
-
46
-
47
-
48
-
49
-
50
-
51
-
52
-
53
-
54
-
55
-
56
-
57
-
58
-
59
-
60
-
61
-
62
-
63
-
64
-
65
-
66
-
67
-
68
-
 69
69 -
 70
70 -
 71
71 -
 72
72 -
 73
73 -
 74
74 -
 75
75 -
 76
76 -
 77
77 -
 78
78 -
 79
79 -
80
-
81
-
82
-
83
-
84
-
85
-
86
-
87
-
88
-
89
-
90
-
91
-
92
-
93
-
94
-
95
-
96
-
97
-
98
-
99
-
100
-
101
-
102
-
103
-
104
-
105
-
106
-
107
-
108
-
109
-
110
-
111
-
112
-
113
-
114
-
115
-
116
-
117
-
118
-
119
-
120
-
121
-
122
-
123
-
124
-
125
-
126
-
127
-
128
-
129
-
130
-
131
-
132
-
133
-
134
-
135
-
136
-
137
-
138
-
139
-
140
-
141
-
142
-
143
-
144
 |
 |
