Panasonic SDRH20 Sd/hdd Video Camcorder - Page 86
CONNECTION AND RECOGNITION ( WINDOWS), Reading the software help, Software uninstallation, procedures
 |
View all Panasonic SDRH20 manuals
Add to My Manuals
Save this manual to your list of manuals |
Page 86 highlights
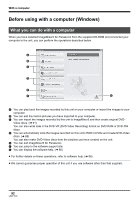
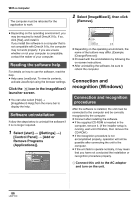
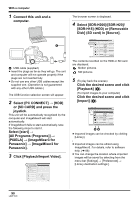
With a computer The computer must be rebooted for the application to work. 2 Select [ImageMixer3], then click [Remove]. ≥ Depending on the operating environment, you may be required to install DirectX 9.0c. If so, click [Yes], and install it. If you install the software in a computer that is not compatible with DirectX 9.0c, the computer may not work properly. If you are unsure whether or not your computer is compatible, contact the maker of your computer. Reading the software help For details on how to use the software, read the help. ≥ Help uses JavaScript. To view its contents, activate JavaScript using the browser settings. Click the icon in the ImageMixer3 launcher screen. ≥ You can also select [Help] # [ImageMixer3 Help] from the menu bar to display the help. Software uninstallation Follow the steps below to uninstall the software if it is no longer required. 1 Select [start] # ([Settings] #) [Control Panel] # [Add or Remove Programs (Applications)]. ≥ Depending on the operating environment, the name of the buttons may differ. (Example: [Change/Remove]) ≥ Proceed with the uninstallation by following the on-screen instructions. ≥ After uninstalling the software, be sure to reboot the computer. Connection and recognition (Windows) Connection and recognition procedures After the software is installed, the unit must be connected to the computer and be correctly recognized by the computer. ≥ Connect after installing the software. ≥ If the supplied CD-ROM is inserted in the computer, remove it. (If the installer setup is running, wait until it finishes, then remove the CD-ROM.) ≥ If the recognition procedure is not accomplished properly, operation will not be possible after connecting the unit to the computer. ≥ If the unit fails to operate normally, it may mean that you have not conducted the installation or recognition procedure properly. ¬ Connect this unit to the AC adaptor and turn on the unit. 86 LSQT1190
-
 1
1 -
2
-
3
-
4
-
5
-
6
-
7
-
8
-
9
-
10
-
11
-
12
-
13
-
14
-
15
-
16
-
17
-
18
-
19
-
20
-
21
-
22
-
23
-
24
-
25
-
26
-
27
-
28
-
29
-
30
-
31
-
32
-
33
-
34
-
35
-
36
-
37
-
38
-
39
-
40
-
41
-
42
-
43
-
44
-
45
-
46
-
47
-
48
-
49
-
50
-
51
-
52
-
53
-
54
-
55
-
56
-
57
-
58
-
59
-
60
-
61
-
62
-
63
-
64
-
65
-
66
-
67
-
68
-
69
-
70
-
71
-
72
-
73
-
74
-
75
-
76
-
77
-
78
-
79
-
80
-
 81
81 -
 82
82 -
 83
83 -
 84
84 -
 85
85 -
 86
86 -
 87
87 -
 88
88 -
 89
89 -
 90
90 -
 91
91 -
92
-
93
-
94
-
95
-
96
-
97
-
98
-
99
-
100
-
101
-
102
-
103
-
104
-
105
-
106
-
107
-
108
-
109
-
110
-
111
-
112
-
113
-
114
-
115
-
116
-
117
-
118
-
119
-
120
-
121
-
122
-
123
-
124
-
125
-
126
-
127
-
128
-
129
-
130
-
131
-
132
-
133
-
134
-
135
-
136
-
137
-
138
-
139
-
140
-
141
-
142
-
143
-
144
 |
 |
