Panasonic WV-CP500 Operating Instructions - Page 10
Step 2, ON default, ON i-VMD, When using the SUPER-D5 function
 |
View all Panasonic WV-CP500 manuals
Add to My Manuals
Save this manual to your list of manuals |
Page 10 highlights
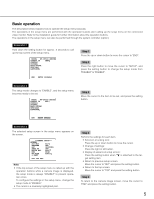
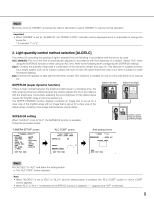
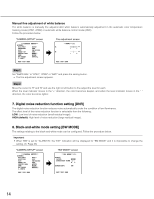
Step 2 Move the cursor to "SUPER-D5" and select the item from the following: ON (default): Activates the SUPER-D5 function all the time. (☞ See below) ON (i-VMD): Activates the SUPER-D5 function all the time. (☞ See below) In addition to the SUPER-D5 function, the motion detection function also works. OFF: Deactivates the SUPER-D5 function. (☞ Page 11) Note: • When "ON" or "ON(i-VMD)" is selected for "SUPER-D5", the following settings will be restricted. SHUTTER: Only OFF and 1/100 are available. (☞ Page 11) SENS UP: Only "OFF" and "AUTO" become available. (☞ Page 12) • When "ON" or "ON(i-VMD)" is selected for "SUPER-D5", a shadow (black line) may appear at the boundary between a bright- er area and a darker area. This is not a malfunction. • When "ON" or "ON(i-VMD)" is selected for "SUPER-D5", the SUPER-D5 function will become more effective by slightly incre- menting "LEVEL". However, flickering or noise may be observed frequently when "LEVEL" is too much incremented. • When flickering or noise is observed frequently due to the illumination of light, select "OFF". (1) When flickering or color deterioration is observed (2) When noise is produced in a bright area on the screen • When "ON(i-VMD)" is selected for "SUPER-D5", performance of the motion detection will vary depending on the i-VMD settings. (☞ Steps 4 - 6 on page 17) When using the SUPER-D5 function Follow the procedure below. Step 1 Move the cursor to "LEVEL" and use the right or left button to adjust the level. Step 2 The dark area of the object is automatically corrected to lighten it. Move the cursor to "MANUAL ABS" and press the setting button. → The area setting screen appears. Step 3 Move the cursor to "POSITION" and press the setting button. Step 4 Use the up, down, right, and left buttons to determine the left upper position of the area to be set and press the setting button. Step 5 Use the up, down, right, and left buttons to determine the right lower position of the area and press the setting button. Note: • To delete an area, move the cursor to "DEL" and press the setting button. • The area to be brighter becomes circular. • The bright level of an area cannot be specified. • Only one area can be set. 10
-
 1
1 -
2
-
3
-
4
-
 5
5 -
 6
6 -
 7
7 -
 8
8 -
 9
9 -
 10
10 -
 11
11 -
 12
12 -
 13
13 -
 14
14 -
 15
15 -
16
-
17
-
18
-
19
-
20
-
21
-
22
-
23
-
24
-
25
-
26
-
27
-
28
-
29
-
30
-
31
-
32
-
33
-
34
-
35
 |
 |
