Panasonic WV-CP500 Operating Instructions - Page 19
Set the detection areas
 |
View all Panasonic WV-CP500 manuals
Add to My Manuals
Save this manual to your list of manuals |
Page 19 highlights
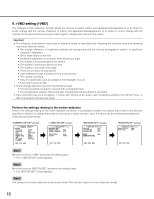
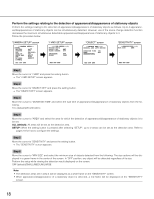
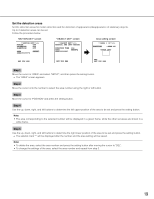
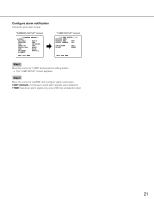
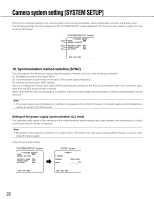
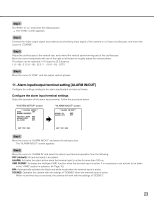
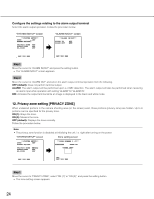
Set the detection areas Set the detection areas for motion detection and the detection of appearance/disappearance of stationary objects. Up to 2 detection areas can be set. Follow the procedure below. "MOTION DET" screen **MOTION DET**(1) MOTION OFF LOITERING OFF DIRECTION OFF AREA SENSITIVITY SETUP "OBJECT DET" screen **OBJECT DET**(1) REMOVAL AND LEFT BEHIND DURATION TIME 10s AREA SETUP SENSITIVITY Area setting screen **AREA 1 /2**(1) POSITION PUSH SW UPPER LEFT RET TOP END RET TOP END DEL RET TOP END Step 1 Move the cursor to "AREA" and select "SETUP", and then press the setting button. → The "AREA" screen appears. Step 2 Move the cursor onto the number to select the area number using the right or left button. Step 3 Move the cursor to "POSITION" and press the setting button. Step 4 Use the up, down, right, and left buttons to determine the left upper position of the area to be set and press the setting button. Note: • The area corresponding to the selected number will be displayed in a green frame, while the other set areas are shown in a white frame. Step 5 Use the up, down, right, and left buttons to determine the right lower position of the area to be set and press the setting button. → The asterisk mark "*" will be displayed after the number and the area setting will be saved. Note: • To delete the area, select the area number and press the setting button after moving the cursor to "DEL". • To change the settings of the area, select the area number and repeat from step 3. 19
-
 1
1 -
2
-
3
-
4
-
5
-
6
-
7
-
8
-
9
-
10
-
11
-
12
-
13
-
 14
14 -
 15
15 -
 16
16 -
 17
17 -
 18
18 -
 19
19 -
 20
20 -
 21
21 -
 22
22 -
 23
23 -
 24
24 -
25
-
26
-
27
-
28
-
29
-
30
-
31
-
32
-
33
-
34
-
35
 |
 |
