Panasonic WV-CP500 Operating Instructions - Page 23
Alarm input/output terminal setting [ALARM IN/OUT], Con the alarm input terminal settings - degree
 |
View all Panasonic WV-CP500 manuals
Add to My Manuals
Save this manual to your list of manuals |
Page 23 highlights
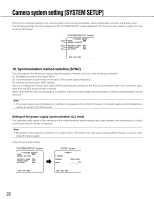
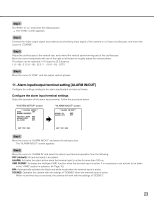
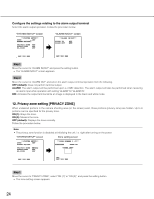
Step 1 Set "SYNC" to "LL" and press the setting button. → The "SYNC" screen appears. Step 2 Connect the video output signal and external synchronizing input signal of the camera to a 2-input oscilloscope, and move the cursor to "COARSE". Step 3 Adjust the oscilloscope to the vertical rate, and extend the vertical synchronizing part of the oscilloscope. Move the cursor horizontally with use of the right or left button to roughly adjust the vertical phase. The phase can be adjusted in 16 steps by 22.5 degrees. 1 (1--16) : 0 °/2 (1--16) : 22.5 16 (1--16) : 337.5 Step 4 Move the cursor to "FINE", and fine adjust vertical phases. 11. Alarm input/output terminal setting [ALARM IN/OUT] Configure the settings relating to the alarm input/output terminal as follows. Configure the alarm input terminal settings Select the operation of the alarm input terminal. Follow the procedure below. "SYSTEM SETUP" screen **SYSTEM SETUP** SYNC INT ALARM IN/OUT PRIVACY ZONE OFF STABILIZER OFF EL-ZOOM OFF "ALARM IN/OUT" screen **ALARM IN/OUT** ALARM IN OFF ALARM OUT OFF RET TOP END RET TOP END Step 1 Move the cursor to "ALARM IN/OUT" and press the setting button. → The "ALARM IN/OUT" screen appears. Step 2 Move the cursor to "ALARM IN" and select the alarm input terminal operation from the following. OFF (default): No terminal input is accepted. ALARM: Activates the alarm action when the terminal input is active for more than 100 ms. VMD PERMIT: Activates the intelligent VMD function when the terminal input is active. It is necessary to set actions to be taken in the "i-VMD" section in advance. (☞ Page 16) BW: Automatically activates the black and white mode when the terminal input is active. SCENE2: Operates the camera with the settings of "SCENE2" when the terminal input is active. When no terminal input is received, the camera will work with the settings of "SCENE1". 23
-
 1
1 -
2
-
3
-
4
-
5
-
6
-
7
-
8
-
9
-
10
-
11
-
12
-
13
-
14
-
15
-
16
-
17
-
 18
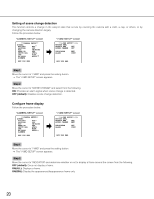
18 -
 19
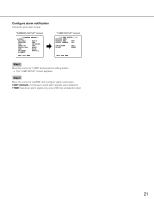
19 -
 20
20 -
 21
21 -
 22
22 -
 23
23 -
 24
24 -
 25
25 -
 26
26 -
 27
27 -
 28
28 -
29
-
30
-
31
-
32
-
33
-
34
-
35
 |
 |