Philips CDR795 User manual - Page 9
Connections - recorder
 |
View all Philips CDR795 manuals
Add to My Manuals
Save this manual to your list of manuals |
Page 9 highlights
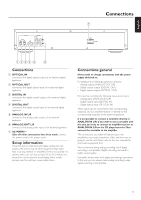
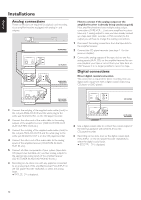
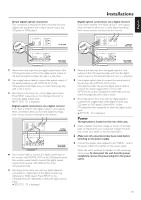
English DIGITAL ANALOG OPTICAL IN OUT IN OUT L R IN OUT Connections 7 ~ AC MAINS 1234 5 6 Connections 1 OPTICAL IN connect to the digital optical output of an external digital appliance 2 OPTICAL OUT connect to the digital optical input of an external digital appliance 3 DIGITAL IN connect to the digital coaxial output of an external digital appliance 4 DIGITAL OUT connect to the digital coaxial input of an external digital appliance 5 ANALOG IN L/R connect to the analog audio output of an external appliance 6 ANALOG OUT L/R connect to the analog audio input of an external appliance 7 AC MAINS ~ After all other connections have been made, connect the power cord to the power outlet. Setup information Place the unit on a flat, hard and stable surface. Do not position the unit on top of other equipment that might heat it up (e.g. receiver or amplifier). If the unit is placed in a cabinet, make sure to leave at least 3.5 cm (1.5 inches) free around the unit to prevent overheating. Active mobile phones near the unit may cause malfunctions. Connections general Never make or change connections with the power supply switched on. For playback the following outputs are present: - Analog output (ANALOG OUT L/R) - Digital coaxial output (DIGITAL OUT) - Digital optical output (OPTICAL OUT) For external recording the following inputs are present: - Analog input (ANALOG IN L/R) - Digital coaxial input (DIGITAL IN) - Digital optical input (OPTICAL IN) These inputs can be connected to the corresponding output(s) of your amplifier/receiver or directly to the corresponding output(s) of the external appliance. It is not possible to connect a turntable directly to ANALOG IN L/R. If you wish to use a turntable with the unit, you have to connect an amplifier/receiver to ANALOG IN L/R on the CD player/recorder.Then connect the turntable to the amplifier. The connections you make will depend upon the possibilities your audio equipment offers and how you are going to use the unit. Please refer to the user manuals for your audio equipment first. We recommend doing analog recording only if digital recording is not possible. Digital recording will result in better sound quality. If possible, always make both digital and analog connections. In this way you can always make analog recordings when digital recording is not possible. 9
-
 1
1 -
2
-
3
-
 4
4 -
 5
5 -
 6
6 -
 7
7 -
 8
8 -
 9
9 -
 10
10 -
 11
11 -
 12
12 -
 13
13 -
 14
14 -
15
-
16
-
17
-
18
-
19
-
20
-
21
-
22
-
23
-
24
-
25
-
26
-
27
-
28
-
29
-
30
-
31
-
32
-
33
-
34
-
35
-
36
-
37
-
38
-
39
-
40
-
41
-
42
-
43
-
44
-
45
-
46
-
47
-
48
-
49
-
50
-
51
-
52
-
53
-
54
-
55
-
56
-
57
-
58
-
59
-
60
-
61
-
62
-
63
-
64
-
65
-
66
-
67
-
68
-
69
-
70
-
71
-
72
 |
 |
