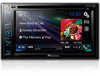
Pioneer AVH-270BT Owners Manual - Page 26
Audio adjustments - power off
 |
View all Pioneer AVH-270BT manuals
Add to My Manuals
Save this manual to your list of manuals |
Page 26 highlights
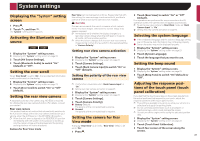
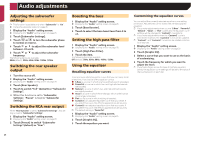
Audio adjustments Adjusting the subwoofer settings p This function is available only when "Subwoofer" is "On". Using the subwoofer output on page 25 1 Display the "Audio" setting screen. Displaying the "Audio" setting screen on page 25 2 Touch [Subwoofer Settings]. 3 Touch or to turn the subwoofer phase to normal or reverse. 4 Touch or to adjust the subwoofer level between -24 and 6. 5 Touch or to adjust the subwoofer frequency. The following items are available: 80Hz(default), 50Hz, 63Hz, 80Hz, 100Hz, 125Hz. Switching the rear speaker output 1 Turn the source off. 2 Display the "Audio" setting screen. Displaying the "Audio" setting screen on page 25 3 Touch [Rear Speaker]. 4 Touch to switch "Full" (default) or "Subwoofer Settings". When this function is set to "Subwoofer Settings", "Preout" is fixed to "Subwoofer Settings". Switching the RCA rear output When "Rear Speaker" is set to "Subwoofer Settings", this setting is fixed to "Subwoofer Settings". 1 Display the "Audio" setting screen. Displaying the "Audio" setting screen on page 25 2 Touch [Preout] to switch "Subwoofer Settings"(default) or "Rear". Boosting the bass 1 Display the "Audio" setting screen. Displaying the "Audio" setting screen on page 25 2 Touch [Bass Booster]. 3 Touch to select the bass boost level from 0 to +6. Setting the high pass filter 1 Display the "Audio" setting screen. Displaying the "Audio" setting screen on page 25 2 Touch [High Pass Filter]. 3 Touch the item. The following items are available: Off(default), 50Hz, 63Hz, 80Hz, 100Hz, 125Hz. Using the equalizer Recalling equalizer curves There are seven stored equalizer curves that you can easily recall at any time. Here is a list of the equalizer curves: ● S.Bass is a curve in which only low-pitched sound is boosted. ● Powerful is a curve in which low- and high-pitched sounds are boosted. ● Natural is a curve in which low- and high-pitched sounds are slightly boosted. ● Vocal is a curve in which the midrange, which is the human vocal range, is boosted. ● Flat is a flat curve in which nothing is boosted. ● Custom1 is an adjusted equalizer curve that you create. If you select this curve, the effect is applied to all AV sources. ● Custom2 is an adjusted equalizer curve that you create. If you select this curve, the effect is applied to all AV sources. p The default setting is "Powerful". 1 Display the "Audio" setting screen. Displaying the "Audio" setting screen on page 25 2 Touch [Graphic EQ]. 3 Touch the equalizer you want. Customizing the equalizer curves You can adjust the currently selected equalizer curve setting as desired. Adjustments can be made with a 5-band graphic equalizer. p If you make adjustments when a curve "S.Bass", "Powerful", "Natural", "Vocal", or "Flat" is selected, the equalizer curve settings will be changed to "Custom1" mandatorily. p If you make adjustments when the "Custom2" curve is selected for example, the "Custom2" curve will be updated. p "Custom1" and "Custom2" curves can be created common to all sources. 1 Display the "Audio" setting screen. Displaying the "Audio" setting screen on page 25 2 Touch [Graphic EQ]. 3 Select a curve that you want to use as the basis of customizing. 4 Touch the frequency for which you want to adjust the level. p If you trail a finger across the bars of multiple equalizer bands, the equalizer curve settings will be set to the value of the touched point on each bar. 26
-
 1
1 -
2
-
3
-
4
-
5
-
6
-
7
-
8
-
9
-
10
-
11
-
12
-
13
-
14
-
15
-
16
-
17
-
18
-
19
-
20
-
 21
21 -
 22
22 -
 23
23 -
 24
24 -
 25
25 -
 26
26 -
 27
27 -
 28
28 -
 29
29 -
 30
30 -
 31
31 -
32
-
33
-
34
-
35
-
36
-
37
-
38
-
39
-
40
-
41
-
42
-
43
-
44
-
45
-
46
-
47
-
48
-
49
-
50
-
51
-
52
-
53
-
54
-
55
-
56
-
57
-
58
-
59
-
60
-
61
-
62
-
63
-
64
-
65
-
66
-
67
-
68
-
69
-
70
-
71
-
72
-
73
-
74
-
75
-
76
-
77
-
78
-
79
-
80
-
81
-
82
-
83
-
84
-
85
-
86
-
87
-
88
-
89
-
90
-
91
-
92
-
93
-
94
-
95
-
96
-
97
-
98
-
99
-
100
-
101
-
102
-
103
-
104
-
105
-
106
-
107
-
108
-
109
-
110
-
111
-
112
-
113
-
114
-
115
-
116
-
117
-
118
-
119
-
120
-
121
-
122
-
123
-
124
-
125
-
126
-
127
-
128
-
129
-
130
-
131
-
132
-
133
-
134
-
135
-
136
-
137
-
138
-
139
-
140
 |
 |
