Pioneer PDP-42A3HD Owner's Manual - Page 23
Menu Setup
 |
View all Pioneer PDP-42A3HD manuals
Add to My Manuals
Save this manual to your list of manuals |
Page 23 highlights
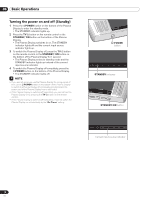
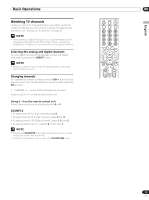
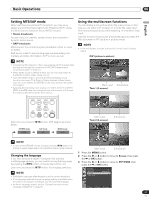
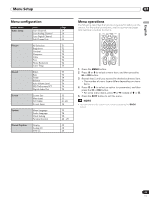
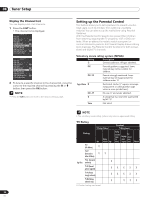
Menu Setup 07 English Menu configuration Home Menu Tuner Setup Item Scan Channels Scan Analog Channel Scan Digital Channel Edit Channel List Picture AV Selection Brightness Contrast Sharpness Color Tint Noise Reduction Color Temp Sound Effect Bass Treble Balance Auto Volume Level SRS TruSurround XT Digital Audio Out Screen Screen Size Main Input PIP/TWIN Screen Saver System Menu Language Audio Language Clock Setting Parental Control Closed Caption Display Analog CC DTV CC Page 24 24 25 25 31 32 32 32 32 32 32 33 33 34 34 34 34 34 34 35 35 21, 22 36 35 36 30 26 - 29 29 29 29 Menu operations The following describes the typical procedure for setting up the menus. For the actual procedures, see the appropriate pages that describe individual functions. C.C. FAVORITE CH SLEEP DISPLAY OK CH RETURN EXIT BACK MENU CH MUTING VOL 1 Press the MENU button. 2 Press c or d to select a menu item, and then press the \ or OK button. 3 Repeat step 2 until you access the desired submenu item. • The number of menu layers differs depending on menu items. 4 Press c or d to select an option (or parameter), and then press the \ or OK button. • For some menu items, press [ or \ instead of c or d. 5 Press the EXIT button to exit the menu. • You can return to the upper menu levels by pressing the BACK button. 23 En
-
 1
1 -
2
-
3
-
4
-
5
-
6
-
7
-
8
-
9
-
10
-
11
-
12
-
13
-
14
-
15
-
16
-
17
-
 18
18 -
 19
19 -
 20
20 -
 21
21 -
 22
22 -
 23
23 -
 24
24 -
 25
25 -
 26
26 -
 27
27 -
 28
28 -
29
-
30
-
31
-
32
-
33
-
34
-
35
-
36
-
37
-
38
-
39
-
40
-
41
-
42
-
43
-
44
-
45
-
46
-
47
-
48
-
49
-
50
-
51
-
52
-
53
-
54
-
55
-
56
-
57
-
58
-
59
-
60
-
61
-
62
-
63
-
64
-
65
-
66
-
67
-
68
-
69
-
70
-
71
-
72
-
73
-
74
-
75
-
76
-
77
-
78
-
79
-
80
-
81
-
82
-
83
-
84
-
85
-
86
-
87
-
88
-
89
-
90
-
91
-
92
-
93
-
94
-
95
-
96
-
97
-
98
-
99
-
100
-
101
-
102
-
103
-
104
-
105
-
106
-
107
-
108
-
109
-
110
-
111
-
112
-
113
-
114
-
115
-
116
-
117
-
118
-
119
-
120
-
121
-
122
-
123
-
124
-
125
-
126
-
127
-
128
-
129
-
130
-
131
-
132
-
133
-
134
 |
 |
