Pioneer PDP-42A3HD Owner's Manual - Page 32
Brightness, Contrast, Sharpness, Color
 |
View all Pioneer PDP-42A3HD manuals
Add to My Manuals
Save this manual to your list of manuals |
Page 32 highlights
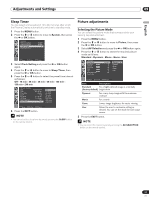
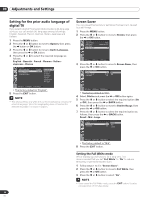
09 Adjustments and Settings Customizing the Picture Settings This Plasma Display has several setting options that allow you to control the picture quality. 1 Press the MENU button. 2 Press the c or d button to move to Picture, then press the a or OK button. 3 Press the c or d button to select the required option as follows, then press the a or OK button. Brightness - Contrast - Sharpness - Color - Tint Picture AV Selection Brightness Contrast Sharpness Color Tint Noise Reduction Color Temp Standard 30 30 30 30 30 Off Move Enter Return Brightness 30 A horizontal bar is displayed. Press the b or a button until you reach the optimal setting. To select other options, press the c or d button. Item | button \ button Brightness For less brightness For more brightness Contrast For less contrast For more contrast Sharpness Color For less sharpness For less color intensity For more sharpness For more color intensity Tint Skin tones become Skin tones become purplish greenish 4 Press the BACK or MENU button to return to the picture menu. 5 Press the EXIT button. Using the Noise Reduction Feature 1 Press the MENU button. 2 Press the c or d button to move to Picture, then press the a or OK button. 3 Press the c or d button to move to Noise Reduction, then press the a or OK button. 4 Press the c or d button to select the required option as follows: On - Off Picture AV Selection Brightness Contrast Sharpness Color Tint Noise Reduction Color Temp Standard On 30 Off 30 30 30 30 Off Move Enter Return 5 Press the EXIT button. • If you make any changes to the options, "AV Selection" is automatically switched to "User". • If you make any changes to the options, the picture mode is automatically switched to User. 32 En
-
 1
1 -
2
-
3
-
4
-
5
-
6
-
7
-
8
-
9
-
10
-
11
-
12
-
13
-
14
-
15
-
16
-
17
-
18
-
19
-
20
-
21
-
22
-
23
-
24
-
25
-
26
-
 27
27 -
 28
28 -
 29
29 -
 30
30 -
 31
31 -
 32
32 -
 33
33 -
 34
34 -
 35
35 -
 36
36 -
 37
37 -
38
-
39
-
40
-
41
-
42
-
43
-
44
-
45
-
46
-
47
-
48
-
49
-
50
-
51
-
52
-
53
-
54
-
55
-
56
-
57
-
58
-
59
-
60
-
61
-
62
-
63
-
64
-
65
-
66
-
67
-
68
-
69
-
70
-
71
-
72
-
73
-
74
-
75
-
76
-
77
-
78
-
79
-
80
-
81
-
82
-
83
-
84
-
85
-
86
-
87
-
88
-
89
-
90
-
91
-
92
-
93
-
94
-
95
-
96
-
97
-
98
-
99
-
100
-
101
-
102
-
103
-
104
-
105
-
106
-
107
-
108
-
109
-
110
-
111
-
112
-
113
-
114
-
115
-
116
-
117
-
118
-
119
-
120
-
121
-
122
-
123
-
124
-
125
-
126
-
127
-
128
-
129
-
130
-
131
-
132
-
133
-
134
 |
 |
