Pioneer PDP-503CMX Operating Instructions - Page 8
Connections and System, Settings - pdp parts
 |
View all Pioneer PDP-503CMX manuals
Add to My Manuals
Save this manual to your list of manuals |
Page 8 highlights
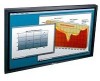
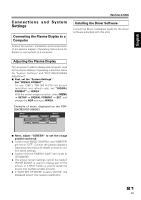
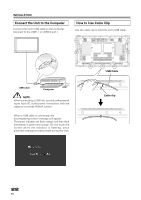
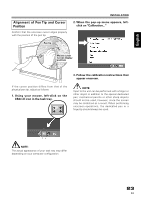
Chinese Español Nederlands Italiano Deutsch Français English Connections and System Settings Connecting the Plasma Display to a Computer Consult the section "Installation and Connections" of the plasma display's Operating Instructions for details on connections to a computer. INSTALLATION Installing the Driver Software Consult the Driver Installation Guide for the driver software (provided with this unit). Adjusting the Plasma Display Turn on power to plasma display and computer. Look at the plasma display's Operating Instruction items for "System Settings" and "PICTURE/SCREEN Adjustment". 7 First, set the "System Settings". Set "SIGNAL FORMAT". To use 1280 x 768 (60 Hz/70 Hz) screen resolution and refresh rate, set "SIGNAL FORMAT" to "WXGA." With the screen image turned on, select MENU = SETUP = SIGNAL FORMAT = SET, and change the XGA setting to WXGA. Example of menu displayed on the PDP504CMX/PDP-50MXE1 MENU INPUT1 PICTURE SCREEN SETUP OPTION POWER MANAGEMENT CLAMP POSITION SIGNAL FORMAT : OFF : AUTO : XGA 7 Next, adjust "SCREEN" to set the image position and clock. ÷ Confirm that "MASK CONTROL" and "ORBITER" are set to "OFF". Consult the plasma display's Operating Instructions for details on how to confirm these settings. ÷ Confirm that the "ENERGY SAVE" item is set to "STANDARD". ÷ The proper screen settings cannot be made if "POINT ZOOM" is used to enlarge part of the screen, or if SPLIT button is used to divide the screen into multiple smaller screens. ÷ If "AUTO SET UP MODE" is set to "ACTIVE", the displayed screen may require recalibration. 21 En
-
 1
1 -
2
-
 3
3 -
 4
4 -
 5
5 -
 6
6 -
 7
7 -
 8
8 -
 9
9 -
 10
10 -
 11
11 -
 12
12 -
 13
13 -
14
-
15
-
16
-
17
-
18
-
19
-
20
-
21
-
22
-
23
-
24
-
25
-
26
-
27
-
28
-
29
-
30
-
31
-
32
-
33
-
34
-
35
-
36
-
37
-
38
-
39
-
40
-
41
-
42
-
43
-
44
-
45
-
46
-
47
-
48
-
49
-
50
-
51
-
52
-
53
-
54
-
55
-
56
-
57
-
58
-
59
-
60
-
61
-
62
-
63
-
64
-
65
-
66
-
67
-
68
-
69
-
70
-
71
-
72
-
73
-
74
-
75
-
76
-
77
-
78
-
79
-
80
-
81
-
82
-
83
-
84
-
85
-
86
-
87
-
88
-
89
-
90
-
91
-
92
-
93
-
94
-
95
-
96
-
97
-
98
-
99
 |
 |
