Pioneer PRO-1000HD Owner's Manual - Page 36
AUTO FUNCTION, Audio Output AUDIO OUT
 |
View all Pioneer PRO-1000HD manuals
Add to My Manuals
Save this manual to your list of manuals |
Page 36 highlights
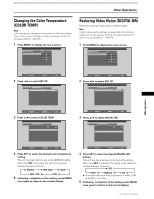
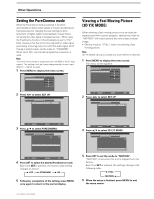
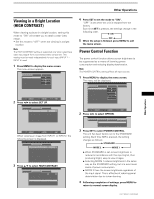
Other Operations AUTO FUNCTION This display is equipped with an optional AUTO FUNCTION selector. When enabled, the selector automatically switches the display's input source to INPUT 1 or INPUT 4 when an image signal is detected at the INPUT 1 jack or the INPUT 4 jack. 1 Press MENU; The onscreen menu will be displayed. MAIN MENU INPUT1 PICTURE SCREEN CONT RAST BR I GHT . R. L EVEL G. L E V E L B. L EVEL H. E NHANCE V. ENHANCE :0 :0 : +60 : +60 : +60 :0 :0 SET UP OPTION RE S ET 2 Press 2/3 to select OPTION. MAIN MENU INPUT1 PICTURE SCREEN SET UP OPTION POWER CONT R OL : S T A NDA RD AUT O F U NCT I ON : OF F AUD I O OUT :F I XED 3 Press 5/∞ to select AUTO FUNCTION. MAIN MENU INPUT1 PICTURE SCREEN SET UP OPTION POWER CONT R OL : S T ANDARD A UT O F U NCT I ON : OF F AUD I O OUT :F I XED 4 Press SET to select INPUT 1 or INPUT 4. The factory default setting is OFF. Each time SET is pressed the selector function switches alternately as shown: 3 OFF INPUT4 2 INPUT1 2 ÷ When OFF is selected, AUTO FUNCTION is disabled. ÷ When INPUT 1 or INPUT 4 is selected, the display input automatically switches to the selected input jack when a signal is detected at the selected jack. Thereafter, the input will not change even if the INPUT button is pressed on the remote control unit or main unit operation panel. (In this case, "AUTO" will be displayed on the screen.) Once the function has switched to the selected input by operation of the AUTO FUNCTION facility, if the input signal is no longer detected at the selected input jack, the function will automatically switch back to the original input source used before the AUTO FUNCTION facility was enabled. 5 Following completion of settings, press MENU again to return the display to its normal screen. Note The AUTO FUNCTION for INPUT1 is supported only when a separate SYNC or composite SYNC analog RGB signal is input. (When a G on SYNC or component video signal is input, AUTO FUNCTION is disable.) 32 PRO-1000HD / PRO-800HD Audio Output (AUDIO OUT) The signal level produced at the AUDIO OUT terminal can be set to FIXED or VARIABLE (linked to the VOLUME) as desired. Note The AUDIO OUT setting affects all input sources (INPUT1- 4). 1 Press MENU; The onscreen menu will be displayed. MAIN MENU PICTURE SCREEN CONT RAST BR I GHT . R. L EVEL G. L E V E L B. L EVEL H. E NHANCE V. ENHANCE :0 :0 : +60 : +60 : +60 :0 :0 SET UP INPUT1 OPTION RE S ET SELECT SET ENTER MENU EXIT 2 Press 2/3 to select OPTION. MAIN MENU INPUT1 PICTURE SCREEN SET UP OPTION POWER CONT R OL : S T A NDA RD AUT O F U NCT I ON : OF F AUD I O OUT :F I XED SELECT SET CHANGE MENU EXIT 3 Press 5/∞ to select AUDIO OUT. MAIN MENU INPUT1 PICTURE SCREEN SET UP OPTION POWER CONT R OL : S T ANDARD AUT O F U NCT I ON : OF F A UD I O OUT : F I XED SELECT SET CHANGE MENU EXIT 4 Press SET to select the desired audio level setting. The factory default setting is FIXED. Each time SET is pressed, the function alternates as shown: 3 FIXED VARIABLE 2 ÷ When FIXED is selected, the audio output volume will not change, even if the setting of the display's VOLUME function is later changed. ÷ When VARIABLE is selected, the level of the output signal changes in accordance with the setting of the VOLUME function. 5 Following completion of settings, press MENU to return to normal screen display.
-
 1
1 -
2
-
3
-
4
-
5
-
6
-
7
-
8
-
9
-
10
-
11
-
12
-
13
-
14
-
15
-
16
-
17
-
18
-
19
-
20
-
21
-
22
-
23
-
24
-
25
-
26
-
27
-
28
-
29
-
30
-
 31
31 -
 32
32 -
 33
33 -
 34
34 -
 35
35 -
 36
36 -
 37
37 -
 38
38 -
 39
39 -
 40
40 -
 41
41 -
42
-
43
-
44
 |
 |
