Pioneer PRO-1000HD Owner's Manual - Page 8
Part Names and Functions
 |
View all Pioneer PRO-1000HD manuals
Add to My Manuals
Save this manual to your list of manuals |
Page 8 highlights
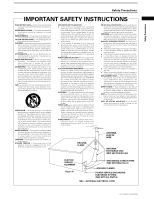
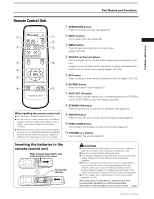
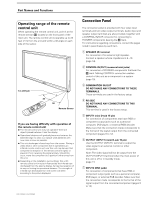
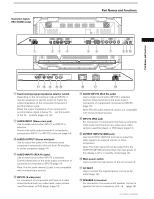
Part Names and Functions Main Unit Main unit 1 Operation panel on the main unit 3 4 5 6 7 8 9 2 Main unit 1 STANDBY/ON indicator This indicator is red during standby mode, and turns to green when the unit is in the operation mode (page 20). Flashes green when Power-Management function is operating (page 24). The flashing pattern is also used to indicate error messages (page 35). 2 Remote control sensor Point the remote control toward the remote sensor to operate the unit (page 6). Operation panel on the main unit 3 STANDBY/ON button Press to put the display in operation or standby mode (page 20). 4 INPUT button Press to select input (page 20). 5 MENU button Press to open and close the on-screen menu (pages 18 to 32). 6 ADJUST (5/∞/3/2) buttons Use to navigate menu screens and to adjust various settings on the unit. Usage of cursor buttons within operations is clearly indicated in the on-screen display (pages 18 to 32). 7 SET button Press to adjust or enter various settings on the unit (pages 18 to 32). 8 SCREEN SIZE button Press to select the screen size (page 22). 9 AUTO SET UP button When using computer signal input, automatically sets the POSITION and CLOCK/PHASE to optimum values (page 26). 4 PRO-1000HD / PRO-800HD
-
 1
1 -
2
-
 3
3 -
 4
4 -
 5
5 -
 6
6 -
 7
7 -
 8
8 -
 9
9 -
 10
10 -
 11
11 -
 12
12 -
 13
13 -
14
-
15
-
16
-
17
-
18
-
19
-
20
-
21
-
22
-
23
-
24
-
25
-
26
-
27
-
28
-
29
-
30
-
31
-
32
-
33
-
34
-
35
-
36
-
37
-
38
-
39
-
40
-
41
-
42
-
43
-
44
 |
 |
