Pioneer SC-85 Owner's Manual - Page 106
Network Setup menu
 |
View all Pioneer SC-85 manuals
Add to My Manuals
Save this manual to your list of manuals |
Page 106 highlights
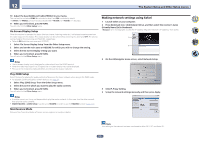
12 The System Setup and Other Setup menus If you select NO for the subwoofer the front speakers will automatically be fixed to LARGE. Also, the center, surround, surround back, front height and front wide speakers can't be set to LARGE if the front speakers are set to SMALL. In this case, all bass frequencies are sent to the subwoofer. 3 Select 'X. OVER' and set the crossover frequency. Frequencies below this point will be sent to the subwoofer (or LARGE speakers). ! This setting decides the cutoff between bass sounds playing back from the speakers selected as LARGE, or the subwoofer, and bass sounds playing back from those selected as SMALL. It also decides where the cutoff will be for bass sounds in the LFE channel. ! With Full Auto MCACC setup or Auto MCACC setup (ALL or Speaker Setting), the setting here will not apply and the crossover frequency will be automatically set. Crossover frequency is a frequency aimed at achieving the optimal sound field taking into account the bass capacity of all connected speakers and human aural characteristics. 4 When you're finished, press RETURN. You will return to the Manual SP Setup menu. Channel Level Using the channel level settings, you can adjust the overall balance of your speaker system, an important factor when setting up a home theater system. 1 Select 'Channel Level' from the Manual SP Setup menu. The test tones will start. 2 Adjust the level of each channel using k/l. Use i/j to switch speakers. Adjust the level of each speaker as the test tone is emitted. ! If you are using a Sound Pressure Level (SPL) meter, take the readings from your main listening position and adjust the level of each speaker to 75 dB SPL (C-weighting/slow reading). 3 When you're finished, press RETURN. You will return to the Manual SP Setup menu. Speaker Distance For good sound depth and separation from your system, you need to specify the distance of your speakers from the listening position. (When Dolby Enabled Speaker is used, specify the distance reached by the speaker sound reflected at the ceiling (page 24) .) The receiver can then add the proper delay needed for effective surround sound. 1 Select 'Speaker Distance' from the Manual SP Setup menu. 2 Adjust the distance of each speaker using k/l. You can adjust the distance of each speaker in 1/2 inch Increments. 3 When you're finished, press RETURN. You will return to the Manual SP Setup menu. Note For best surround sound, make sure the surround back speakers are the same distance from the listening position. X-Curve Most soundtracks mixed for cinema sound too bright when played back in large rooms. The X-Curve setting acts as a kind of re-equalization for home theater listening, and restores proper tonal balance of movie soundtracks. 1 Select 'X-Curve' from the Manual SP Setup menu. 2 Choose the X-Curve setting you want. Use k/l to adjust the setting. The X-Curve is expressed as a downwards slope in decibels per octave, starting at 2 kHz. The sound becomes less bright as the slope increases (to a maximum of -3.0dB/oct). Use the following guidelines to set the X-Curve according to your room size: Room size (ft2) ≤400 ≤550 ≤650 ≤800 ≤3200 ≤12000 X-Curve (dB/oct) -0.5 -1.0 -1.5 -2.0 -2.5 -3.0 ! If you select OFF, the frequency curve will be flat and the X-Curve has no effect. 3 When you're finished, press RETURN. Network Setup menu Make the settings for connecting the receiver to the Internet and using the network functions. 1 Press MAIN RECEIVER to switch the remote control to the receiver operation mode, and then press HOME MENU. A Graphical User Interface (GUI) screen appears on your TV. Use i/j/k/l and ENTER to navigate through the screens and select menu items. Press RETURN to exit the current menu. 2 Select 'System Setup' from the HOME MENU. 3 Select 'Network Setup' from the System Setup menu. 4 Select the setting you want to adjust. If you are doing this for the first time, you may want to adjust these settings in order: ! IP Address, Proxy - Sets up the IP address/Proxy of this receiver (page 106 ). ! Network Standby - Even when the unit is in standby mode, it is possible to turn on the power of the unit from iControlAV5 (page 107 ). ! Friendly Name - The name of the receiver displayed on a computer or other device connected to the network can be changed (page 107 ). ! Parental Lock - Restricts usage of network functions (page 107 ). ! Port Number Setting - Sets the numbers of the ports where signals from IP Control are received (page 107 ). IP address/Proxy setting In case the router connected to the LAN terminal on this receiver is a broadband router (with a built-in DHCP server function), simply turn on the DHCP server function, and you will not need to set up the network manually. You must set up the network as described below only when you have connected this receiver to a broadband router without a DHCP server function. Before you set up the network, consult with your ISP or the network manager for the required settings. It is advised that you also refer to the operation manual supplied with your network component. ! In case you make changes to the network configuration without the DHCP server function, make the corre- sponding changes to the network settings of this receiver. 106
-
 1
1 -
2
-
3
-
4
-
5
-
6
-
7
-
8
-
9
-
10
-
11
-
12
-
13
-
14
-
15
-
16
-
17
-
18
-
19
-
20
-
21
-
22
-
23
-
24
-
25
-
26
-
27
-
28
-
29
-
30
-
31
-
32
-
33
-
34
-
35
-
36
-
37
-
38
-
39
-
40
-
41
-
42
-
43
-
44
-
45
-
46
-
47
-
48
-
49
-
50
-
51
-
52
-
53
-
54
-
55
-
56
-
57
-
58
-
59
-
60
-
61
-
62
-
63
-
64
-
65
-
66
-
67
-
68
-
69
-
70
-
71
-
72
-
73
-
74
-
75
-
76
-
77
-
78
-
79
-
80
-
81
-
82
-
83
-
84
-
85
-
86
-
87
-
88
-
89
-
90
-
91
-
92
-
93
-
94
-
95
-
96
-
97
-
98
-
99
-
100
-
 101
101 -
 102
102 -
 103
103 -
 104
104 -
 105
105 -
 106
106 -
 107
107 -
 108
108 -
 109
109 -
 110
110 -
 111
111 -
112
-
113
-
114
-
115
-
116
-
117
-
118
-
119
-
120
-
121
-
122
-
123
-
124
-
125
-
126
-
127
-
128
-
129
-
130
-
131
-
132
-
133
-
134
-
135
-
136
-
137
 |
 |
