Pioneer SC-85 Owner's Manual - Page 111
Making network settings using Safari
 |
View all Pioneer SC-85 manuals
Add to My Manuals
Save this manual to your list of manuals |
Page 111 highlights
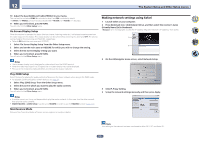
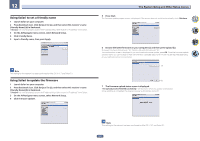
12 The System Setup and Other Setup menus 10 Adjust the bass (BASS) and treble (TREBLE) to your tastes. This can only be set when ZONE 2 is selected in step 2 and ON is selected in step 8. The BASS and TREBLE can each be adjusted between -10.0dB and +10.0dB, in 1 dB steps. 11 When you're finished, press RETURN. You will return to the Other Setup menu. On Screen Display Setup When the receiver is operated, its status (the input name, listening mode, etc.) is displayed superimposed over the video output on the display. This status display can be turned off by switching this setting to OFF. The setting can be made for the main zone and HDZONE, respectively. ! Default: ON (both the main zone and HDZONE) 1 Select 'On Screen Display Setup' from the Other Setup menu. 2 Select and set the main zone or HDZONE for which you wish to change the setting. 3 Select the On Screen Display setting you want. 4 When you're finished, press RETURN. You will return to the Other Setup menu. Notes ! The on-screen display is only displayed for video output from the HDMI terminal. ! When the video input signal is a 3D signal, the on-screen display may not be displayed. ! The size of the characters displayed differs according to the output resolution. Play ZONE Setup Select the zone for playing the audio contents of devices in the home network when using in the DMR mode. ! For playable DLNA-compatible network devices, see page 69 . 1 Select 'Play ZONE Setup' from the Other Setup menu. 2 Select the zone in which you want to play the audio contents. 3 When you're finished, press RETURN. You will return to the Other Setup menu. Notes ! If another zone is on, it may not be possible to play the audio contents. In this case, turn the other zone off, then play the audio contents. ! MAIN/HDZONE at ZONE Setup must be set to HDZONE in order to use the HDZONE function (page 110 ). Maintenance Mode Only use this if so instructed by a Pioneer service engineer or custom installer. Making network settings using Safari 1 Launch Safari on your computer. 2 Press Bookmark icon. Click Bonjour list (a), and then select this receiver's name (Friendly Name) (b) in Bookmark. If Bonjour list is not displayed, access the IP address"http://(the receiver's IP address)" from Safari. a b 3 On the AVNavigator menu screen, select Network Setup. 4 Click IP, Proxy Setting. 5 Setup the network settings manually and then press Apply. Note This setting for the network has been confirmed for Mac OS X 10.7 and Safari 5.1. 111
-
 1
1 -
2
-
3
-
4
-
5
-
6
-
7
-
8
-
9
-
10
-
11
-
12
-
13
-
14
-
15
-
16
-
17
-
18
-
19
-
20
-
21
-
22
-
23
-
24
-
25
-
26
-
27
-
28
-
29
-
30
-
31
-
32
-
33
-
34
-
35
-
36
-
37
-
38
-
39
-
40
-
41
-
42
-
43
-
44
-
45
-
46
-
47
-
48
-
49
-
50
-
51
-
52
-
53
-
54
-
55
-
56
-
57
-
58
-
59
-
60
-
61
-
62
-
63
-
64
-
65
-
66
-
67
-
68
-
69
-
70
-
71
-
72
-
73
-
74
-
75
-
76
-
77
-
78
-
79
-
80
-
81
-
82
-
83
-
84
-
85
-
86
-
87
-
88
-
89
-
90
-
91
-
92
-
93
-
94
-
95
-
96
-
97
-
98
-
99
-
100
-
101
-
102
-
103
-
104
-
105
-
 106
106 -
 107
107 -
 108
108 -
 109
109 -
 110
110 -
 111
111 -
 112
112 -
 113
113 -
 114
114 -
 115
115 -
 116
116 -
117
-
118
-
119
-
120
-
121
-
122
-
123
-
124
-
125
-
126
-
127
-
128
-
129
-
130
-
131
-
132
-
133
-
134
-
135
-
136
-
137
 |
 |
