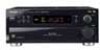
Pioneer VSX-36TX Owner's Manual - Page 30
Go on to the next to continue set up.
 |
View all Pioneer VSX-36TX manuals
Add to My Manuals
Save this manual to your list of manuals |
Page 30 highlights
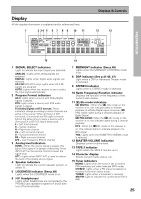
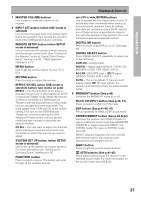
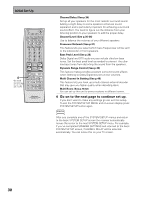
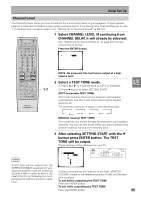
Initial Set Up Î S0URCE MULTI OPERATION USE SETUP SYSTEM OFF RECEIVER DVD/LD TV/SAT VCR1 VCR2 MULTI CONTROL CD MD/ TAPE1 TUNER TVCONT CLASS MPX BAND DIRECT ACCESS ¶ 7 38 - TUNING + - + STATION 1¡ DTV ON/OFF DTV MENU 4¢ - + CHANNEL 123 456 7 GUIDE +10 + TV VOL - 8 0 TV TV CONTROL TV FUNC 9 EXIT ENTER DISC + VOLUME - 4 (to exit SYSTEM SETUP) REMOTE SETUP INPUT ATT SYSTEM SETUP EFFECT/ CH SEL MENU + MUTE FUNCTION DIGITAL NR ENTER - SIGNAL SELECT MIDNIGHT LIGHT MULTI CH INPUT THX DSP /DTS ADVANCED STEREO/ DIRECT STANDARD AV PRE-PROGRAMMED AND LEARNING REMOTE CONTROL UNIT Channel Delay (See p.34) Set up all your speakers for the most realistic surround sound. Adding a slight delay to some speakers enhances sound separation and is particularly important for achieving a surround sound effect. You need to figure out the distance from your listening position to your speakers to add the proper delay. Channel Level (See p.35-36) Use to balance the volumes of your different speakers. Crossover Network (See p.37) This feature lets you select which bass frequencies will be sent to the subwoofer or front speakers. Bass Peak Level (See p.38) Dolby Digital and DTS audio sources include ultra-low bass tones. Set the bass peak level as needed to prevent the ultralow bass tones from distorting the sound from the speakers. Dynamic Range Control (See p.39) This feature makes possible excellent surround sound effects when listening to Dolby Digital sources at low volumes. Multi Channel In Setting (See p.40) This feature lets you hook up a multi channel external decoder that may give you higher quality when decoding discs. Multi-Room (See p.78-82) You can set up this unit to power systems in different rooms. 4 Go on to the next page to continue set up. If you don't want to make any settings go can exit this setup. To exit the SYSTEM SETUP MENU and on-screen display press SYSTEM SETUP button again. memo After you complete one of the SYSTEM SETUP menus and return to the basic SYSTEM SETUP screen the receiver automatically moves the cursor to the next SYSTEM SETUP menu. For example, if you've completed SPEAKER SETTINGS and returned to the basic SYSTEM SETUP screen, CHANNEL DELAY will be selected automatically. You can notice this on your TV screen. 30
-
 1
1 -
2
-
3
-
4
-
5
-
6
-
7
-
8
-
9
-
10
-
11
-
12
-
13
-
14
-
15
-
16
-
17
-
18
-
19
-
20
-
21
-
22
-
23
-
24
-
 25
25 -
 26
26 -
 27
27 -
 28
28 -
 29
29 -
 30
30 -
 31
31 -
 32
32 -
 33
33 -
 34
34 -
 35
35 -
36
-
37
-
38
-
39
-
40
-
41
-
42
-
43
-
44
-
45
-
46
-
47
-
48
-
49
-
50
-
51
-
52
-
53
-
54
-
55
-
56
-
57
-
58
-
59
-
60
-
61
-
62
-
63
-
64
-
65
-
66
-
67
-
68
-
69
-
70
-
71
-
72
-
73
-
74
-
75
-
76
-
77
-
78
-
79
-
80
-
81
-
82
-
83
-
84
-
85
-
86
-
87
-
88
-
89
-
90
-
91
-
92
 |
 |
