Pioneer VSX-36TX Owner's Manual - Page 46
Playing Stereo Sources
 |
View all Pioneer VSX-36TX manuals
Add to My Manuals
Save this manual to your list of manuals |
Page 46 highlights
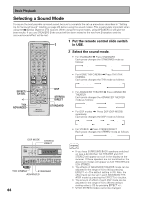
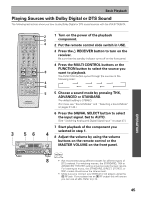
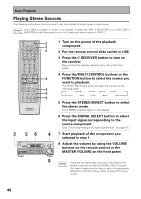
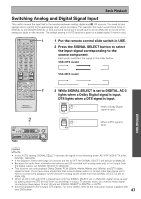
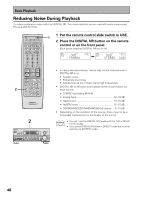
Basic Playback Playing Stereo Sources The following instructions show you how to use the receiver for stereo audio or audio-visual. memo If the TAPE 2 indicator is visible in the display, it means the TAPE 2 MONITOR is on. Press TAPE 2 MONITOR on the front panel to turn it off unless you want to listen to TAPE 2. Î S0URCE MULTI OPERATION USE SETUP SYSTEM OFF RECEIVER DVD/LD TV/SAT VCR1 VCR2 MULTI CONTROL CD MD/ TAPE1 TUNER TVCONT CLASS MPX BAND DIRECT ACCESS ¶ 7 38 - TUNING + - + STATION 1¡ DTV ON/OFF DTV MENU 4¢ - + CHANNEL 123 456 7 GUIDE +10 + TV VOL - 8 0 TV TV CONTROL TV FUNC 9 EXIT ENTER DISC + VOLUME - REMOTE SETUP INPUT ATT SYSTEM SETUP EFFECT/ CH SEL MENU + MUTE FUNCTION DIGITAL NR ENTER - SIGNAL SELECT MIDNIGHT LIGHT MULTI CH INPUT THX DSP /DTS ADVANCED STEREO/ DIRECT STANDARD 2 3 4 8 4 6 5 AV PRE-PROGRAMMED AND LEARNING REMOTE CONTROL UNIT 3 56 4 AUDIO/VIDEO MULTI-CHANNEL RECEIVER N∫m¿≤≥ım STANDBY/ON STANDBY DSP MODE STEREO/ DIRECT /DTS THX CINEMA ADVANCED STANDARD MULTI-ROOM &SOURCE CONTROL VIDEO VCR 1/DVR VCR 2 DVD/LD TV/SAT MD/TAPE1/ CD CD-R TUNER PHONO PHONES VIDEO INPUT S-VIDEO VIDEO L AUDIO R MULTI CH INPUT CHANNEL TONE SELECT DIGITAL SIGNAL FL LOUDNESS NR SELECT DIMMER CLASS BAND - TUNING + SPEAKERS - BASS + - TREBLE + VIDEO TAPE 2 SELCT MONITOR MPX TUNER CONTROL MEMORY - STATION + MIN INPUT SELECTOR MASTER VOLUME MAX 8 1 Turn on the power of the playback component. 2 Put the remote control slide switch in USE. 3 Press the RECEIVER button to turn on the receiver. Be sure that the standby indicator turns off on the front panel. 4 Press the MULTI CONTROL buttons or the FUNCTION button to select the source you want to playback. The FUNCTION button cycles through the sources in the following order: DVD/LD TV/SAT CD MD TUNER VCR 2 VCR 1 VIDEO PHONO 5 Press the STEREO/DIRECT button to select the stereo mode. The STEREO indicator lights on the display. 6 Press the SIGNAL SELECT button to select the input signal corresponding to the source component. (See "Switching Analog and Digital Signal Input" on page 47.) 7 Start playback of the component you selected in step 1. 8 Adjust the volume by using the VOLUME buttons on the remote control or the MASTER VOLUME on the front panel. memo If you are not able to get sound from the receiver the problem may well lie with the SIGNAL SELECT switch. You need to make sure the input is set to the appropriate ANALOG or DIGITAL setting. Refer to page 47 for more on this. 46
-
 1
1 -
2
-
3
-
4
-
5
-
6
-
7
-
8
-
9
-
10
-
11
-
12
-
13
-
14
-
15
-
16
-
17
-
18
-
19
-
20
-
21
-
22
-
23
-
24
-
25
-
26
-
27
-
28
-
29
-
30
-
31
-
32
-
33
-
34
-
35
-
36
-
37
-
38
-
39
-
40
-
 41
41 -
 42
42 -
 43
43 -
 44
44 -
 45
45 -
 46
46 -
 47
47 -
 48
48 -
 49
49 -
 50
50 -
 51
51 -
52
-
53
-
54
-
55
-
56
-
57
-
58
-
59
-
60
-
61
-
62
-
63
-
64
-
65
-
66
-
67
-
68
-
69
-
70
-
71
-
72
-
73
-
74
-
75
-
76
-
77
-
78
-
79
-
80
-
81
-
82
-
83
-
84
-
85
-
86
-
87
-
88
-
89
-
90
-
91
-
92
 |
 |
