Pioneer VSX-515-K Owner's Manual - Page 37
Setting up the receiver
 |
View all Pioneer VSX-515-K manuals
Add to My Manuals
Save this manual to your list of manuals |
Page 37 highlights
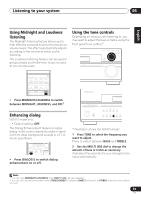
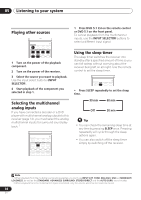
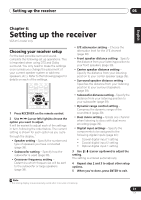
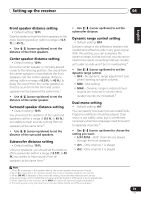
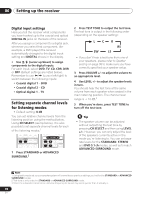
Setting up the receiver 06 English Deutsch Français Italiano Nederlands Español Chapter 6: Setting up the receiver VSX-415 model only Choosing your receiver setup For the best possible surround sound, complete the following set up operations. This is important when using DTS and Dolby surround. You only need to make the settings once (unless you change the placement of your current speaker system or add new speakers, etc.). Refer to the following pages for details on each of the settings. CD-R/ CD TAPE/MD FM AM ADVANCED MIDNIGHT/ STANDARD SURROUND STEREO LOUDNESS TOP MENU SETUP MENU TUNER EXIT DVD ENTER RECEIVER CHSELECT VOLUME MUTE 1 Press RECEIVER on the remote control. 2 Use / (cursor left/right) to choose the option you want to adjust. It will be easiest to adjust each of the settings in turn, following the order below. The current setting is shown for each option as you cycle through the display.1 • Speaker setting - Specify the number and type of speakers you have connected (page 38). • Subwoofer setting - Specify how the subwoofer is used (page 38). • Crossover frequency setting - Determine which frequencies will be sent to the subwoofer or large speakers (page 38). • LFE attenuator setting - Choose the attenuator level for the LFE channel (page 38). • Front speaker distance setting - Specify the distance from your listening position to your front speakers (page 39). • Center speaker distance setting - Specify the distance from your listening position to your center speaker (page 39). • Surround speaker distance setting - Specifies the distance from your listening position to your surround speakers (page 39). • Subwoofer distance setting - Specify the distance from your listening position to your subwoofer (page 39). • Dynamic range control setting - Compress the dynamic range of the soundtrack (page 39). • Dual mono setting - Isolate one channel when listening to discs with dual mono encoding (page 39). • Digital input settings - Specify the components to be assigned to the following digital inputs (page 40): • Coaxial digital input 1 setting • Coaxial digital input 2 setting • Optical digital input 1 setting 3 Use / (cursor up/down) to adjust the setting. The setting is entered automatically. 4 Repeat step 2 and 3 to adjust other setup options. 5 When you're done, press ENTER to exit. Note 1 The setting display is automatically exited after 3 minutes of inactivity. 37 En
-
 1
1 -
2
-
3
-
4
-
5
-
6
-
7
-
8
-
9
-
10
-
11
-
12
-
13
-
14
-
15
-
16
-
17
-
18
-
19
-
20
-
21
-
22
-
23
-
24
-
25
-
26
-
27
-
28
-
29
-
30
-
31
-
 32
32 -
 33
33 -
 34
34 -
 35
35 -
 36
36 -
 37
37 -
 38
38 -
 39
39 -
 40
40 -
 41
41 -
 42
42 -
43
-
44
-
45
-
46
-
47
-
48
-
49
-
50
-
51
-
52
-
53
-
54
-
55
-
56
-
57
-
58
-
59
-
60
-
61
-
62
-
63
-
64
-
65
-
66
-
67
-
68
-
69
-
70
-
71
-
72
-
73
-
74
-
75
-
76
-
77
-
78
-
79
-
80
-
81
-
82
-
83
-
84
-
85
-
86
-
87
-
88
-
89
-
90
-
91
-
92
-
93
-
94
-
95
-
96
-
97
-
98
-
99
-
100
-
101
-
102
-
103
-
104
-
105
-
106
-
107
-
108
 |
 |
