Pioneer VSX-515-K Owner's Manual - Page 40
Setting up the receiver, Setting separate channel levels, for listening modes
 |
View all Pioneer VSX-515-K manuals
Add to My Manuals
Save this manual to your list of manuals |
Page 40 highlights
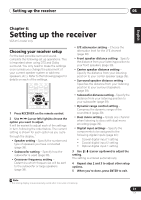
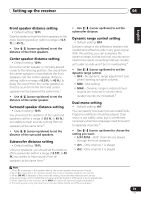
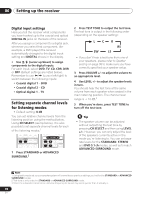
06 Setting up the receiver Digital input settings Here you tell the receiver what components you have hooked up to the coaxial and optical DIGITAL IN jacks on the back of the receiver. After you assign a component to a digital jack, whenever you select that component, (for example, a DVD player) the receiver automatically changes to the digital input setting and DIGITAL shows in the display. • Use / (cursor up/down) to assign components to the digital inputs. For each input, select DVD, TV, CD, CDR, DVR or OFF (default settings are listed below). Remember to use / (cursor left/right) to switch between the following inputs: • Coaxial digital 1 - DVD • Coaxial digital 2 - CD • Optical digital 1 - TV Setting separate channel levels for listening modes • Default setting: 0 dB You can set relative channel levels from the listening position using the method below. Using CH SELECT (see tip below), it is also possible to set separate channel levels for each of the listening modes.1 CD R/ CD TAPE/MD FM AM ADVANCED MIDNIGHT/ STANDARD SURROUND STEREO LOUDNESS CH SELECT VOLUME MUTE TOP MENU SETUP MENU TEST TONE LEVEL EFFECT CLASS TUNER DVD TUNER MPX 1 Press STANDARD or ADVANCED SURROUND.2 2 Press TEST TONE to output the test tone. The test tone is output in the following order (depending on the speaker setting): LCR RS SW LS • If you don't hear a test tone from one of your speakers, please refer to Speaker setting on page 38 to make sure you have correctly specified your speaker setup. 3 Press VOLUME +/- to adjust the volume to an appropriate level. 4 Use LEVEL +/- to adjust the speaker levels in turn. You should hear the test tone at the same volume from each speaker when seated in the main listening position. The channel level range is ± 10 dB.3 5 When you're done, press TEST TONE to turn off the test tone. Tip • The speaker volume can be adjusted without outputting the test tone by pressing CH SELECT and then using LEVEL +/-. However, you can only adjust the level of the speakers currently active in the mode you're listening to. You can set separate levels for the STANDARD, STEREO and DVD 5.1 ch modes, as well as for each ADVANCED SURROUND mode. Note 1 Using test tones to set up your speaker system will overwrite any previous settings you had for the STANDARD or ADVANCED SURROUND modes. 2 Test tone is only output in STANDARD or ADVANCED SURROUND mode. 3 Since the subwoofer transmits an ultra-low frequency its sound may seem quieter than it actually is. 40 En
-
 1
1 -
2
-
3
-
4
-
5
-
6
-
7
-
8
-
9
-
10
-
11
-
12
-
13
-
14
-
15
-
16
-
17
-
18
-
19
-
20
-
21
-
22
-
23
-
24
-
25
-
26
-
27
-
28
-
29
-
30
-
31
-
32
-
33
-
34
-
 35
35 -
 36
36 -
 37
37 -
 38
38 -
 39
39 -
 40
40 -
 41
41 -
 42
42 -
 43
43 -
 44
44 -
 45
45 -
46
-
47
-
48
-
49
-
50
-
51
-
52
-
53
-
54
-
55
-
56
-
57
-
58
-
59
-
60
-
61
-
62
-
63
-
64
-
65
-
66
-
67
-
68
-
69
-
70
-
71
-
72
-
73
-
74
-
75
-
76
-
77
-
78
-
79
-
80
-
81
-
82
-
83
-
84
-
85
-
86
-
87
-
88
-
89
-
90
-
91
-
92
-
93
-
94
-
95
-
96
-
97
-
98
-
99
-
100
-
101
-
102
-
103
-
104
-
105
-
106
-
107
-
108
 |
 |