Pioneer VSX-C300 Operating Instructions - Page 13
Connecting Video Components - av receiver
 |
View all Pioneer VSX-C300 manuals
Add to My Manuals
Save this manual to your list of manuals |
Page 13 highlights
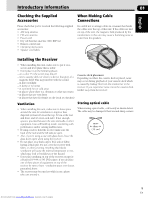
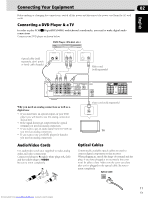
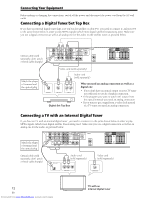
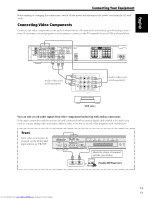
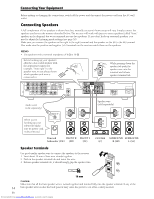
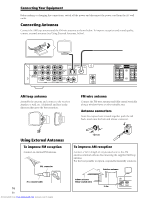
English Connecting Your Equipment Before making or changing the connections, switch off the power and disconnect the power cord from the AC wall outlet. Connecting Video Components Connect your video components to the jacks as shown below. All video decks are hooked up with analog connections. If you want to record programs it is necessary to connect to the IN terminals on your VCR as shown below. R L DVD IN TV/ SAT IN DIGITAL (OPTICAL) VCR IN R L AUDIO 1 MONITOR OUT 2 ANTENNA AM LOOP FM UNBAL 75Ω R L VCR OUT VIDEO AUDIO SUB WOOFER OUT FRONT R L SPEAKERS CENTER SURROUND R L IN OUT CONTROL Audio /video cord (sold separately) VIDEO L AUDIO R IN 1 IN 2 OUT 1 OUT 2 Audio /video cord (sold separately) VCR (etc.) You can only record audio signals from video components hooked up with analog connections. If the input component and the receiver are only connected with an optical digital cable (which is for audio) you need to connect analog video and audio cables in order to be able to record video programs with soundtracks. Front Front video connections are accessed via the front panel input selector as "FRONT." STANDBY FRONT INPUT INPUT SIGNAL DIGITAL MULTI ch 2PROLOGIC 2DIGITAL DTS OFF ON PHONES VIDEO L AUDIO R DIGITAL IN MPEG VIRTUAL PHONES SURR. STEREO DVD TV/SAT Match the shape of terminal and the optical plug. AV-IN/OUT AV-IN/OUT COLOR BRIGHT MONITOR PHONES DIGITAL OUT (OPTICAL) ON/OFF HOLD Portable DVD Player (etc.) 13 En Downloaded from www.Manualslib.com manuals search engine
-
 1
1 -
2
-
3
-
4
-
5
-
6
-
7
-
 8
8 -
 9
9 -
 10
10 -
 11
11 -
 12
12 -
 13
13 -
 14
14 -
 15
15 -
 16
16 -
 17
17 -
 18
18 -
19
-
20
-
21
-
22
-
23
-
24
-
25
-
26
-
27
-
28
-
29
-
30
-
31
-
32
-
33
-
34
-
35
-
36
-
37
-
38
-
39
-
40
-
41
-
42
-
43
-
44
-
45
-
46
-
47
-
48
-
49
-
50
-
51
-
52
-
53
-
54
-
55
-
56
 |
 |
