Pioneer VSX-C300 Operating Instructions - Page 42
Press the INPUT/Control Mode Select
 |
View all Pioneer VSX-C300 manuals
Add to My Manuals
Save this manual to your list of manuals |
Page 42 highlights
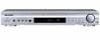
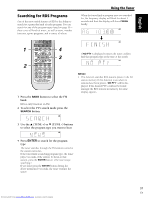
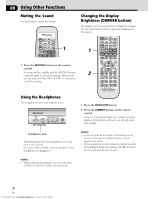
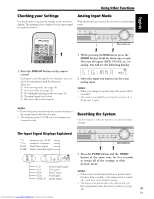
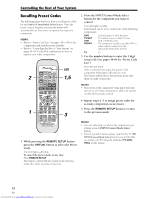
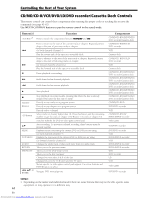
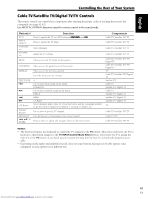
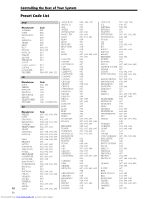
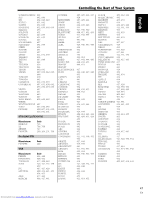
Controlling the Rest of Your System Recalling Preset Codes The following steps show you how to recall preset codes for each INPUT/Control Mode Select button. Once the preset code is assigned, pressing the button will automatically set the remote to operate the respective component. MEMO: • Refer to "Preset Code List" on pages 46 to 48 for the components and manufacturers available. • Refer to "Controlling the Rest of Your System" on pages 44-45 for detailed explanations on how to operate your other components. 2 1 RECEIVER DVD INPUT SELECT REMOTE MASTER TV/SAT VCR SETUP VOLUME TUNER FRONT DISPLAY MUTING RECEIVER TV TV CONTROL TV INPUT SELECT CHANNEL VOLUME SOURCE BAND CLASS EDIT DISPLAY S M L ROOM SETUP TOP MENU TUNE CH. SELECT ST AUDIO ENTER ST CH. LEVEL MENU TUNE TEST TONE SEARCH RF ATT MPX D.ACCESS DIMMER FLAT QUIET S.BASS 1 2 3 4 VIRTUAL 5-D GAME TV SURR. 5 6 7 8 PHONES MUSICAL DRAMA ACTION SURR. 9 0 +10 ENTER STEREO STANDARD AUTO MIDNGHT 2ch MULTI 2/MULTI AUDIO/VIDEO PRE-PROGRAMMED REMOTE CONTROL UNIT LED 1,5 3 1 While pressing the REMOTE SETUP button press the VIRTUAL button to select the Preset mode. The LED lights will blink. To cancel the preset mode at any time Press REMOTE SETUP. The remote control will also return to the previous mode after thirty seconds of inactivity. 2 Press the INPUT/Control Mode Select button for the component you want to control. The LED lights steadily. Each button can be set to control one of the following components DVD TV/SAT VCR FRONT DVD/LD player or DVD Recorder TV, Satellite tuner or Cable TV tuner VCR or DVD Recorder The component (usually a portable DVD or video camera) connected to the jacks on the front of the receiver TV TV 3 Use the number buttons to enter the 3 digit setup code (see pages 46-48 for "Preset Code List"). The LED will blink. After a code has been input the power of the component being input will turn on or off. The remote will return to the previous mode after thirty seconds of inactivity. MEMO: • The power of the component being input will only turn on or off if that component is able to be turned on directly by remote control. 4 Repeat steps 2-3 to assign preset codes for as many components as necessary. 5 Press the REMOTE SETUP button to return to the previous mode. MEMO: • You can only input a code for the component type written on each INPUT/Control Mode Select button. • Even if you don't input a preset code for the TV (TV INPUT/Control Mode Select button) you will be able to control your TV using the dedicated TV CONTROL on the remote. 42 En Downloaded from www.Manualslib.com manuals search engine
-
 1
1 -
2
-
3
-
4
-
5
-
6
-
7
-
8
-
9
-
10
-
11
-
12
-
13
-
14
-
15
-
16
-
17
-
18
-
19
-
20
-
21
-
22
-
23
-
24
-
25
-
26
-
27
-
28
-
29
-
30
-
31
-
32
-
33
-
34
-
35
-
36
-
 37
37 -
 38
38 -
 39
39 -
 40
40 -
 41
41 -
 42
42 -
 43
43 -
 44
44 -
 45
45 -
 46
46 -
 47
47 -
48
-
49
-
50
-
51
-
52
-
53
-
54
-
55
-
56
 |
 |
