Pioneer VSX-C300 Operating Instructions - Page 17
Operating other Pioneer Components with this Unit, s Sensor, Plugging in the Receiver - service manual
 |
View all Pioneer VSX-C300 manuals
Add to My Manuals
Save this manual to your list of manuals |
Page 17 highlights
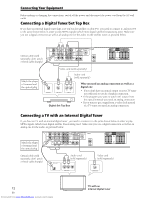
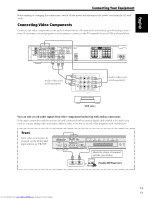
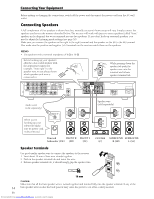
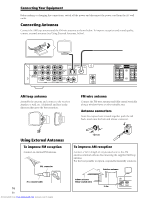
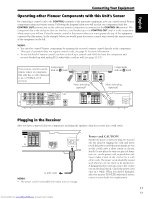
English Connecting Your Equipment Operating other Pioneer Components with this Unit's Sensor By connecting a control cord to the CONTROL terminals of the respective equipment, you can control several Pioneer components using one remote sensor. Following the diagram below you will see that one component feeds the CONTROL OUT terminal and on the other end another component is connected to the CONTROL IN terminal. The component that is the end point (the one that has a cord hooked up to its CONTROL OUT only) it is the component whose sensor you will use. Point the remote control at that sensor when you want operate the any of the equipment connected by this system. In the example below you would point the remote control unit towards the remote sensor of the equipment on the left. MEMO: • You can also control Pioneer components by pointing the receiver's remote control directly at the component. This type of operation does not require control cords. See page 41 for more information. • To use this kind of remote control you have to hook up a control cord AND the have the component and receiver hooked up with analog RCA audio/video cords as well (see page 11-13). Point remote control towards remote sensor of component that only has a cord connected to its CONTROL OUT terminal Components with an Î mark R L DVD IN TV/ SAT IN DIGITAL (OPTICAL) VCR IN R L AUDIO 1 MONITOR OUT 2 ANTENNA AM LOOP FM UNBAL 75Ω R L VCR OUT VIDEO AUDIO SUB WOOFER OUT Mono mini plug (optional) FRONT R L SPEAKERS CENTER SURROUND R L Components with an Î mark Mono mini plug (optional) IN OUT CONTROL AC IN Plugging in the Receiver After you have connected all your components, including the speakers, plug the receiver into a wall outlet. SPEAKERS CENTER SURROUND R L IN OUT CONTROL AC IN to wall outlet MEMO: • The power cord is removable from main unit for storage. Downloaded from www.Manualslib.com manuals search engine Power cord CAUTION! Handle the power cord by the plug. Do not pull out the plug by tugging the cord and never touch the power cord when your hands are wet as this could cause a short circuit or electric shock. Do not place the unit or a piece of furniture, etc., on the power cord, or pinch the cord. Never make a knot in the cord or tie it with other cords. The power cords should be routed such that they are not likely to be stepped on. A damaged power cord can cause a fire or give you an electrical shock. Check the power cord once in a while. When you find it damaged, ask your nearest PIONEER authorized service center or your dealer for a replacement. 17 En
-
 1
1 -
2
-
3
-
4
-
5
-
6
-
7
-
8
-
9
-
10
-
11
-
 12
12 -
 13
13 -
 14
14 -
 15
15 -
 16
16 -
 17
17 -
 18
18 -
 19
19 -
 20
20 -
 21
21 -
 22
22 -
23
-
24
-
25
-
26
-
27
-
28
-
29
-
30
-
31
-
32
-
33
-
34
-
35
-
36
-
37
-
38
-
39
-
40
-
41
-
42
-
43
-
44
-
45
-
46
-
47
-
48
-
49
-
50
-
51
-
52
-
53
-
54
-
55
-
56
 |
 |
