Pioneer VSX-D814-K Installation Manual - Page 15
SW.VOL.DWN - s manual
 |
View all Pioneer VSX-D814-K manuals
Add to My Manuals
Save this manual to your list of manuals |
Page 15 highlights
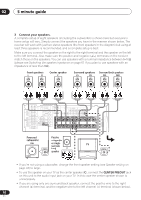
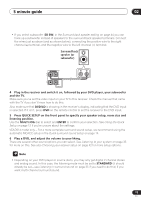
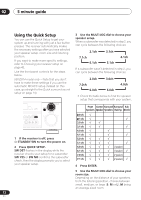
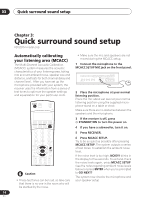
Quick surround sound setup 03 If you see an ERR message in the display, there may be a problem with your mic or the speaker connections. Turn off the power, and check the problem indicated by the ERR message (see below), then try the auto surround setup again. • ERR MIC - Check the microphone connection. • ERR Fch - Check the front speaker connections. • ERR Sch - Check the surround or surround back speaker connections. • ERR SW - Make sure the subwoofer has been switched on and volume on the subwoofer is turned up. 7 Use and to select the speaker system that corresponds to your setup. Cycle between the following choices: 2.0ch 2.1ch* 3.0ch 3.1ch* 7.1ch* 4.0ch 7.0ch 4.1ch* 6.1ch* 6.0ch 5.1ch* 5.0ch * Indicates a subwoofer is included in your speaker setup See the table on page 12 if you're unsure which speaker system to select. 8 If you selected a speaker system that includes a subwoofer, press ENTER to check the subwoofer output level. If the subwoofer output level is too high/low, SW.VOL.DWN/SW.VOL.UP blinks in the display for five seconds. To exit and check your subwoofer output level, press MCACC SETUP (see the notes regarding noise levels below) or simply press ENTER when you're prompted to GO NEXT? 9 Press ENTER to finish the auto surround setup. The system checks for speaker size, channel delay and channel level. If you have connected a subwoofer, it will check for ambient noise once again. When the auto surround setup is complete, the volume level returns to normal and COMPLETE, then RESUME shows in the display. The MCACC indicator then lights to show that MCACC setup is complete. • If the room environment is not optimal for the auto surround setup (too much ambient noise, echo off the walls, obstacles blocking the speakers from the microphone) the final settings may be incorrect. Check for household appliances (air conditioner, fridge, fan, etc.), that may be affecting the environment and switch them off if necessary. • Some older TVs may interfere with the operation of the mic. If this seems to be happening, switch off the TV when doing the auto surround setup. • Using the MCACC system to set up your speaker system overwrites any previous settings you had for the STANDARD or ADVANCED SURROUND modes. • When the STANDARD or ADVANCED SURROUND mode is selected, you can check the settings made with MCACC by using CH SELECT (to check channel levels) or by going through the steps in Choosing your receiver setup on page 42 to check other settings. • Depending on the characteristics of your room, sometimes identical speakers with cone sizes of around 5 inches (12cm) will end up with different size settings. You can correct the setting manually using the receiver setup on page 42. 15 En
-
 1
1 -
2
-
3
-
4
-
5
-
6
-
7
-
8
-
9
-
 10
10 -
 11
11 -
 12
12 -
 13
13 -
 14
14 -
 15
15 -
 16
16 -
 17
17 -
 18
18 -
 19
19 -
 20
20 -
21
-
22
-
23
-
24
-
25
-
26
-
27
-
28
-
29
-
30
-
31
-
32
-
33
-
34
-
35
-
36
-
37
-
38
-
39
-
40
-
41
-
42
-
43
-
44
-
45
-
46
-
47
-
48
-
49
-
50
-
51
-
52
-
53
-
54
-
55
-
56
-
57
-
58
-
59
-
60
-
61
-
62
-
63
-
64
-
65
-
66
-
67
-
68
-
69
-
70
-
71
 |
 |
