Pioneer VSX-D814-K Installation Manual - Page 33
Character display LCD - remote code
 |
View all Pioneer VSX-D814-K manuals
Add to My Manuals
Save this manual to your list of manuals |
Page 33 highlights
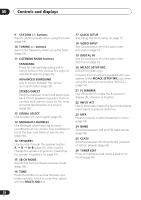
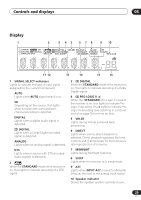
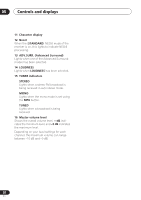
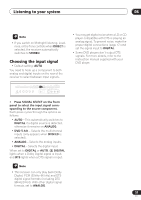
Controls and displays 05 The following DVR controls can be accessed by pressing SHIFT: ì REC Starts recording. REC STOP Stops recording. HDD/DVD These buttons switch between the hard disk and DVD controls for DVD/HDD recorders. 9 RECEIVER CONTROL buttons STANDARD Press for Standard decoding and to switch between the various Pro Logic IIx and Neo:6 options (page 35). ADV. SURR. Use to switch between the various surround modes (page 35). STEREO Switches between direct and stereo playback. Direct playback bypasses the tone controls and channel levels for the most accurate reproduction of a source (page 36). SLEEP Use to put the receiver in sleep mode and select the amount of time before the receiver turns off (page 41). MIDNIGHT/LOUDNESS Switches to Midnight or Loudness listening (page 40). TEST TONE Sounds the test tone when setting up the surround sound of the receiver (page 50). CH SELECT Selects a speaker when setting up the surround sound of the receiver (page 50). LEVEL +/- Adjusts the levels of the surround sound of the receiver (page 50). EFFECT +/- Adds or subtracts the amount of effect with different advanced surround modes (page 35). 10 SHIFT Press to access the DVR controls above the component control butttons. 11 SOURCE Press to turn on/off other components connected to the receiver. 12 Character display (LCD) This display shows preset codes and other information when transmitting control signals. The following commands are shown when you're setting the remote to control other components (see Controlling the rest of your system on page 57): SETUP Indicates the setup mode, from which you choose the options below. PRESET See Selecting preset codes directly on page 57. LEARN (VSX-D914 model only) See Programming signals from other remote controls on page 58. DIRECT F See Direct function on page 60. ERASE (VSX-D914 model only) See Erasing one of the remote control button settings on page 59. RESET See Erasing all of the remote control presets on page 60. READ ID See Confirming preset codes on page 60. 33 En
-
 1
1 -
2
-
3
-
4
-
5
-
6
-
7
-
8
-
9
-
10
-
11
-
12
-
13
-
14
-
15
-
16
-
17
-
18
-
19
-
20
-
21
-
22
-
23
-
24
-
25
-
26
-
27
-
 28
28 -
 29
29 -
 30
30 -
 31
31 -
 32
32 -
 33
33 -
 34
34 -
 35
35 -
 36
36 -
 37
37 -
 38
38 -
39
-
40
-
41
-
42
-
43
-
44
-
45
-
46
-
47
-
48
-
49
-
50
-
51
-
52
-
53
-
54
-
55
-
56
-
57
-
58
-
59
-
60
-
61
-
62
-
63
-
64
-
65
-
66
-
67
-
68
-
69
-
70
-
71
 |
 |