Pioneer VSX-D814-K Installation Manual - Page 4

Contents - remote

Page 4 highlights

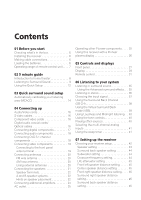
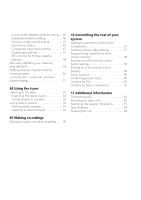
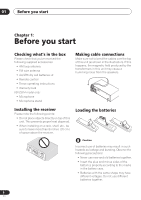
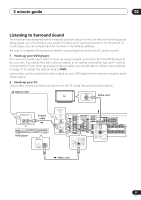
Contents 01 Before you start Checking what's in the box 6 Installing the receiver 6 Making cable connections 6 Loading the batteries 6 Operating range of remote control unit. . . . 7 02 5 minute guide Introduction to home theater 8 Listening to Surround Sound 9 Using the Quick Setup 12 03 Quick surround sound setup Automatically calibrating your listening area (MCACC 14 04 Connecting up Audio/Video cords 16 S-video cables 16 Component video cords 16 Digital audio coaxial cords/ Optical cables 16 Connecting digital components 17 Connecting audio components 18 Connecting DVD 5.1 channel components 18 Connecting video components 19 Connecting to the front panel video terminal 19 Connecting antennas 20 FM wire antenna 20 AM loop antenna 20 Using external antennas 20 Connecting the speakers 21 Speaker terminals 22 A and B speaker systems 22 Hints on speaker placement 22 Connecting additional amplifiers 24 AC outlet 25 Operating other Pioneer components . . . . 25 Using this receiver with a Pioneer plasma display 26 05 Controls and displays Front panel 27 Display 29 Remote control 31 06 Listening to your system Listening in surround sound 35 Using the Advanced surround effects. . . 35 Listening in stereo 36 Choosing the input signal 37 Using the Surround Back Channel (SB CH 38 Using the Virtual Surround Back mode (VSB 39 Using Loudness and Midnight listening . . 40 Using the tone controls 40 Playing other sources 40 Selecting the multi-channel analog inputs 41 Using the sleep timer 41 07 Setting up the receiver Choosing your receiver setup 42 Speaker setting 43 Surround back speaker setting 44 Subwoofer setting 44 Crossover frequency setting 44 LFE attenuator setting 45 Front left speaker distance setting . . . . . 45 Center speaker distance setting 45 Front right speaker distance setting . . . . 46 Surround right speaker distance setting 46 Surround back speaker distance setting 46

  • 1
  • 2
  • 3
  • 4
  • 5
  • 6
  • 7
  • 8
  • 9
  • 10
  • 11
  • 12
  • 13
  • 14
  • 15
  • 16
  • 17
  • 18
  • 19
  • 20
  • 21
  • 22
  • 23
  • 24
  • 25
  • 26
  • 27
  • 28
  • 29
  • 30
  • 31
  • 32
  • 33
  • 34
  • 35
  • 36
  • 37
  • 38
  • 39
  • 40
  • 41
  • 42
  • 43
  • 44
  • 45
  • 46
  • 47
  • 48
  • 49
  • 50
  • 51
  • 52
  • 53
  • 54
  • 55
  • 56
  • 57
  • 58
  • 59
  • 60
  • 61
  • 62
  • 63
  • 64
  • 65
  • 66
  • 67
  • 68
  • 69
  • 70
  • 71

Contents
01 Before you start
Checking what’s in the box. . . . . . . . . . . . . . 6
Installing the receiver . . . . . . . . . . . . . . . . . . 6
Making cable connections . . . . . . . . . . . . . . 6
Loading the batteries. . . . . . . . . . . . . . . . . . . 6
Operating range of remote control unit. . . . 7
02 5 minute guide
Introduction to home theater . . . . . . . . . . . . 8
Listening to Surround Sound . . . . . . . . . . . . 9
Using the Quick Setup . . . . . . . . . . . . . . . . 12
03 Quick surround sound setup
Automatically calibrating your listening
area (MCACC) . . . . . . . . . . . . . . . . . . . . . . . 14
04 Connecting up
Audio/Video cords . . . . . . . . . . . . . . . . . . . . 16
S-video cables . . . . . . . . . . . . . . . . . . . . . . . 16
Component video cords . . . . . . . . . . . . . . . 16
Digital audio coaxial cords/
Optical cables . . . . . . . . . . . . . . . . . . . . . . . 16
Connecting digital components . . . . . . . . . 17
Connecting audio components . . . . . . . . . 18
Connecting DVD 5.1 channel
components . . . . . . . . . . . . . . . . . . . . . . . . . 18
Connecting video components. . . . . . . . . . 19
Connecting to the front panel
video terminal . . . . . . . . . . . . . . . . . . . . . . 19
Connecting antennas . . . . . . . . . . . . . . . . . 20
FM wire antenna . . . . . . . . . . . . . . . . . . . . 20
AM loop antenna. . . . . . . . . . . . . . . . . . . . 20
Using external antennas . . . . . . . . . . . . . 20
Connecting the speakers . . . . . . . . . . . . . . 21
Speaker terminals . . . . . . . . . . . . . . . . . . . 22
A and B speaker systems . . . . . . . . . . . . . 22
Hints on speaker placement . . . . . . . . . . 22
Connecting additional amplifiers . . . . . . . . 24
AC outlet. . . . . . . . . . . . . . . . . . . . . . . . . . . . 25
Operating other Pioneer components . . . . 25
Using this receiver with a Pioneer
plasma display . . . . . . . . . . . . . . . . . . . . . . . 26
05 Controls and displays
Front panel . . . . . . . . . . . . . . . . . . . . . . . . . . 27
Display . . . . . . . . . . . . . . . . . . . . . . . . . . . . . 29
Remote control. . . . . . . . . . . . . . . . . . . . . . . 31
06 Listening to your system
Listening in surround sound. . . . . . . . . . . . 35
Using the Advanced surround effects. . . 35
Listening in stereo . . . . . . . . . . . . . . . . . . . . 36
Choosing the input signal . . . . . . . . . . . . . . 37
Using the Surround Back Channel
(SB CH) . . . . . . . . . . . . . . . . . . . . . . . . . . . . . 38
Using the Virtual Surround Back
mode (VSB). . . . . . . . . . . . . . . . . . . . . . . . . . 39
Using Loudness and Midnight listening . . 40
Using the tone controls . . . . . . . . . . . . . . . . 40
Playing other sources . . . . . . . . . . . . . . . . . 40
Selecting the multi-channel analog
inputs . . . . . . . . . . . . . . . . . . . . . . . . . . . . . . 41
Using the sleep timer . . . . . . . . . . . . . . . . . 41
07 Setting up the receiver
Choosing your receiver setup . . . . . . . . . . . 42
Speaker setting . . . . . . . . . . . . . . . . . . . . . 43
Surround back speaker setting . . . . . . . . 44
Subwoofer setting . . . . . . . . . . . . . . . . . . . 44
Crossover frequency setting. . . . . . . . . . . 44
LFE attenuator setting. . . . . . . . . . . . . . . . 45
Front left speaker distance setting . . . . . 45
Center speaker distance setting . . . . . . . 45
Front right speaker distance setting . . . . 46
Surround right speaker distance
setting. . . . . . . . . . . . . . . . . . . . . . . . . . . . . 46
Surround back speaker distance
setting. . . . . . . . . . . . . . . . . . . . . . . . . . . . . 46