ProForm 1000 Lt Treadmill English Manual - Page 8
x 1 Tek Screws 82. Note: One replacement
 |
View all ProForm 1000 Lt Treadmill manuals
Add to My Manuals
Save this manual to your list of manuals |
Page 8 highlights
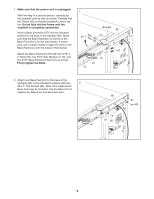
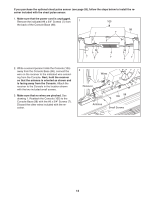
1. Make sure that the power cord is unplugged. With the help of a second person, carefully tip the treadmill onto its side as shown. Partially fold the Frame (55) so that the treadmill is more stable. Do not fully fold the Frame until the treadmill is completely assembled. Insert a Base Extension (97) into the indicated bracket on the base of the Uprights (85). Make sure that the Base Extension is turned so the Base Foot (81) is on the side shown. If necessary, use a rubber mallet to align the holes in the Base Extension with the holes in the bracket. Attach the Base Extension (97) with two 5/16" x 2" Bolts (87), two 5/16" Star Washers (110), and two 5/16" Base Extension Nuts (91) as shown. Firmly tighten the Bolts. 1 Bracket 85 87 110 91 97 81 55 2. Attach two Base Feet (81) to the base of the Uprights (85) in the indicated locations with two 2 #8 x 1" Tek Screws (82). Note: One replacement Base Foot may be included. Use the Base Foot to replace any Base Foot that becomes worn. 85 81 82 81 82 8
-
 1
1 -
2
-
 3
3 -
 4
4 -
 5
5 -
 6
6 -
 7
7 -
 8
8 -
 9
9 -
 10
10 -
 11
11 -
 12
12 -
 13
13 -
14
-
15
-
16
-
17
-
18
-
19
-
20
-
21
-
22
-
23
-
24
-
25
-
26
-
27
-
28
-
29
-
30
-
31
-
32
-
33
-
34
-
35
-
36
-
37
-
38
-
39
-
40
 |
 |
