RCA DRC8052N User Guide - Page 18
Connections and Setup - dvd
 |
UPC - 840356939995
View all RCA DRC8052N manuals
Add to My Manuals
Save this manual to your list of manuals |
Page 18 highlights
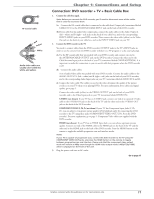
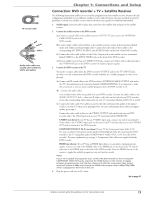
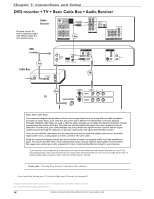
Chapter 1: Connections and Setup The audio input jacks on the audio receiver you use to connect to the DVD recorder will determine which source or input you need to select on the A/V receiver when you want to watch TV or play a disc. 3b. If you have a Dolby Digital or DTS receiver, connect a digital audio coaxial cable to the DIGITAL AUDIO OUT jack on the DVD recorder and the Digital Audio Input jack on the receiver (cable not supplied with DVD recorder). You must also adjust the Audio setting (go to page 34 for information). Notes: If your TV is capable of progressive scan, connect the DVD recorder to the TV using the COMPONENT VIDEO OUT jacks, and press the HDMI button on the remote to toggle between progressive scan and interlace. Please note that the component video output mode will remain at 480p even though the HDMI video output mode is 480p/720p/1080i, which is displayed on the front of the unit. 4. Plug the power cord into an AC outlet. Go to page 17 16 Graphics contained within this publication are for representation only.
-
 1
1 -
2
-
3
-
4
-
5
-
6
-
7
-
8
-
9
-
10
-
11
-
12
-
 13
13 -
 14
14 -
 15
15 -
 16
16 -
 17
17 -
 18
18 -
 19
19 -
 20
20 -
 21
21 -
 22
22 -
 23
23 -
24
-
25
-
26
-
27
-
28
-
29
-
30
-
31
-
32
-
33
-
34
-
35
-
36
-
37
-
38
-
39
-
40
-
41
-
42
-
43
-
44
-
45
-
46
 |
 |
