Ricoh Aficio SP 5210DN Operating Instructions - Page 56
To install other options on the controller board, follow the installation procedure shown
 |
View all Ricoh Aficio SP 5210DN manuals
Add to My Manuals
Save this manual to your list of manuals |
Page 56 highlights
3. Installing Options 7. Fit the hard disk on the connector of the controller board carefully until it stops. 3 CEC017 8. Tighten the two screws by turning them clockwise with a coin, and then secure the hard disk board by tightening the third screw from the under side of the controller board. CEC018 9. To install other options on the controller board, follow the installation procedure shown in the documentation provided with the option. 10. Align the controller board with the top and bottom rails, and then push it carefully in, until it stops. The printer may malfunction if the controller board is not properly installed. 54 CEC076
-
 1
1 -
2
-
3
-
4
-
5
-
6
-
7
-
8
-
9
-
10
-
11
-
12
-
13
-
14
-
15
-
16
-
17
-
18
-
19
-
20
-
21
-
22
-
23
-
24
-
25
-
26
-
27
-
28
-
29
-
30
-
31
-
32
-
33
-
34
-
35
-
36
-
37
-
38
-
39
-
40
-
41
-
42
-
43
-
44
-
45
-
46
-
47
-
48
-
49
-
50
-
 51
51 -
 52
52 -
 53
53 -
 54
54 -
 55
55 -
 56
56 -
 57
57 -
 58
58 -
 59
59 -
 60
60 -
 61
61 -
62
-
63
-
64
-
65
-
66
-
67
-
68
-
69
-
70
-
71
-
72
-
73
-
74
-
75
-
76
-
77
-
78
-
79
-
80
-
81
-
82
-
83
-
84
-
85
-
86
-
87
-
88
-
89
-
90
-
91
-
92
-
93
-
94
-
95
-
96
-
97
-
98
-
99
-
100
-
101
-
102
-
103
-
104
-
105
-
106
-
107
-
108
-
109
-
110
-
111
-
112
-
113
-
114
-
115
-
116
-
117
-
118
-
119
-
120
-
121
-
122
-
123
-
124
-
125
-
126
-
127
-
128
-
129
-
130
-
131
-
132
-
133
-
134
-
135
-
136
-
137
-
138
-
139
-
140
-
141
-
142
-
143
-
144
-
145
-
146
-
147
-
148
-
149
-
150
-
151
-
152
-
153
-
154
-
155
-
156
-
157
-
158
-
159
-
160
-
161
-
162
-
163
-
164
-
165
-
166
-
167
-
168
-
169
-
170
-
171
-
172
-
173
-
174
-
175
-
176
-
177
-
178
-
179
-
180
-
181
-
182
-
183
-
184
-
185
-
186
-
187
-
188
-
189
-
190
-
191
-
192
-
193
-
194
-
195
-
196
-
197
-
198
-
199
-
200
-
201
-
202
-
203
-
204
-
205
-
206
-
207
-
208
-
209
-
210
-
211
-
212
-
213
-
214
-
215
-
216
-
217
-
218
-
219
-
220
-
221
-
222
-
223
-
224
-
225
-
226
-
227
-
228
 |
 |
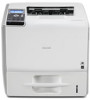
7.
Fit the hard disk on the connector of the controller board carefully until it stops.
CEC017
8.
Tighten the two screws by turning them clockwise with a coin, and then secure the hard disk
board by tightening the third screw from the under side of the controller board.
CEC018
9.
To install other options on the controller board, follow the installation procedure shown in
the documentation provided with the option.
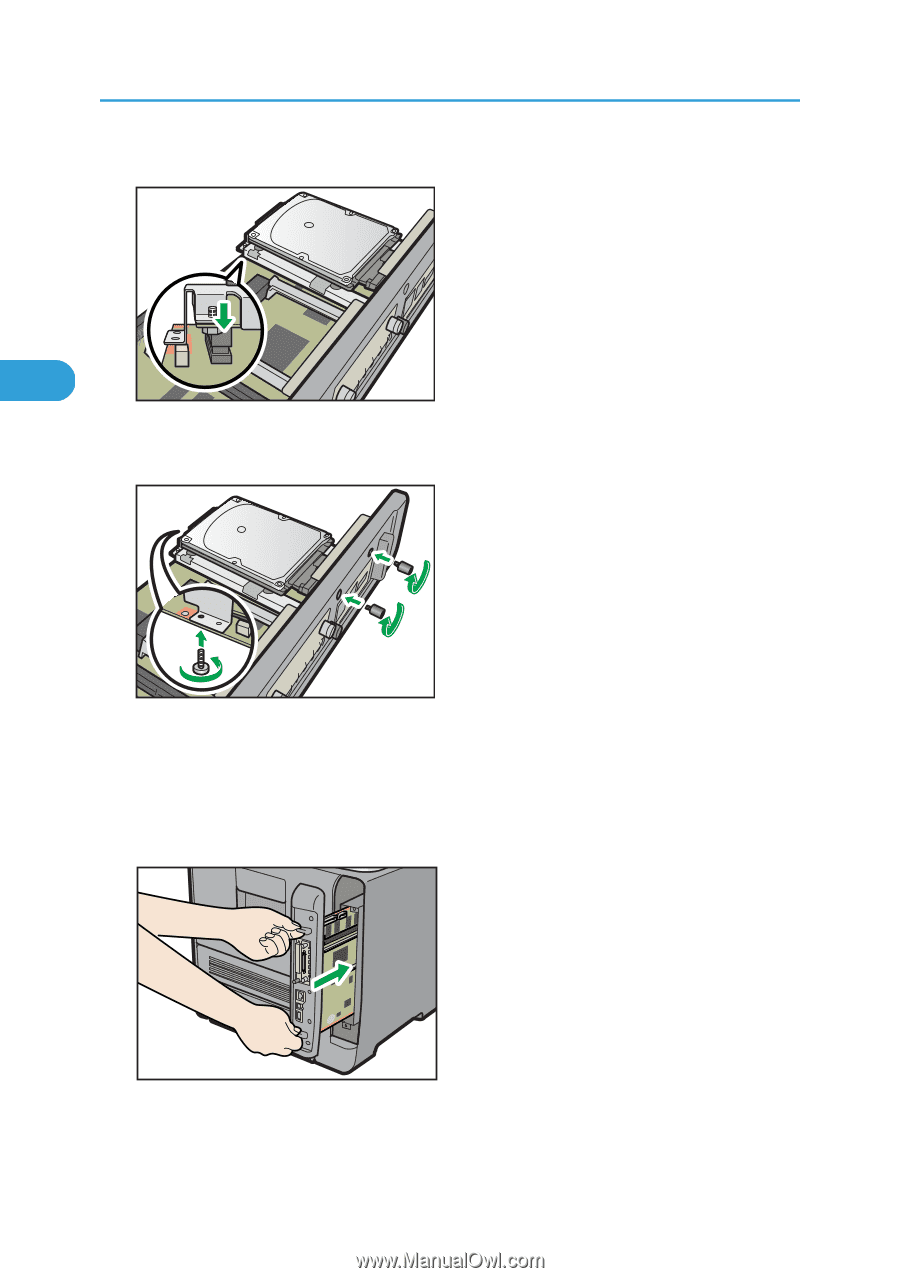
10.
Align the controller board with the top and bottom rails, and then push it carefully in, until
it stops.
The printer may malfunction if the controller board is not properly installed.
CEC076
3. Installing Options
54
3