Ridgid KJ-3100 Owners Manual - Page 11
Drain Preparation, Hose Set-Up
 |
View all Ridgid KJ-3100 manuals
Add to My Manuals
Save this manual to your list of manuals |
Page 11 highlights
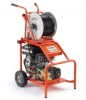
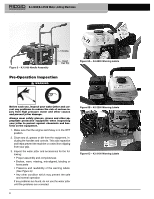
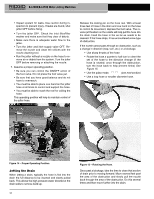
KJ-2200/KJ-3100 Water Jetting Machines Fill the tank prior to starting the jetter. When starting jetter, turn the tank valve off. As soon as the jetter is started, open the tank valve. Monitor the tank water level, and if needed, stop jetting to allow the tank to refill. Do not allow the water level to fall below the hose end. Hot water can be used for improved cleaning. Do not use water hotter than 140°F. - this can cause the pump thermal overload to open. When using hot water, use appropriate personal protective equipment to reduce the risk of burns. When using in cold weather, use precautions to prevent water from freezing in the pump. This can damage the pump. Make sure that the inlet supply valve on the jetter is closed and attach the supply hose to the jetter. Drain Preparation If working through a manhole, storm grate or other large access, use pipe and fittings to create a guide for the jetter hose from the drain opening to operation point. This will prevent the jetter hose from whipping around in the access and protect the hose from damage. 1. Select a jetter hose size appropriate for the drain being cleaned. It is not generally recommended to connect two jetter hoses together for cleaning drains. The connection between the two hoses is less flexible and can prevent passage through fittings See Jetter Hose Selection Chart. 2. As needed, separate the hose reel from the motor/pump assembly. Locate the hose reel within 3 feet of the drain opening. Do not allow excessive amounts of hose outside of the drain to prevent hose damage. If the hose reel cannot be placed within 3 feet of the drain opening, extend the drain opening back to the hose reel with similar sized pipe and fittings. 3. Route a hose from the jetter to the IN fitting on the foot valve. Use teflon tape to seal the connection. Position the foot valve for accessibility. You must be able to control the jetter hose and the foot valve. 4. Connect the hose from the reel to the OUT fitting on the foot valve. Out Fitting In Fitting Figure 10 - Extending the Drain Opening to the Operation Point Hose Set-Up Use care when routing jetter hoses. Routing hoses over rough surfaces, sharp edges, crossing hoses, etc. can damage the hose jacket, especially when the jetter is used in the pulse mode. Keeping the jetter hose on the reel will help to minimize hose damage. Figure 11 - Foot Valve Connection 5. Mark the jetter hose near the end to indicate when the nozzle is getting close to the drain opening when withdrawn. This will help prevent the nozzle from coming out of the drain and whipping around. The distance depends on the configuration of the drain, but should be at least 4' /1.2 m. 6. Remove the nozzle from the end of the jetter hose and place the end of the jetter hose in the drain. Open the inlet supply valve to purge the air and any debris from the jetter and hoses. Allow water to flow for at least 2 minutes. 7. Close the inlet supply valve. 8. Select a nozzle. Use nozzles specifically sized for the jetter being used. Using incorrect nozzles can cause poor performance (low operating pressure or low flow) or may damage the jetter with excessively high 9
-
 1
1 -
2
-
3
-
4
-
5
-
 6
6 -
 7
7 -
 8
8 -
 9
9 -
 10
10 -
 11
11 -
 12
12 -
 13
13 -
 14
14 -
 15
15 -
 16
16 -
17
-
18
-
19
-
20
-
21
-
22
-
23
-
24
-
25
-
26
-
27
-
28
-
29
-
30
-
31
-
32
-
33
-
34
-
35
-
36
-
37
-
38
-
39
-
40
-
41
-
42
-
43
-
44
-
45
-
46
-
47
-
48
-
49
-
50
-
51
-
52
-
53
-
54
-
55
-
56
-
57
-
58
-
59
-
60
 |
 |