Ridgid KJ-3100 Owners Manual - Page 16
Maintenance Instructions
 |
View all Ridgid KJ-3100 manuals
Add to My Manuals
Save this manual to your list of manuals |
Page 16 highlights
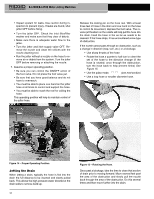
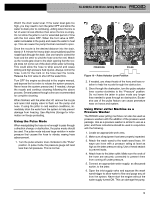
KJ-2200/KJ-3100 Water Jetting Machines 7. Make sure that pulse actuator lever is rotated counterclockwise in the "Pressure" position. 8. Wash Wand Nozzle Adjustments - By rotating the nozzle, the wash pattern can be adjusted from a fine stream to a wide fan type spray. By pulling the nozzle forward (low pressure) and backward (high pressure), the pressure can be adjusted. Make sure that the nozzle is pulled back to the high pressure position to start operation. PrLeosswure PrHeisgshure Pattern Adjustment Figure 17 - Wash Wand Nozzle Adjustments Lock Out 9. Wash Wand Lock Out - the wash wand includes a lock out on the back of the trigger. Flip the lock out down to prevent the operation of the trigger when the wash wand is not in use. 10. With the wand pointed in a safe direction, squeeze the wash wand trigger to reduce pressure and allow the engine to be started. Following the starting instructions supplied in the engine manual, start the engine. Allow the engine to warm up. Release the trigger as soon as the engine starts. 11. With the wand pointed in a safe direction, squeeze the wash wand trigger. Turn the unloader valve while monitoring the pressure gauge to adjust the pressure as desired. Do not exceed the machine pressure rating. Release the wash wand trigger. Pressure Washer Operation 1. When using as a pressure washer use both hands to grip and direct the wash wand for greater control. Never direct the wash wand at people. High pressure fluid can inject under skin resulting in serious injury. Never direct wash wand at electrical equipment or wiring to reduce the risk of electrical shock. 2. Control the flow of water with the trigger. Use care when using the pressure washer. Holding the nozzle too close to a surface can damage it. Test a small, inconspicuous area to confirm the settings work as desired. 3. Do not allow the jetter to run for extended period of time with the trigger OFF. When the trigger is OFF, water recirculates in the pump and it causes the water to heat up. This can cause the pump thermal overload to open. 4. Once pressure washing is complete, release the trigger and turn OFF the engine as directed in the engine manual. Squeeze the trigger to release system pressure. Never leave the system pressurized. Detergent Injector 1. If needed, attach the detergent injector to the outlet port. Remove the output hose and attach the detergent injector with arrow on the unit pointing the same direction as the water flow. Use thread sealant to prevent leaks. Reattach the output hose. 2. Attach the siphon hose to the detergent injector. Place the strainer end of hose into the detergent container. Only use detergents designed for use with pressure washers. Follow all detergent instructions. Do not spray flammable liquids or toxic chemicals. Other detergents, solvents, cleaners, etc. can damage the jetter, or cause serious injury. 3. When pressure washing, detergents are only dispensed when wash wand nozzle is in the low pressure position. Pull the nozzle forward to the low pressure position to dispense detergent. 4. During operation, the detergent application rate can be adjusted by turning the sleeve on the detergent injector. Counter-clockwise increases the amount of detergent, clockwise decreases. 5. When detergent application is complete, remove the strainer from the detergent, place into a bucket of clean water and flush the system of any detergent. Maintenance Instructions WARNING Before performing any maintenance, engine switch should be in OFF position and spark plug wires should be disconnected to prevent inadvertent operation. Press foot valve or wand trigger to release any fluid pressure in system. Always wear safety glasses and gloves when performing any maintenance to help protect against drain chemicals and bacteria. Cleaning The hose should be cleaned as needed with hot, soapy water and/or disinfectants. Do not allow water to enter the engine or electrical system. Do not clean with pressure washer. Wipe the unit down with a damp cloth. 14
-
 1
1 -
2
-
3
-
4
-
5
-
6
-
7
-
8
-
9
-
10
-
 11
11 -
 12
12 -
 13
13 -
 14
14 -
 15
15 -
 16
16 -
 17
17 -
 18
18 -
 19
19 -
 20
20 -
 21
21 -
22
-
23
-
24
-
25
-
26
-
27
-
28
-
29
-
30
-
31
-
32
-
33
-
34
-
35
-
36
-
37
-
38
-
39
-
40
-
41
-
42
-
43
-
44
-
45
-
46
-
47
-
48
-
49
-
50
-
51
-
52
-
53
-
54
-
55
-
56
-
57
-
58
-
59
-
60
 |
 |
