Ryobi RTS23 User Manual 5 - Page 25
Types Of Cuts, Warning, Cutting Tips
 |
View all Ryobi RTS23 manuals
Add to My Manuals
Save this manual to your list of manuals |
Page 25 highlights
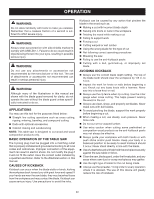
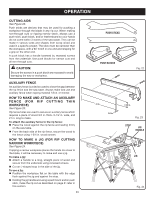
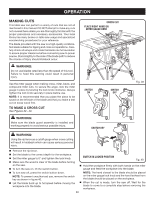
OPERATION TYPES OF CUTS See Figure 27. There are six basic cuts: 1) the cross cut, 2) the rip cut, 3) the miter cut, 4) the bevel cross cut, 5) the bevel rip cut, and 1 6) the compound (bevel) miter cut. All other cuts are combi- nations of these basic six. Operating procedures for making each kind of cut are given later in this section. WARNING: Always make sure the blade guard and anti-kickback 2 pawls are in place and working properly when making these cuts to avoid possible injury. Cross cuts are straight 90° cuts made across the grain of the workpiece. The wood is fed into the cut at a 90° angle to the blade, and the blade is vertical. Rip cuts are made with the grain of the wood. To avoid 3 kickback while making a rip cut, make sure one side of the wood rides firmly against the rip fence. Miter cuts are made with the wood at any angle to the blade other than 90°. The blade is vertical. Miter cuts tend to "creep" during cutting. This can be controlled by holding the workpiece securely against the miter gauge. Bevel cuts are made with an angled blade. Bevel cross cuts 4 are across the wood grain, and bevel rip cuts are with the grain. Compound (or bevel) miter cuts are made with an angled blade on wood that is angled to the blade. Be thoroughly familiar with making cross cuts, rip cuts, bevel cuts, and miter cuts before trying a compound miter cut. CUTTING TIPS 5 Dado and rabbet cuts are non-through cuts which can be either rip cuts or cross cuts. Carefully read and understand all sections of this operator's manual before attempting any operation. WARNING: 6 Do not use blades rated less than the speed of this tool. Failure to heed this warning could result in personal injury. The kerf (the cut made by the blade in the wood) will be wider than the blade to avoid overheating or binding. Make allowance for the kerf when measuring wood. Make sure the kerf is made on the waste side of the measuring line. Cut the wood with the finish side up. Knock out any loose knots with a hammer before making the cut. Always provide proper support for the wood as it comes out of the saw. 25 CROSS CUT RIP CUT MITER CUT BEVEL CROSS CUT BEVEL RIP CUT COMPOUND (BEVEL) MITER CUT Fig. 27
-
 1
1 -
2
-
3
-
4
-
5
-
6
-
7
-
8
-
9
-
10
-
11
-
12
-
13
-
14
-
15
-
16
-
17
-
18
-
19
-
 20
20 -
 21
21 -
 22
22 -
 23
23 -
 24
24 -
 25
25 -
 26
26 -
 27
27 -
 28
28 -
 29
29 -
 30
30 -
31
-
32
-
33
-
34
-
35
-
36
-
37
-
38
-
39
-
40
-
41
-
42
 |
 |
