Samsung CLP 500 User Manual (ENGLISH) - Page 10
Don't use sharp objects, such as a knife or scissors, to, open the transfer belt package. You could
 |
UPC - 635753702002
View all Samsung CLP 500 manuals
Add to My Manuals
Save this manual to your list of manuals |
Page 10 highlights
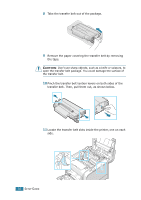
8 Take the transfer belt out of the package. 9 Remove the paper covering the transfer belt by removing the tape. CAUTION: Don't use sharp objects, such as a knife or scissors, to open the transfer belt package. You could damage the surface of the transfer belt. 10 Pinch the transfer belt tention levers on both sides of the transfer belt. Then, pull them out, as shown below. 11 Locate the transfer belt slots inside the printer, one on each side. 10 SETUP GUIDE
-
 1
1 -
2
-
3
-
4
-
 5
5 -
 6
6 -
 7
7 -
 8
8 -
 9
9 -
 10
10 -
 11
11 -
 12
12 -
 13
13 -
 14
14 -
 15
15 -
16
-
17
-
18
-
19
-
20
-
21
-
22
-
23
-
24
-
25
-
26
-
27
-
28
-
29
-
30
-
31
-
32
-
33
-
34
-
35
-
36
-
37
-
38
-
39
-
40
-
41
-
42
-
43
-
44
-
45
-
46
-
47
-
48
-
49
-
50
-
51
-
52
-
53
-
54
-
55
-
56
-
57
-
58
-
59
-
60
-
61
-
62
-
63
-
64
-
65
-
66
-
67
-
68
-
69
-
70
-
71
-
72
-
73
-
74
-
75
-
76
-
77
-
78
-
79
-
80
-
81
-
82
-
83
-
84
-
85
-
86
-
87
-
88
-
89
-
90
-
91
-
92
-
93
-
94
-
95
-
96
-
97
-
98
-
99
-
100
-
101
-
102
-
103
-
104
-
105
-
106
-
107
-
108
-
109
-
110
-
111
-
112
-
113
-
114
-
115
-
116
-
117
-
118
-
119
-
120
-
121
-
122
-
123
-
124
-
125
-
126
-
127
-
128
-
129
-
130
-
131
-
132
-
133
-
134
-
135
-
136
-
137
-
138
-
139
-
140
-
141
-
142
-
143
-
144
-
145
-
146
-
147
-
148
-
149
-
150
-
151
-
152
-
153
-
154
-
155
-
156
-
157
-
158
-
159
-
160
-
161
-
162
-
163
-
164
-
165
-
166
-
167
-
168
-
169
-
170
-
171
-
172
-
173
-
174
-
175
-
176
-
177
-
178
-
179
-
180
-
181
-
182
-
183
-
184
-
185
-
186
-
187
-
188
-
189
-
190
-
191
-
192
-
193
-
194
-
195
-
196
-
197
-
198
-
199
-
200
-
201
-
202
-
203
-
204
-
205
-
206
-
207
-
208
-
209
-
210
-
211
-
212
-
213
-
214
-
215
-
216
-
217
-
218
-
219
-
220
-
221
-
222
-
223
-
224
-
225
-
226
-
227
-
228
-
229
-
230
-
231
-
232
-
233
-
234
-
235
-
236
-
237
-
238
-
239
-
240
-
241
-
242
-
243
-
244
-
245
 |
 |

S
ETUP
G
UIDE
10
8
Take the transfer belt out of the package.
9
Remove the paper covering the transfer belt by removing
the tape.
C
AUTION
:
Don’t use sharp objects, such as a knife or scissors, to
open the transfer belt package. You could damage the surface of
the transfer belt.
10
Pinch the transfer belt tention levers on both sides of the
transfer belt. Then, pull them out, as shown below.
11
Locate the transfer belt slots inside the printer, one on each
side.