Samsung CLP 500 User Manual (ENGLISH) - Page 150
imaging unit. Close the top and left cover should the setup need to, be halted for any reason.
 |
UPC - 635753702002
View all Samsung CLP 500 manuals
Add to My Manuals
Save this manual to your list of manuals |
Page 150 highlights
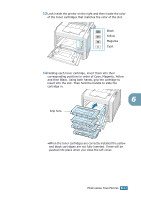
3 Pull the handle lightly first, and then holding the toner cartridges, remove them from the printer. Set them on a clean flat surface. 4 Press the top cover release button to unlatch the top cover and open it all the way. CAUTION: If you open the left cover for a few minutes, the imaging unit can be exposed to light. This causes damage to the imaging unit. Close the top and left cover should the setup need to be halted for any reason. 6.32 MAINTAINING YOUR PRINTER
-
 1
1 -
2
-
3
-
4
-
5
-
6
-
7
-
8
-
9
-
10
-
11
-
12
-
13
-
14
-
15
-
16
-
17
-
18
-
19
-
20
-
21
-
22
-
23
-
24
-
25
-
26
-
27
-
28
-
29
-
30
-
31
-
32
-
33
-
34
-
35
-
36
-
37
-
38
-
39
-
40
-
41
-
42
-
43
-
44
-
45
-
46
-
47
-
48
-
49
-
50
-
51
-
52
-
53
-
54
-
55
-
56
-
57
-
58
-
59
-
60
-
61
-
62
-
63
-
64
-
65
-
66
-
67
-
68
-
69
-
70
-
71
-
72
-
73
-
74
-
75
-
76
-
77
-
78
-
79
-
80
-
81
-
82
-
83
-
84
-
85
-
86
-
87
-
88
-
89
-
90
-
91
-
92
-
93
-
94
-
95
-
96
-
97
-
98
-
99
-
100
-
101
-
102
-
103
-
104
-
105
-
106
-
107
-
108
-
109
-
110
-
111
-
112
-
113
-
114
-
115
-
116
-
117
-
118
-
119
-
120
-
121
-
122
-
123
-
124
-
125
-
126
-
127
-
128
-
129
-
130
-
131
-
132
-
133
-
134
-
135
-
136
-
137
-
138
-
139
-
140
-
141
-
142
-
143
-
144
-
 145
145 -
 146
146 -
 147
147 -
 148
148 -
 149
149 -
 150
150 -
 151
151 -
 152
152 -
 153
153 -
 154
154 -
 155
155 -
156
-
157
-
158
-
159
-
160
-
161
-
162
-
163
-
164
-
165
-
166
-
167
-
168
-
169
-
170
-
171
-
172
-
173
-
174
-
175
-
176
-
177
-
178
-
179
-
180
-
181
-
182
-
183
-
184
-
185
-
186
-
187
-
188
-
189
-
190
-
191
-
192
-
193
-
194
-
195
-
196
-
197
-
198
-
199
-
200
-
201
-
202
-
203
-
204
-
205
-
206
-
207
-
208
-
209
-
210
-
211
-
212
-
213
-
214
-
215
-
216
-
217
-
218
-
219
-
220
-
221
-
222
-
223
-
224
-
225
-
226
-
227
-
228
-
229
-
230
-
231
-
232
-
233
-
234
-
235
-
236
-
237
-
238
-
239
-
240
-
241
-
242
-
243
-
244
-
245
 |
 |

M
AINTAINING
Y
OUR
P
RINTER
6.
32
3
Pull the handle lightly first, and then holding the toner
cartridges, remove them from the printer. Set them on a
clean flat surface.
4
Press the top cover release button to unlatch the top cover
and open it all the way.
C
AUTION
: If you open the left cover for a few minutes, the
imaging unit can be exposed to light. This causes damage to the
imaging unit. Close the top and left cover should the setup need to
be halted for any reason.