Samsung CLP 500 User Manual (ENGLISH) - Page 48
Printer Components, Front View - cartridges
 |
UPC - 635753702002
View all Samsung CLP 500 manuals
Add to My Manuals
Save this manual to your list of manuals |
Page 48 highlights
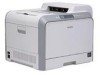
Printer Components Front View Top Cover (Open to install the imaging unit and transfer belt.) Paper Output Tray Output Support Top Cover Release Button Handle (Use it to lift the printer.) Left Cover (To install the toner cartridges press the top cover release button and open fully.) Control Panel (see page 2.2.) Front Cover (Open to replace the waste toner container.) Tray 1 (250-sheet paper feeder) Optional Tray 2 (500-sheet paper feeder) NOTE: If you continuously print many pages, the surface of the output tray may become hot. Ensure that you, and especially children, do not touch the surface. 1.4 INTRODUCTION
-
 1
1 -
2
-
3
-
4
-
5
-
6
-
7
-
8
-
9
-
10
-
11
-
12
-
13
-
14
-
15
-
16
-
17
-
18
-
19
-
20
-
21
-
22
-
23
-
24
-
25
-
26
-
27
-
28
-
29
-
30
-
31
-
32
-
33
-
34
-
35
-
36
-
37
-
38
-
39
-
40
-
41
-
42
-
 43
43 -
 44
44 -
 45
45 -
 46
46 -
 47
47 -
 48
48 -
 49
49 -
 50
50 -
 51
51 -
 52
52 -
 53
53 -
54
-
55
-
56
-
57
-
58
-
59
-
60
-
61
-
62
-
63
-
64
-
65
-
66
-
67
-
68
-
69
-
70
-
71
-
72
-
73
-
74
-
75
-
76
-
77
-
78
-
79
-
80
-
81
-
82
-
83
-
84
-
85
-
86
-
87
-
88
-
89
-
90
-
91
-
92
-
93
-
94
-
95
-
96
-
97
-
98
-
99
-
100
-
101
-
102
-
103
-
104
-
105
-
106
-
107
-
108
-
109
-
110
-
111
-
112
-
113
-
114
-
115
-
116
-
117
-
118
-
119
-
120
-
121
-
122
-
123
-
124
-
125
-
126
-
127
-
128
-
129
-
130
-
131
-
132
-
133
-
134
-
135
-
136
-
137
-
138
-
139
-
140
-
141
-
142
-
143
-
144
-
145
-
146
-
147
-
148
-
149
-
150
-
151
-
152
-
153
-
154
-
155
-
156
-
157
-
158
-
159
-
160
-
161
-
162
-
163
-
164
-
165
-
166
-
167
-
168
-
169
-
170
-
171
-
172
-
173
-
174
-
175
-
176
-
177
-
178
-
179
-
180
-
181
-
182
-
183
-
184
-
185
-
186
-
187
-
188
-
189
-
190
-
191
-
192
-
193
-
194
-
195
-
196
-
197
-
198
-
199
-
200
-
201
-
202
-
203
-
204
-
205
-
206
-
207
-
208
-
209
-
210
-
211
-
212
-
213
-
214
-
215
-
216
-
217
-
218
-
219
-
220
-
221
-
222
-
223
-
224
-
225
-
226
-
227
-
228
-
229
-
230
-
231
-
232
-
233
-
234
-
235
-
236
-
237
-
238
-
239
-
240
-
241
-
242
-
243
-
244
-
245
 |
 |

I
NTRODUCTION
1.
4
Printer Components
Front View
N
OTE
:
If you continuously print many pages, the surface of the
output tray may become hot. Ensure that you, and especially
children, do not touch the surface.
Control Panel
(see page 2.2.)
Paper Output Tray
Top Cover
(Open to install the imaging unit
and transfer belt.)
Front Cover
(Open to replace
the waste toner
container.)
Output Support
Tray 1
(250-sheet paper feeder)
Top Cover
Release Button
Optional Tray 2
(500-sheet paper feeder)
Left Cover
(To install the toner cartridges
press the top cover release
button and open fully.)
Handle
(Use it to lift
the printer.)