Samsung ML-6512ND User Manual Ver.1.03 (English) - Page 98
Necessary precautions to take when installing accessories
 |
View all Samsung ML-6512ND manuals
Add to My Manuals
Save this manual to your list of manuals |
Page 98 highlights
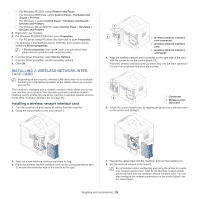
2. Pull the imaging unit out. locks into place completely. 3. Remove the new imaging unit from its bag. • Do not use sharp objects, such as a knife or scissors, to open the toner cartridge package. They might scratch the drum of the cartridge. • To prevent damage to the imaging unit, do not expose it to light for more than a few minutes. Cover it with a piece of paper, if necessary. 4. Thoroughly shake the imaging unit 5 or 6 times to distribute the toner evenly inside the imaging unit. 5. Remove the protection cover and seal. 6. Hold the imaging unit by the handle and slowly insert the cartridge into the opening in the machine. Tabs on the sides of the imaging unit and corresponding grooves within the machine will guide the imaging unit into the correct position until it • Do not touch the green surface of the imaging unit. • To prevent damage to the imaging unit, do not expose it to light for more than a few minutes. Cover it with a piece of paper, if necessary. 7. Reinsert the toner cartridge. 8. Close the top cover. Make sure that the cover is securely closed. NECESSARY PRECAUTIONS TO TAKE WHEN INSTALLING ACCESSORIES • Disconnect the power cord. To avoid the possibility of an electrical shock, always disconnect the power cord when installing or removing ANY internal or external accessories. • Discharge static electricity. The control board and internal accessories (network interface card or memory module) are sensitive to static electricity. Before installing or removing any internal accessories, discharge static electricity from your body by touching something metal, such as the metal back plate on any device plugged into a grounded power source. If you walk around before finishing the installation, repeat this procedure to discharge any static electricity again. • Activating the added accessories in the PS driver properties. After installing an accessory such as an optional tray, PS driver users must do the additional setting. Go to the PS printer properties and set the added accessory activated. When installing accessories, the battery inside the machine is a service component and needs to be replaced by an authorized servicer. Do not change it by yourself. There is a risk of an explosion if battery is replaced by an incorrect type. ACTIVATING THE ADDED ACCESSORIES IN PRINTER PROPERTIES After installing added accessories, you need to select it in the printer properties of the printer driver in order to use it. 1. Install the driver (See "Installing locally connected machine's driver" on page 30 or "Installing network connected machine's driver" on page 36). 2. Click the Windows Start menu. 3. For Windows 2000, select Settings > Printers. Supplies and accessories_ 98
-
 1
1 -
2
-
3
-
4
-
5
-
6
-
7
-
8
-
9
-
10
-
11
-
12
-
13
-
14
-
15
-
16
-
17
-
18
-
19
-
20
-
21
-
22
-
23
-
24
-
25
-
26
-
27
-
28
-
29
-
30
-
31
-
32
-
33
-
34
-
35
-
36
-
37
-
38
-
39
-
40
-
41
-
42
-
43
-
44
-
45
-
46
-
47
-
48
-
49
-
50
-
51
-
52
-
53
-
54
-
55
-
56
-
57
-
58
-
59
-
60
-
61
-
62
-
63
-
64
-
65
-
66
-
67
-
68
-
69
-
70
-
71
-
72
-
73
-
74
-
75
-
76
-
77
-
78
-
79
-
80
-
81
-
82
-
83
-
84
-
85
-
86
-
87
-
88
-
89
-
90
-
91
-
92
-
 93
93 -
 94
94 -
 95
95 -
 96
96 -
 97
97 -
 98
98 -
 99
99 -
 100
100 -
 101
101 -
 102
102 -
 103
103 -
104
-
105
-
106
-
107
-
108
-
109
-
110
-
111
-
112
-
113
-
114
-
115
-
116
-
117
-
118
-
119
-
120
 |
 |
