Samsung MV900F User Manual Ver.1.0 (English) - Page 119
Entering text, 3D Panorama modes.
 |
View all Samsung MV900F manuals
Add to My Manuals
Save this manual to your list of manuals |
Page 119 highlights
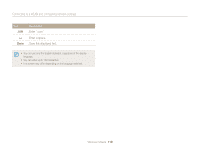
Connecting to a WLAN and configuring network settings • You can also connect to free WLANs in some foreign countries. • A login page may appear when you select free WLANs provided by some network service providers. Enter your ID and password to connect to the WLAN. For information about registering or the service, contact the network service providers. • Be cautious when you enter personal information for an AP connection. Do not enter any payment or credit card information on your camera. The manufacturer is not liable for any problem caused by entering such information. • Available network connections may differ by country. • The WLAN feature of your camera must comply with radio transmission laws in your region. To ensure compliance, use the WLAN feature only in the country where you purchased the camera. • The process for adjusting network settings may differ, depending on network conditions. • Do not access a network that you are not authorized to use. • Before you connect to a network, ensure your battery is fully charged. • When a DHCP server is not available you must make an autoip. txt file and copy it to the inserted memory card to connect to the network using Auto IP. • You cannot upload or send files captured in 3D Photo and 3D Panorama modes. • Files that you transfer to another device may not be supported by the device. In this case, use a computer to playback the files. Entering text Learn how to enter text. The icons in the table below let you move the cursor, change the case, etc. Cancel Done Icon Cancel Description Delete the last letter. Move the cursor. In ABC mode, change the case. Stop entering text and return to the previous page. Switch between Symbol mode and ABC mode. Wireless network 118
-
 1
1 -
2
-
3
-
4
-
5
-
6
-
7
-
8
-
9
-
10
-
11
-
12
-
13
-
14
-
15
-
16
-
17
-
18
-
19
-
20
-
21
-
22
-
23
-
24
-
25
-
26
-
27
-
28
-
29
-
30
-
31
-
32
-
33
-
34
-
35
-
36
-
37
-
38
-
39
-
40
-
41
-
42
-
43
-
44
-
45
-
46
-
47
-
48
-
49
-
50
-
51
-
52
-
53
-
54
-
55
-
56
-
57
-
58
-
59
-
60
-
61
-
62
-
63
-
64
-
65
-
66
-
67
-
68
-
69
-
70
-
71
-
72
-
73
-
74
-
75
-
76
-
77
-
78
-
79
-
80
-
81
-
82
-
83
-
84
-
85
-
86
-
87
-
88
-
89
-
90
-
91
-
92
-
93
-
94
-
95
-
96
-
97
-
98
-
99
-
100
-
101
-
102
-
103
-
104
-
105
-
106
-
107
-
108
-
109
-
110
-
111
-
112
-
113
-
 114
114 -
 115
115 -
 116
116 -
 117
117 -
 118
118 -
 119
119 -
 120
120 -
 121
121 -
 122
122 -
 123
123 -
 124
124 -
125
-
126
-
127
-
128
-
129
-
130
-
131
-
132
-
133
-
134
-
135
-
136
-
137
-
138
-
139
-
140
-
141
-
142
-
143
-
144
-
145
-
146
-
147
-
148
-
149
-
150
-
151
-
152
-
153
-
154
-
155
-
156
-
157
-
158
-
159
-
160
-
161
-
162
-
163
-
164
-
165
-
166
-
167
-
168
-
169
-
170
-
171
-
172
-
173
 |
 |