Samsung MultiXpress SL-K2200 User Guide - Page 50
IPv6 configuration
 |
View all Samsung MultiXpress SL-K2200 manuals
Add to My Manuals
Save this manual to your list of manuals |
Page 50 highlights
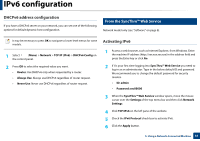
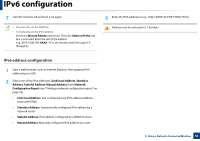
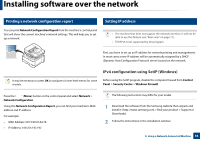
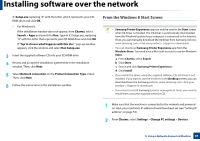
IPv6 configuration IPv6 is supported properly only in Windows Vista or higher. Some features and optional goods may not be available depending on model or country (see "Features by model" on page 7 or "Accessing the menus" on page 21). 4 From the control panel Network model only (see "Software" on page 8). Activating IPv6 The machine supports the following IPv6 addresses for network printing and managements. • Link-local Address: Self-configured local IPv6 address (Address starts with FE80). • Stateless Address: Automatically configured IPv6 address by a network router. • Stateful Address: IPv6 address configured by a DHCPv6 server. • Manual Address: Manually configured IPv6 address by a user. In the IPv6 network environment, follow the next procedure to use the IPv6 address. It may be necessary to press OK to navigate to lower-level menus for some models. 1 Select (Menu) > Network > TCP/IP (IPv6) > IPv6 Protocol on the control panel. 2 Select On and press OK. 3 Turn the machine off and turn it on again. When you install the printer driver, do not configure both IPv4 and IPv6. We recommend to configure either IPv4 or IPv6. 5. Using a Network-Connected Machine 50
-
 1
1 -
2
-
3
-
4
-
5
-
6
-
7
-
8
-
9
-
10
-
11
-
12
-
13
-
14
-
15
-
16
-
17
-
18
-
19
-
20
-
21
-
22
-
23
-
24
-
25
-
26
-
27
-
28
-
29
-
30
-
31
-
32
-
33
-
34
-
35
-
36
-
37
-
38
-
39
-
40
-
41
-
42
-
43
-
44
-
 45
45 -
 46
46 -
 47
47 -
 48
48 -
 49
49 -
 50
50 -
 51
51 -
 52
52 -
 53
53 -
 54
54 -
 55
55 -
56
-
57
-
58
-
59
-
60
-
61
-
62
-
63
-
64
-
65
-
66
-
67
-
68
-
69
-
70
-
71
-
72
-
73
-
74
-
75
-
76
-
77
-
78
-
79
-
80
-
81
-
82
-
83
-
84
-
85
-
86
-
87
-
88
-
89
-
90
-
91
-
92
-
93
-
94
-
95
-
96
-
97
-
98
-
99
-
100
-
101
-
102
-
103
-
104
-
105
-
106
-
107
-
108
-
109
-
110
-
111
-
112
-
113
-
114
-
115
-
116
-
117
-
118
-
119
-
120
-
121
-
122
-
123
-
124
-
125
-
126
-
127
-
128
-
129
-
130
-
131
-
132
-
133
-
134
-
135
-
136
-
137
-
138
-
139
-
140
-
141
-
142
-
143
-
144
-
145
-
146
-
147
-
148
-
149
-
150
-
151
-
152
-
153
-
154
-
155
-
156
-
157
-
158
-
159
-
160
-
161
-
162
-
163
-
164
-
165
-
166
-
167
-
168
-
169
-
170
-
171
-
172
-
173
-
174
-
175
-
176
-
177
-
178
-
179
-
180
-
181
-
182
-
183
-
184
-
185
-
186
-
187
-
188
-
189
-
190
-
191
-
192
-
193
-
194
-
195
-
196
-
197
-
198
-
199
-
200
-
201
-
202
-
203
-
204
-
205
-
206
 |
 |