Samsung SC-D372 User Manual (ENGLISH) - Page 16
Using the Lithium Ion Battery Pack, Utilización de la batería de iones de litio
 |
UPC - 036725301689
View all Samsung SC-D372 manuals
Add to My Manuals
Save this manual to your list of manuals |
Page 16 highlights
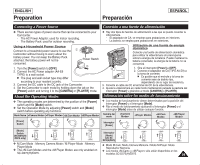
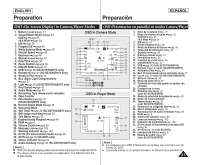
ENGLISH Preparation Preparación ESPAÑOL Using the Lithium Ion Battery Pack Utilización de la batería de iones de litio ✤ Use SB-LSM80 or SB-LSM160 Battery Pack only. ✤ Utilice únicamente la batería B-LSM80 o SB-LSM160. ✤ The Battery Pack may be charged a little at the time of purchase. ✤ Es posible que la batería esté cargada sólo parcialmente al adquirir Charging the Lithium Ion Battery Pack la videocámara. 1. Turn the [Power] switch to [OFF]. 2. Attach the Battery Pack to the Camcorder. 3. Connect the AC Power Blinking time Once per second Twice per second Three times per second Blinking stops and stays on Charging rate Less than 50% 50% ~ 75% 75% ~ 90% 90% ~ 100% adapter (AA-E9 TYPE) to On for a second and off for Error - Reset the Battery a wall socket. a second Pack and the DC Cable 4. Connect the DC cable to Carga de la batería Frecuencia de parpadeo Velocidad de carga de iones de litio Una vez por segundo Menos del 50% 1. Gire el interruptor Dos veces por segundo 50% ~ 75% [Power] a [OFF]. 2. Conecte la batería a la videocámara. 3. Conecte el adaptador Tres veces por segundo 75% ~ 90% Deja de parpadear y queda encendido 90% ~ 100% Encendido durante un segundo Error - Reinicialice la y apagado durante un segundo batería y el cable de CC de CA (TIPO AA-E9) a la toma de corriente. the DC jack on the Camcorder. 4. Conecte el cable de CC al terminal de CC de la videocámara. I The charging indicator will start to blink, showing that the Battery is I El indicador de carga comenzará a parpadear, lo cual indica que charging. se está cargando la batería. 5. Press and hold the DISPLAY button while charging 5. Presione la tecla DISPLAY mientras se produce la and the charging status will be displayed on the LCD Battery Info carga y el estado de carga aparecerá en la pantalla screen for 7 seconds. I The battery charge status is given as reference and Battery charged LCD durante 7 segundos. I El nivel de la batería indicado que se facilita al usuario is an estimation. It may differ depending on the 0% 50% 100% son datos de referencia aproximados. Puede que Battery capacity and temperature. difiera de la capacidad y temperatura de la batería. 6. When the Battery is fully charged, disconnect the 6. Cuando la batería esté totalmente cargada, Battery Pack and the AC Power Adapter from the desconecte la batería y el adaptador de CA de la Camcorder. videocámara. Incluso con la videocámara apagada, Even with the Power switched Off, the Battery Pack will still discharge. la batería se descargará. Charging, Recording Times based on Model and Battery Type. ✤ The continuous recording times given Time Charging time in the table to the right Battery Recording time are approximations. Actual recording time depends on usage. ✤ The continuous recording times in the SB-LSM80 SB-LSM160 (Option) Approx. 1hr 20min Approx. 3hr Approx. 1hr 20min Approx. 2hr 40min operating instructions are measured using a fully charged Battery Pack at 77 °F (25 °C). ✤ Even when the Power switched Off, the Battery Pack will still discharge if it is left attached to the device. Tiempos de carga/grabación basándose en el Tiempo Tiempo de carga Batería Tiempo de grabación modelo y el tipo de batería SB-LSM80 Aprox. 1 h. 20 min. Aprox. 1 h. 20 min. ✤ Los tiempos de grabación continua que se facilitan en la SB-LSM160 (Opcional) Aprox. 3 h. Aprox. 2 h. 40 min. tabla son aproximados. El tiempo real de grabación depende del uso de la videocámara. ✤ Los tiempos de grabación continua en las instrucciones de funcionamiento se miden utilizando una batería totalmente cargada a 25 °C (77 °F). ✤ Incluso con la unidad apagada, la batería se descargará si se deja conectada al dispositivo. 16
-
 1
1 -
2
-
3
-
4
-
5
-
6
-
7
-
8
-
9
-
10
-
 11
11 -
 12
12 -
 13
13 -
 14
14 -
 15
15 -
 16
16 -
 17
17 -
 18
18 -
 19
19 -
 20
20 -
 21
21 -
22
-
23
-
24
-
25
-
26
-
27
-
28
-
29
-
30
-
31
-
32
-
33
-
34
-
35
-
36
-
37
-
38
-
39
-
40
-
41
-
42
-
43
-
44
-
45
-
46
-
47
-
48
-
49
-
50
-
51
-
52
-
53
-
54
-
55
-
56
-
57
-
58
-
59
-
60
-
61
-
62
-
63
-
64
-
65
-
66
-
67
-
68
-
69
-
70
-
71
-
72
-
73
-
74
-
75
-
76
-
77
-
78
-
79
-
80
-
81
-
82
-
83
-
84
-
85
-
86
-
87
-
88
-
89
-
90
-
91
-
92
-
93
-
94
-
95
-
96
-
97
-
98
-
99
-
100
-
101
-
102
-
103
-
104
-
105
-
106
-
107
-
108
-
109
-
110
 |
 |
